If you’re building Slack notifications, you can keep it simple: a bit of text, maybe an emoji and some bolding to draw attention to what’s essential.
But you can also go much further with Slack notifications. Slack allows you to use various text options, images, design, and interactivity in your messaging. To put these together, you can use Slack’s Block Kit.
Block Kit is Slack's UI framework for composing the app's messages, modals, and pages. Using it, you can create rich notifications for your users.
Video walkthrough
If you prefer to learn with video, watch it here.
Block Kit is just JSON
This is the most straightforward idea to grasp when working with Slack’s Block Kit. You are just putting JSON objects together, no matter what type of interface you are building. JSON is a string format that closely resembles JavaScript object format, and is made up of key-value pairs:
{
  "key": "value",
  "name": "Jeff Everhart"
}
But these key-value pairs don’t have to be just strings. They can be strings, numbers, arrays, booleans, or even other objects. This means you can create complex hierarchies, like we’ll see in the following Slack interfaces.
Let’s start with a simple example:
{
  "blocks": [
    {
      "type": "section",
      "text": {
        "type": "plain_text",
        "text": "This is a plain text section block."
      }
    }
  ]
}
In this example, you have the root object, which is contained by the outer curly braces { … }. Inside this object, there's a key named blocks. The value associated with this key is an array, indicated by the square brackets [ ... ].
Our array here contains just one object, but, as we’ll see, we can put many objects inside this array to build our message UI. Inside this object, there are two key-value pairs:
- type: This key has a value of "section." This indicates the type or role of this object within the broader structure.
- text: The value associated with this key is another object. This nested object contains two key-value pairs:
- type: This has a value of "plain_text". Again, this is the role of the object
- text: This has the value of "This is a plain text.”, the actual content that will be displayed to the user.
To add another section, we can add more JSON objects to the blocks array. That’s what we’ll do next to build out our message.
Creating and sending a notification with Block Kit
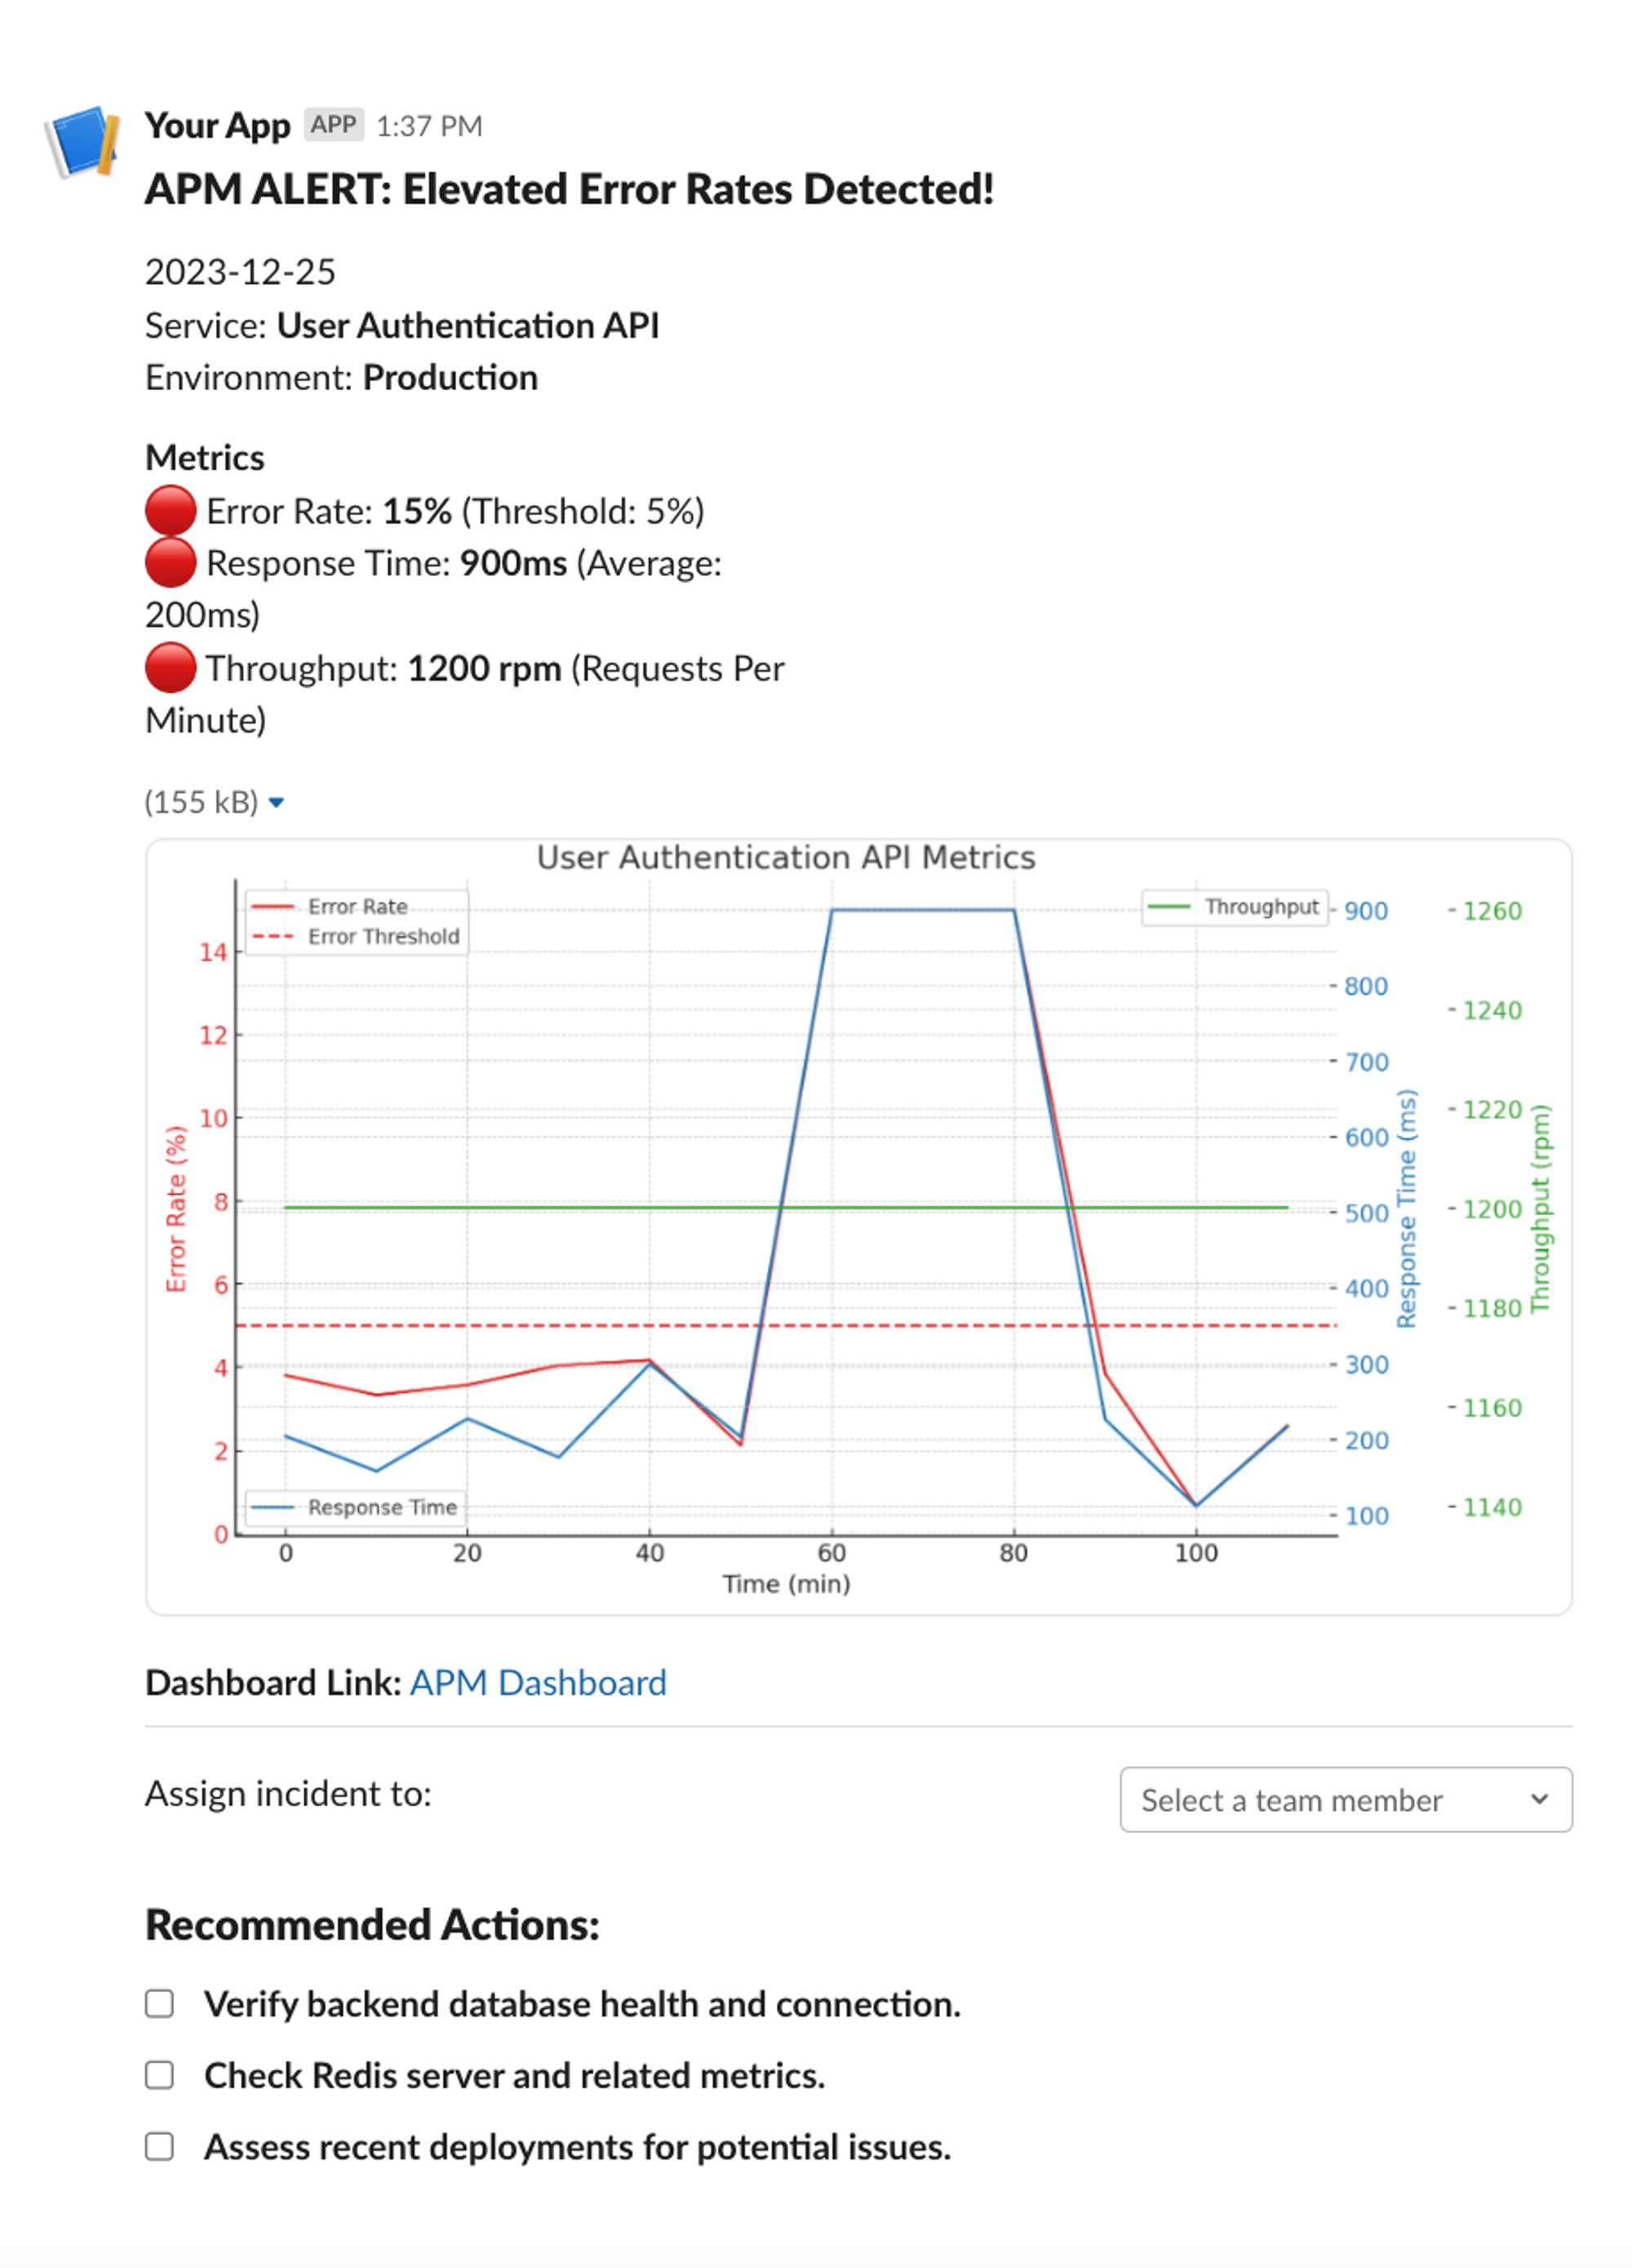
Now, let’s put together something more useful using Block Kit. We’ll build a notification for an application performance monitoring tool, telling the user in Slack what is happening in their application. Typically, these monitoring tools will send notifications when certain conditions are met, like error rates above a certain threshold, or when actions are taken, like a new deployment.
Here’s what this message will look like in Slack:
Slack has an excellent tool to help build Block Kit, unsurprisingly called Block Kit Builder. This interface allows you to visually build out the JSON of your Slack message and get previews in real-time as you make changes.
Using the ‘add block’ actions on the left-hand side of the UI, you can add blocks to your payload with just a few clicks. The code pane will also highlight syntax errors as you go. Since JSON has a very specific structure, this can be pretty helpful if you’re just learning this syntax or need to debug something.
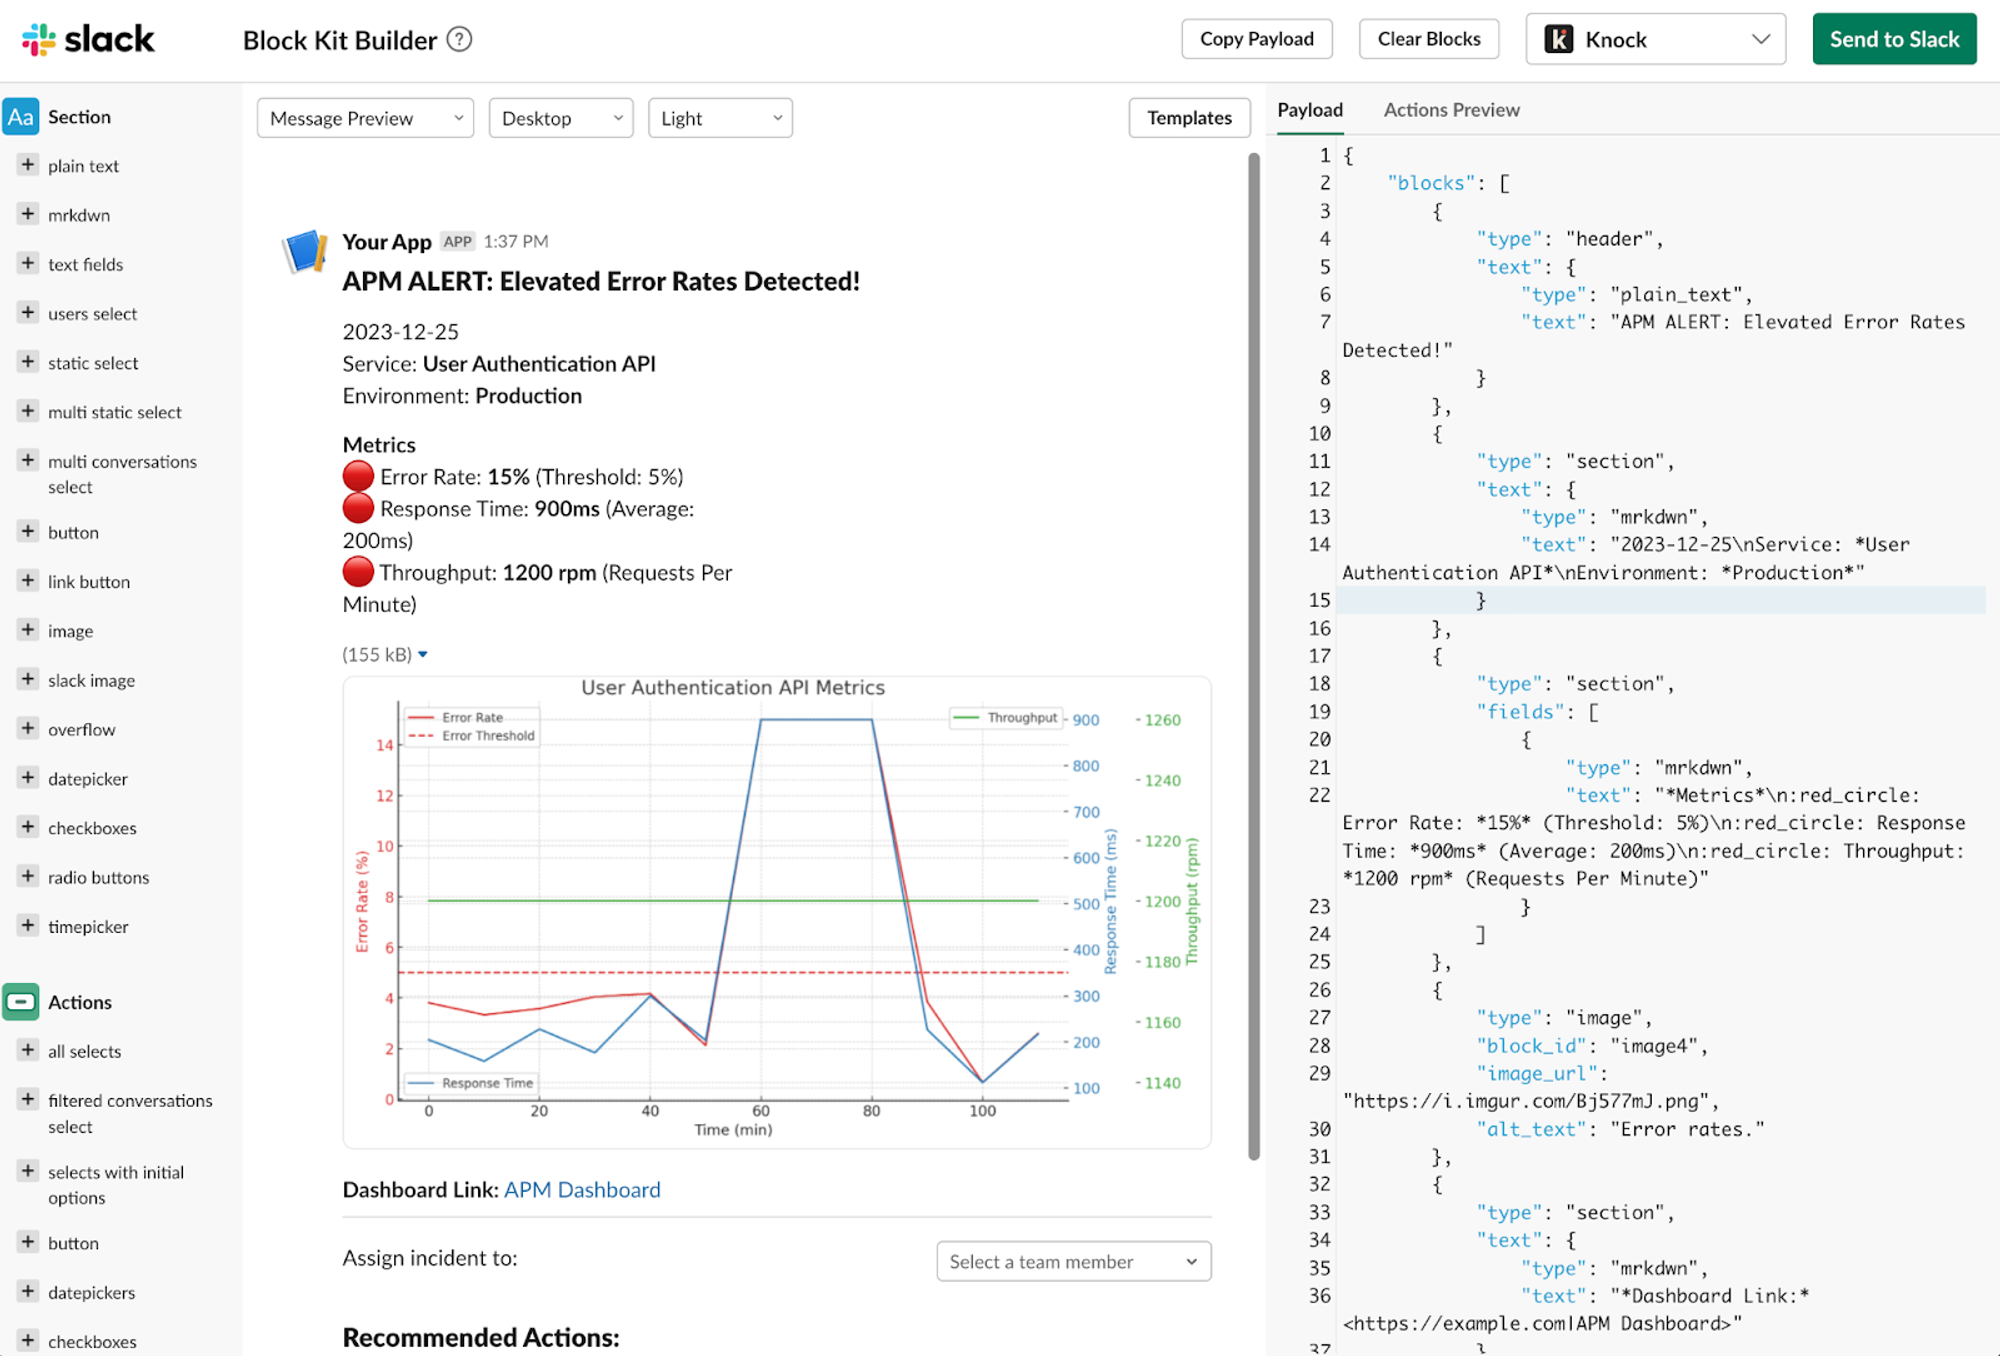
Here’s what the payload for this notification looks like:
{
  "blocks": [
    {
      "type": "header",
      "text": {
        "type": "plain_text",
        "text": "APM ALERT: Elevated Error Rates Detected!"
      }
    },
    {
      "type": "section",
      "text": {
        "type": "mrkdwn",
        "text": "2023-12-25\nService: *User Authentication API*\nEnvironment: *Production*"
      }
    },
    {
      "type": "section",
      "fields": [
        {
          "type": "mrkdwn",
          "text": "*Metrics*\n:red_circle: Error Rate: *15%* (Threshold: 5%)\n:red_circle: Response Time: *900ms* (Average: 200ms)\n:red_circle: Throughput: *1200 rpm* (Requests Per Minute)"
        }
      ]
    },
    {
      "type": "image",
      "block_id": "image4",
      "image_url": "https://i.imgur.com/Bj577mJ.png",
      "alt_text": "Error rates."
    },
    {
      "type": "section",
      "text": {
        "type": "mrkdwn",
        "text": "*Dashboard Link:* <https://example.com|APM Dashboard>"
      }
    },
    {
      "type": "divider"
    },
    {
      "type": "section",
      "text": {
        "type": "mrkdwn",
        "text": "Assign incident to:"
      },
      "accessory": {
        "type": "users_select",
        "placeholder": {
          "type": "plain_text",
          "text": "Select a team member",
          "emoji": true
        },
        "action_id": "users_select-action"
      }
    },
    {
      "type": "header",
      "text": {
        "type": "plain_text",
        "text": "Recommended Actions:",
        "emoji": true
      }
    },
    {
      "type": "actions",
      "elements": [
        {
          "type": "checkboxes",
          "options": [
            {
              "text": {
                "type": "mrkdwn",
                "text": "*Verify backend database health and connection.*"
              },
              "value": "value-0"
            },
            {
              "text": {
                "type": "mrkdwn",
                "text": "*Check Redis server and related metrics.*"
              },
              "value": "value-1"
            },
            {
              "text": {
                "type": "mrkdwn",
                "text": "*Assess recent deployments for potential issues.*"
              },
              "value": "value-2"
            }
          ],
          "action_id": "actionId-1"
        }
      ]
    }
  ]
}
Let’s break this down into its constituent parts to see what you can add to your messages using Block Kit.
Adding text
There are two ways to add text with Block Kit. First, we can use plain_text.
{
  "type": "header",
  "text": {
    "type": "plain_text",
    "text": "APM ALERT: Elevated Error Rates Detected!",
    "emoji": true
  }
}
This is easy for building out simple notifications and one-line messages. By setting emoji to true, you can optionally add emojis to this text. This is also a Header block, which makes the font larger and bolds the text.
But a better way to include text in a message is to use Slack’s mrkdwn to format your messages.
{
  "type": "section",
  "text": {
    "type": "mrkdwn",
    "text": "2023-12-25\nService: *User Authentication API*\nEnvironment: *Production*"
  }
},
{
  "type": "section",
  "fields": [
    {
      "type": "mrkdwn",
      "text": "*Metrics*\n:red_circle: Error Rate: *15%* (Threshold: 5%)\n:red_circle: Response Time: *900ms* (Average: 200ms)\n:red_circle: Throughput: *1200 rpm* (Requests Per Minute)"
    }
  ]
}
Here, we can use formatting such as bolding to highlight specific text. We can also use emojis to draw the user's attention to particular items in the notification.
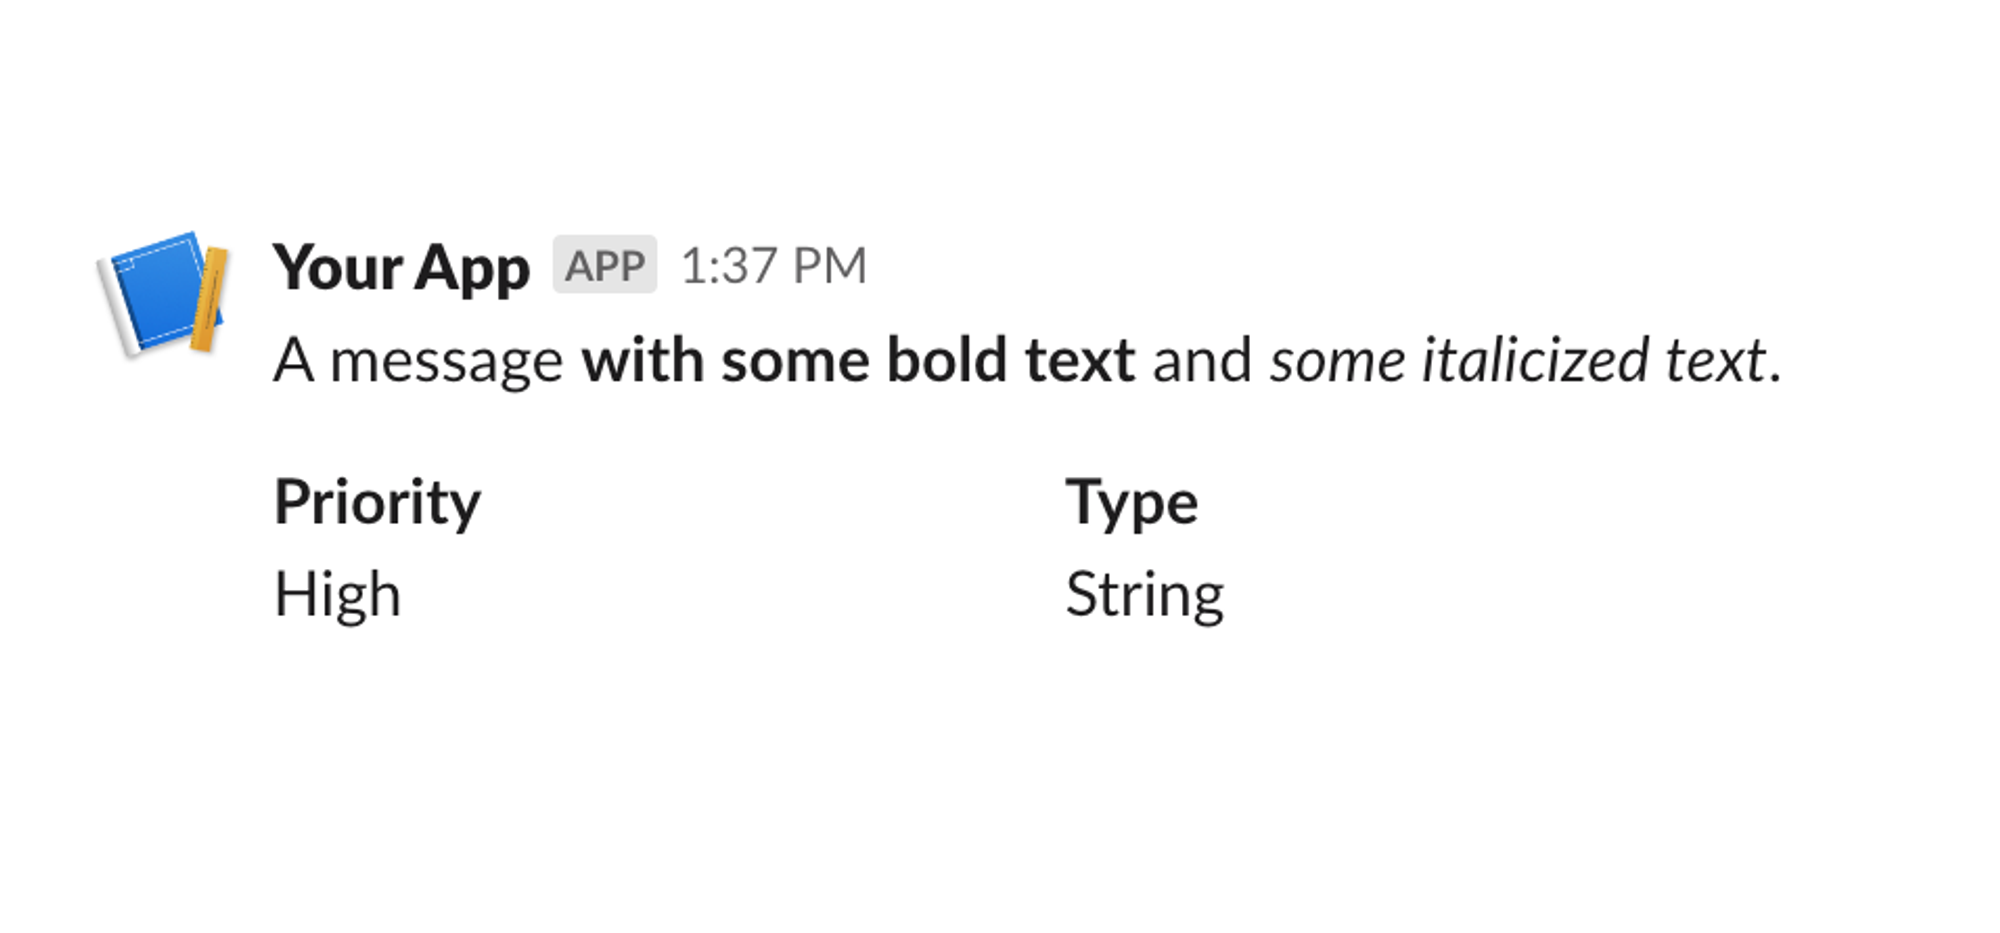
The snippet above also shows how you can add some structure to your payloads using the Section block. By adding fields, we can group text or images into compact side-by-side columns if we include more than one text object:
Adding Images & Videos
Next, we have an image of the incident from the dashboard. You can add images to your Slack message by defining the block as an image type and then passing a publicly available image URL using the image_url key.
{
  "type": "image",
  "block_id": "image4",
  "image_url": "https://i.imgur.com/Bj577mJ.png",
  "alt_text": "Error rates."
}
The Image block also requires a value be passed for alt_text, and you can optionally provide a title. Depending on the use case for your Slack integration, the Image block can also use internal Slack files using the slack_file option.
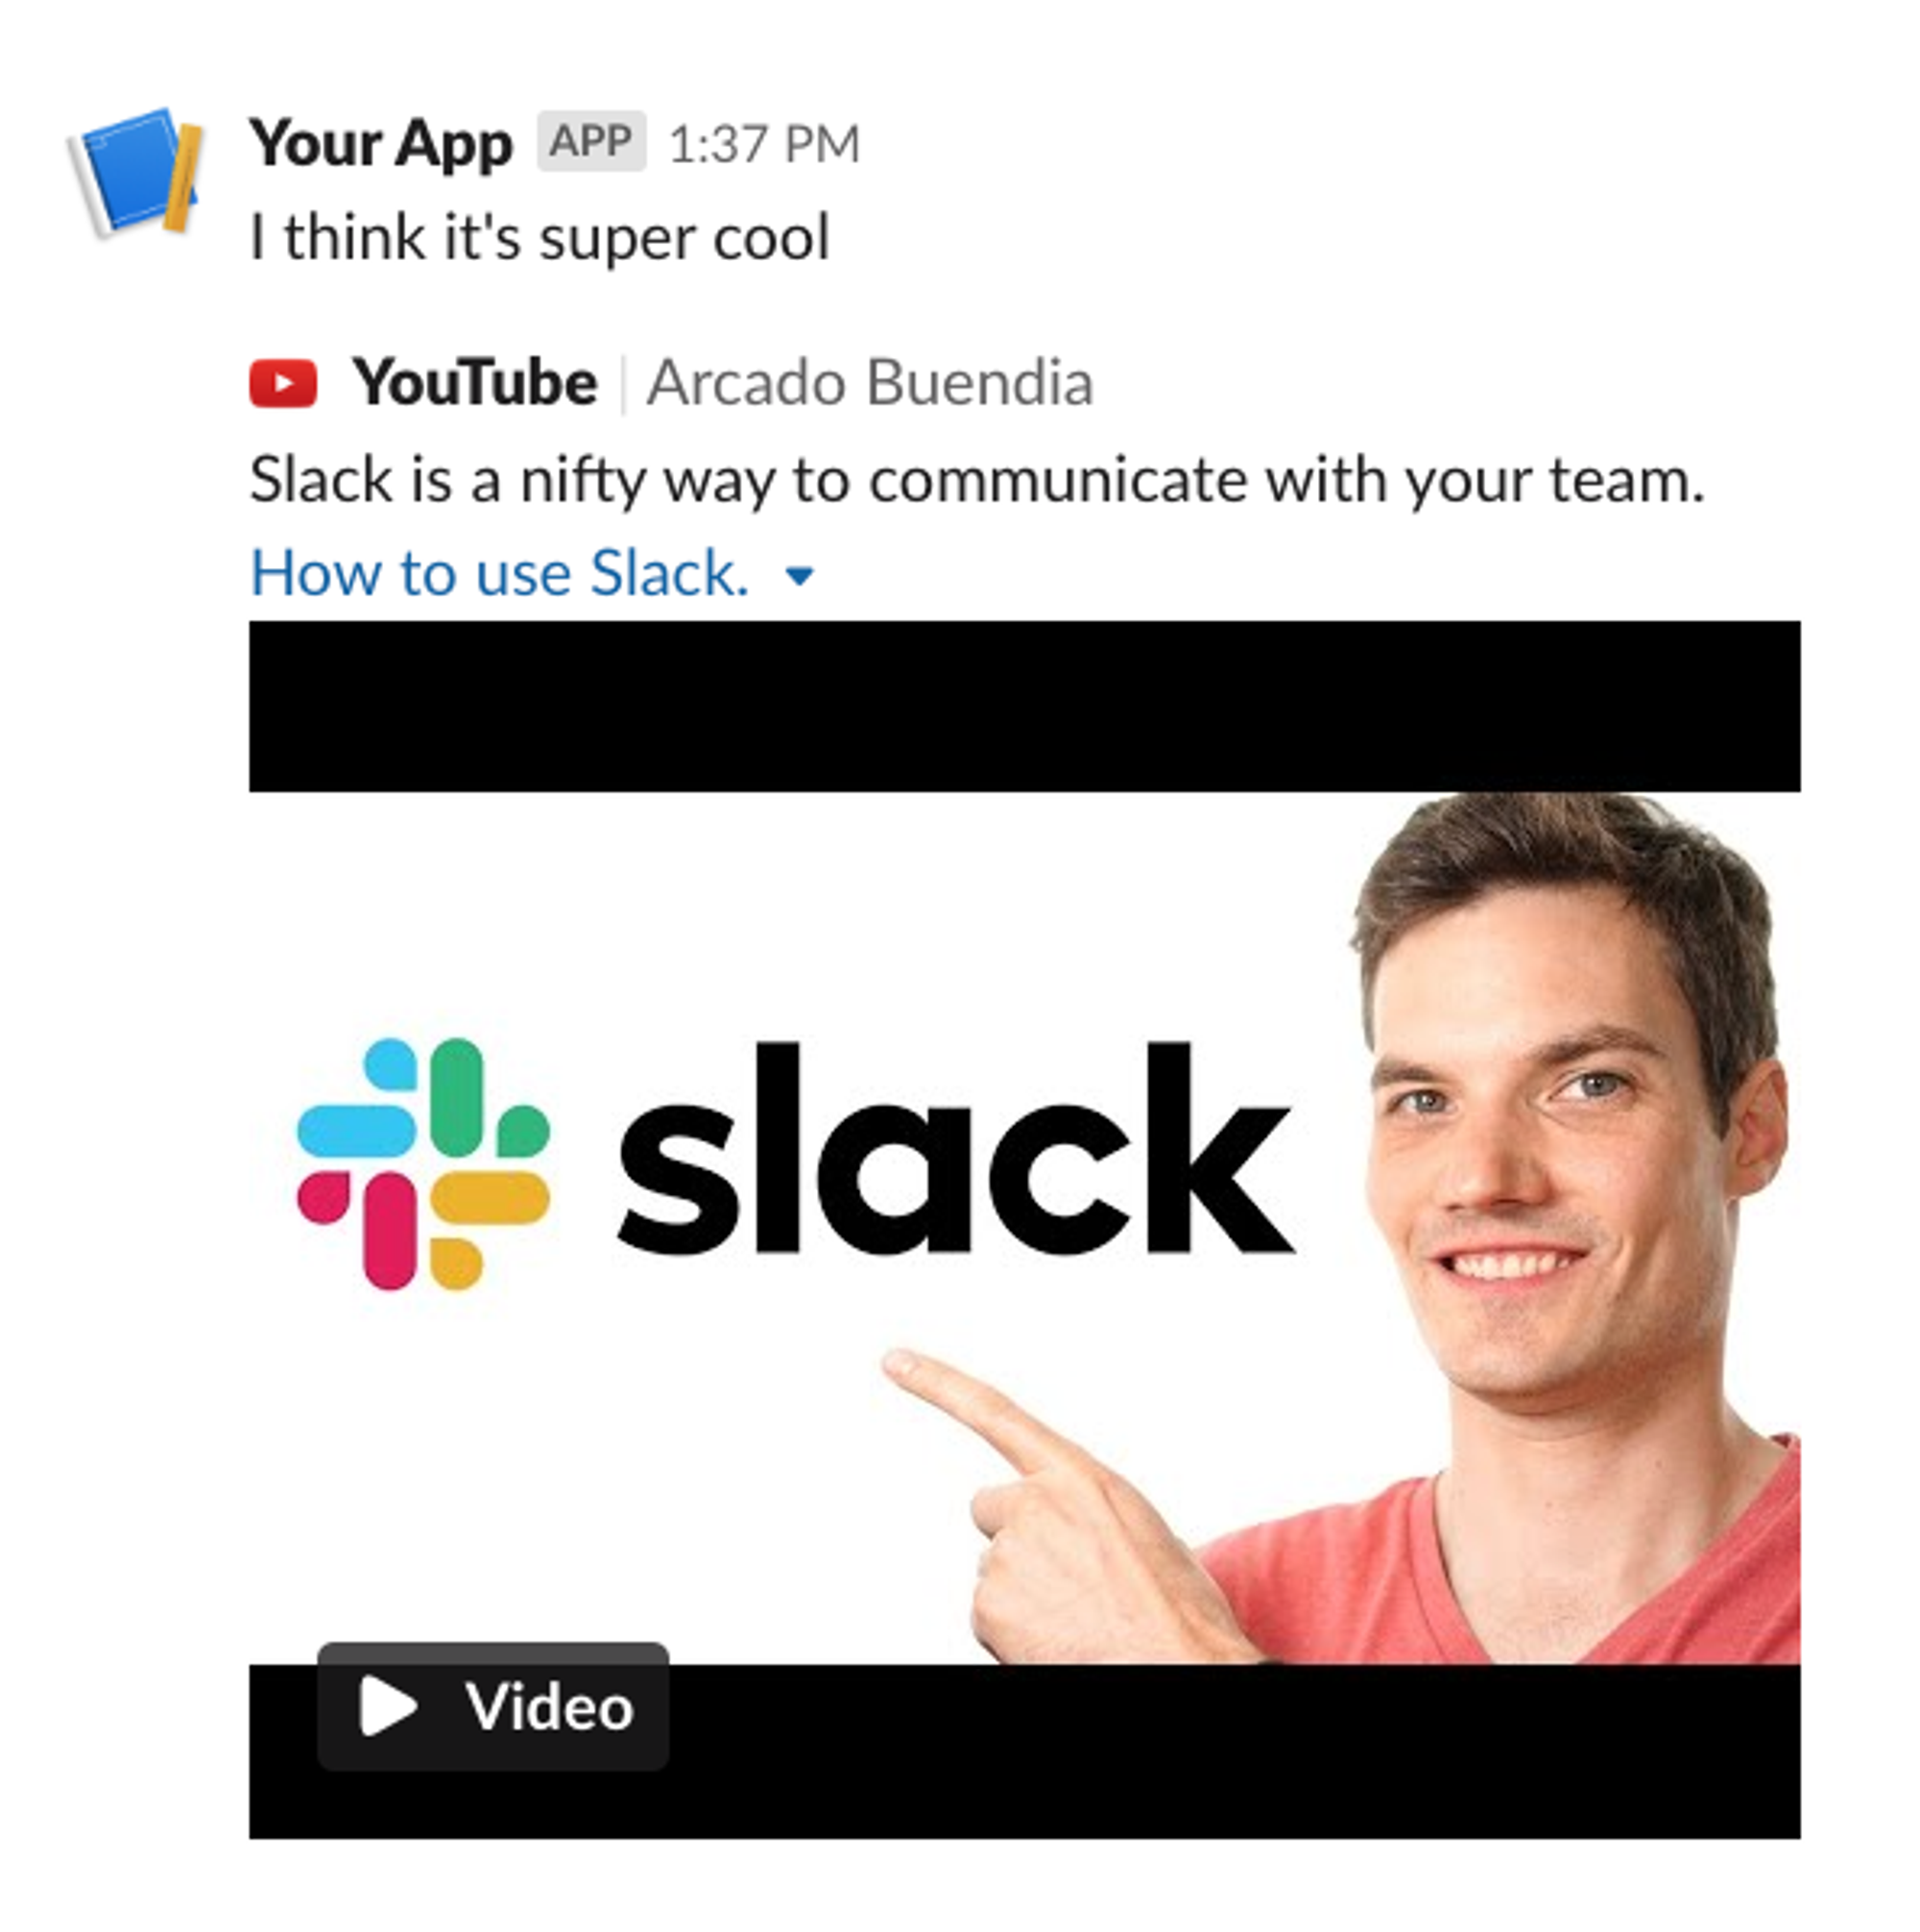
The Video block is similar to images, with a different block type and a few additional pieces of information.
{
  "blocks": [
    {
      "type": "video",
      "title": {
        "type": "plain_text",
        "text": "How to use Slack.",
        "emoji": true
      },
      "title_url": "https://www.youtube.com/watch?v=RRxQQxiM7AA",
      "description": {
        "type": "plain_text",
        "text": "Slack is a nifty way to communicate with your team.",
        "emoji": true
      },
      "video_url": "https://www.youtube.com/embed/RRxQQxiM7AA?feature=oembed&autoplay=1",
      "alt_text": "How to use Slack?",
      "thumbnail_url": "https://i.ytimg.com/vi/RRxQQxiM7AA/hqdefault.jpg",
      "author_name": "Arcado Buendia",
      "provider_name": "YouTube",
      "provider_icon_url": "https://a.slack-edge.com/80588/img/unfurl_icons/youtube.png"
    }
  ]
}
According to the Slack docs, the Video block requires the following fields: type, alt_text, title, thumbnail_url, and video_url. Since the Video block is meant to embed and unfurl video links in any Slack context, the links.embed:write scope is required for your integration.
The example above would render like this inside of Slack.
Adding interactivity to notifications
Static notifications are good, but one of the biggest benefits of Slack over email as a notification channel is the level of interactivity you can add. Adding interactivity to your Slack notifications allows integrations to enhance user workflows and perform actions in other systems directly from their existing workspace.
Links can be interactive
In this example, we'll introduce a small element of interactivity first using a basic link. We can link the user to the APM dashboard so they can find out more information about the incident.
{
  "type": "section",
  "text": {
    "type": "mrkdwn",
    "text": "*Dashboard Link:* <https://example.com|APM Dashboard>"
  }
}
An important thing to note is that Slack mrkdwn links are subtly different from regular markdown links, using angle brackets, < … > instead of square brackets [ … ]. Even though links are the lowest level of interactivity we can provide for users in this context, a direct link to a resource in another system can help streamline workflows for the user.
Taking the application monitoring example one step further, this link could take the user directly to the offending server or even include a query string to filter to a more particular view:
{
  "type": "section",
  "text": {
    "type": "mrkdwn",
    "text": "*Dashboard Link:* <https://example.com/dashboard?server=ec2-small&errorType=warn,error|APM Dashboard>"
  }
}
Using action blocks
However, sometimes we’ll want to let users perform actions directly from a notification, so let’s move on to a more complex form of interactivity. In the following example, we have two ways for a user to interact with the notifications here:
- A multi-select to assign the incident to a user
- A list of checkboxes for an incident response checklist
Here are the blocks for these.
{
  "type": "section",
  "text": {
    "type": "mrkdwn",
    "text": "Assign incident to:"
  },
  "accessory": {
    "type": "users_select",
    "placeholder": {
      "type": "plain_text",
      "text": "Select a team member",
      "emoji": true
    },
    "action_id": "users_select-action"
  }
},
{
  "type": "header",
  "text": {
    "type": "plain_text",
    "text": "Recommended Actions:",
    "emoji": true
  }
},
{
  "type": "actions",
  "elements": [
    {
      "type": "checkboxes",
      "options": [
        {
          "text": {
            "type": "mrkdwn",
            "text": "*Verify backend database health and connection.*"
          },
          "value": "value-0"
        },
        {
          "text": {
            "type": "mrkdwn",
            "text": "*Check Redis server and related metrics.*"
          },
          "value": "value-1"
        },
        {
          "text": {
            "type": "mrkdwn",
            "text": "*Assess recent deployments for potential issues.*"
          },
          "value": "value-2"
        }
      ],
      "action_id": "actionId-1"
    }
  ]
}
The crucial parts of these blocks aren’t how you put them together but what you can do with them. In Slack Block Kit, these are ‘Action’ blocks, meaning you can do something with the output when a user selects them. Here, we’re just using multi-select and checkboxes, but you can have radio buttons, inputs, date and time pickers, and buttons.
You need a backend for your Slack app to use the output of these interactions. Then, you need to add a Request URL to your Slack dashboard so it knows where to send the “action.”
If you have a fully developed app, this will be a POST endpoint where you’ll manage the interactivity. For our case, we’ll spin up a ngrok URL for a local development application and add that to Slack.
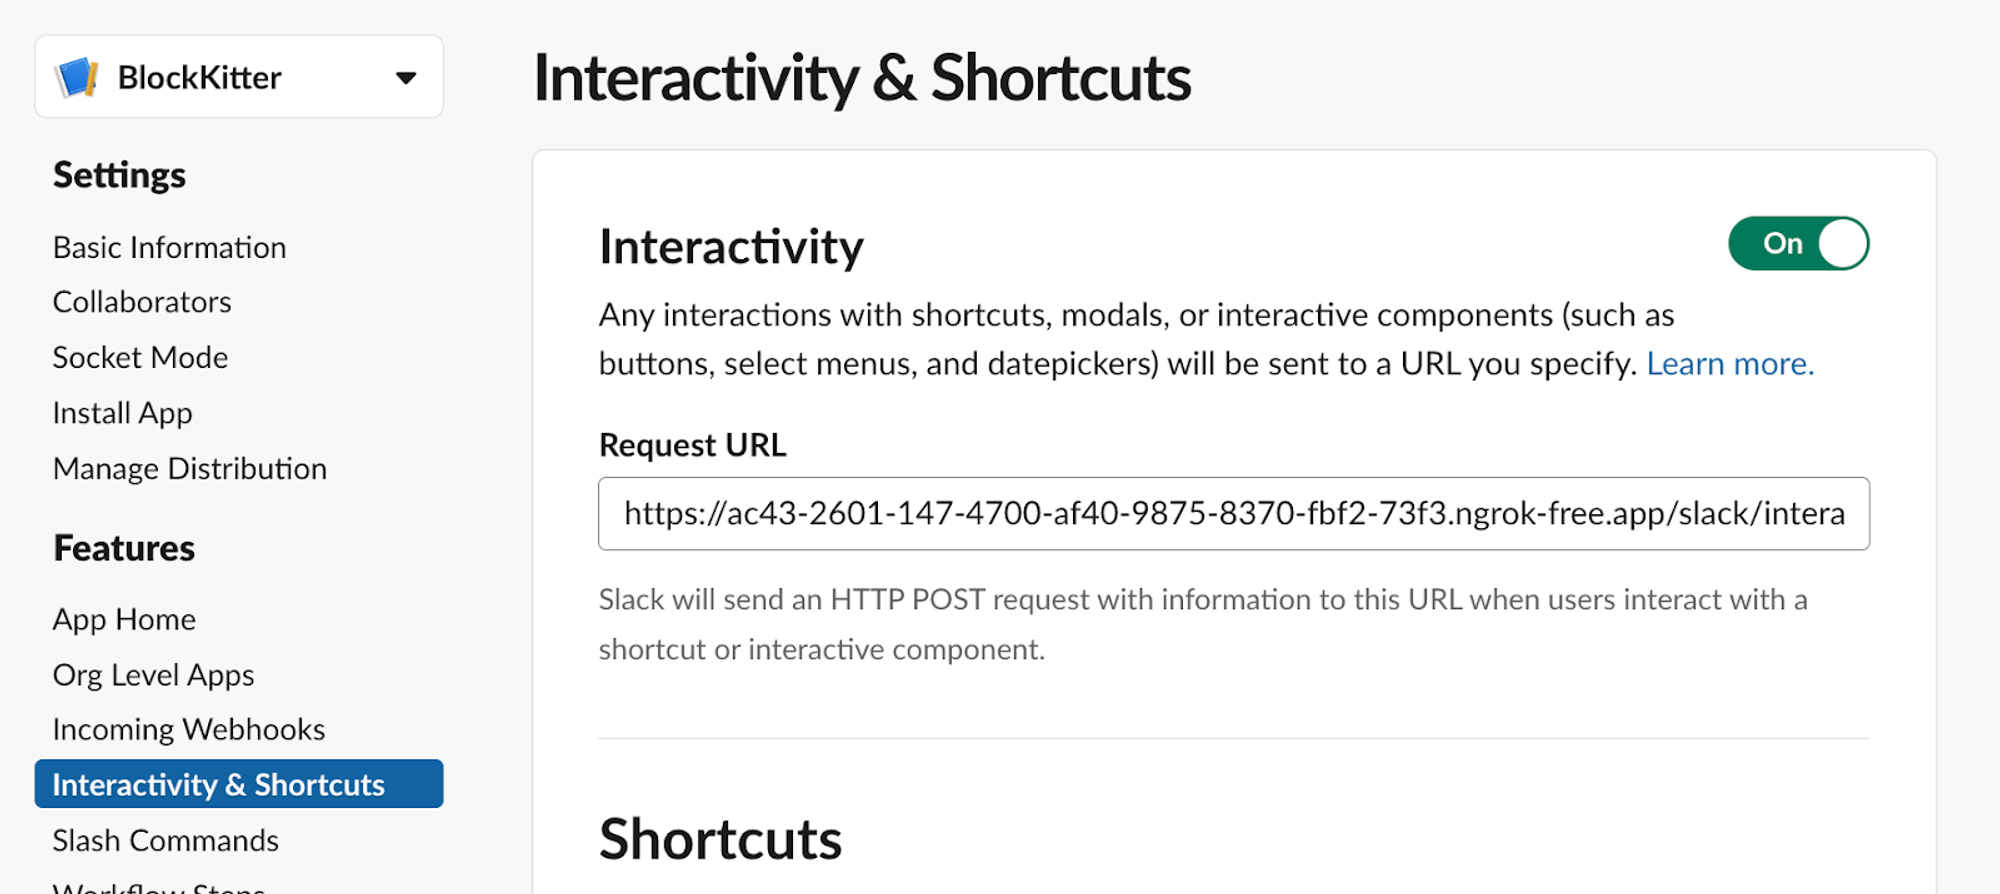
In this example, we have a single Next.js API route handler that will accept the interaction payload generated by Slack. We will send our actions to the “/slack/interactive-endpoint” created by a /app/slack/interactive-endpoint/route.js file. Here’s all the code the create the endpoint and handle the interactive requests in the block JSON above:
export async function POST(request) {
  const formData = await request.formData();
  const payload = JSON.parse(formData.get("payload"));
  const channel = payload.channel.id;
  const actions = payload.actions[0];
  let res = null;
  if (actions.type === "users_select") {
    const selectedUserId = actions["selected_user"];
    res = await postMessage(
      channel,
      "You have been assigned an incident.",
      selectedUserId,
    );
  } else if (actions.type === "checkboxes") {
    payload.message.blocks.forEach((block) => {
      if (block.block_id === actions.block_id) {
        block.elements[0].options.forEach((option) => {
          const isSelectedOption =
            actions.selected_options.filter(
              (selectedOption) => selectedOption.value === option.value,
            ).length > 0
              ? true
              : false;

          if (isSelectedOption) {
            option.text.text = option.text.text.includes("~")
              ? option.text.text
              : `~${option.text.text}~`;
          } else {
            option.text.text = option.text.text.replaceAll("~", "");
          }
        });
      }
    });
    res = await updateMessage(
      channel,
      payload.message.ts,
      payload.message.blocks,
    );
  }

  return Response.json({ res });
}

async function postMessage(channelId, text, selectedUserId) {
  const url = `https://slack.com/api/chat.postMessage`;
  const slackResponse = await fetch(url, {
    method: "POST",
    body: JSON.stringify({
      channel: channelId,
      text: `<@${selectedUserId}>, ${text}`,
    }),
    headers: {
      Authorization: `Bearer ${process.env.SLACK_TOKEN}`,
      "Content-Type": "application/json; charset-utf8",
    },
  });

  const res = await slackResponse.json();
  return res;
}

async function updateMessage(channelId, timestamp, blocks) {
  const url = `https://slack.com/api/chat.update`;
  const slackResponse = await fetch(url, {
    method: "POST",
    body: JSON.stringify({
      channel: channelId,
      ts: timestamp,
      blocks: blocks,
    }),
    headers: {
      Authorization: `Bearer ${process.env.SLACK_TOKEN}`,
      "Content-Type": "application/json; charset-utf8",
    },
  });

  const res = await slackResponse.json();
  return res;
}
There’s quite a bit going on in this file, so let’s take a second to walk through what’s happening. In the first few lines, we’ll extract the payload from the POST request Slack sends, along with the channel and actions values. Here we’ll create some branches in our code to handle the different types of actions we’ve specified on the action_id key of our Slack blocks.
export async function POST(request) {
  const formData = await request.formData();
  const payload = JSON.parse(formData.get("payload"));
  const channel = payload.channel.id;
  const actions = payload.actions[0];
  let res = null;
  if (actions.type === "users_select") {
    //handle user select
  } else if (actions.type === "checkboxes") {
    //handle checkboxes
  }

  return Response.json({ res });
}
If the Slack user selects a value from the users select dropdown, we’ll execute the code in the users_select branch. In a more robust system, you might make a database call to assign someone to a particular incident, but in this example we’ll just send a message back to Slack tagging that invididual.
To do that, we’ll create another function called postMessage that will take a channelId, some message text and the selectedUserId as parameters. In this function, the SLACK_TOKEN value is a Bot token that we’ve assigned to this app.
async function postMessage(channelId, text, selectedUserId) {
  const url = `https://slack.com/api/chat.postMessage`;
  const slackResponse = await fetch(url, {
    method: "POST",
    body: JSON.stringify({
      channel: channelId,
      text: `<@${selectedUserId}>, ${text}`,
    }),
    headers: {
      Authorization: `Bearer ${process.env.SLACK_TOKEN}`,
      "Content-Type": "application/json; charset-utf8",
    },
  });

  const res = await slackResponse.json();
  return res;
}
Much of the data we’ll need to handle interactive selections is passed as a part of the payload from Slack, either as a part of the base payload or inside of the payload’s actions key. Once we’ve extracted the data into variables, we can call the postMessage function to make a POST request to Slack’s API.
const payload = JSON.parse(formData.get("payload"));
const channel = payload.channel.id;
const actions = payload.actions[0];
let res = null;
if (actions.type === "users_select") {
  const selectedUserId = actions["selected_user"];
  res = await postMessage(
    channel,
    "You have been assigned an incident.",
    selectedUserId,
  );
}
When this message, is sent it renders in Slack like this:
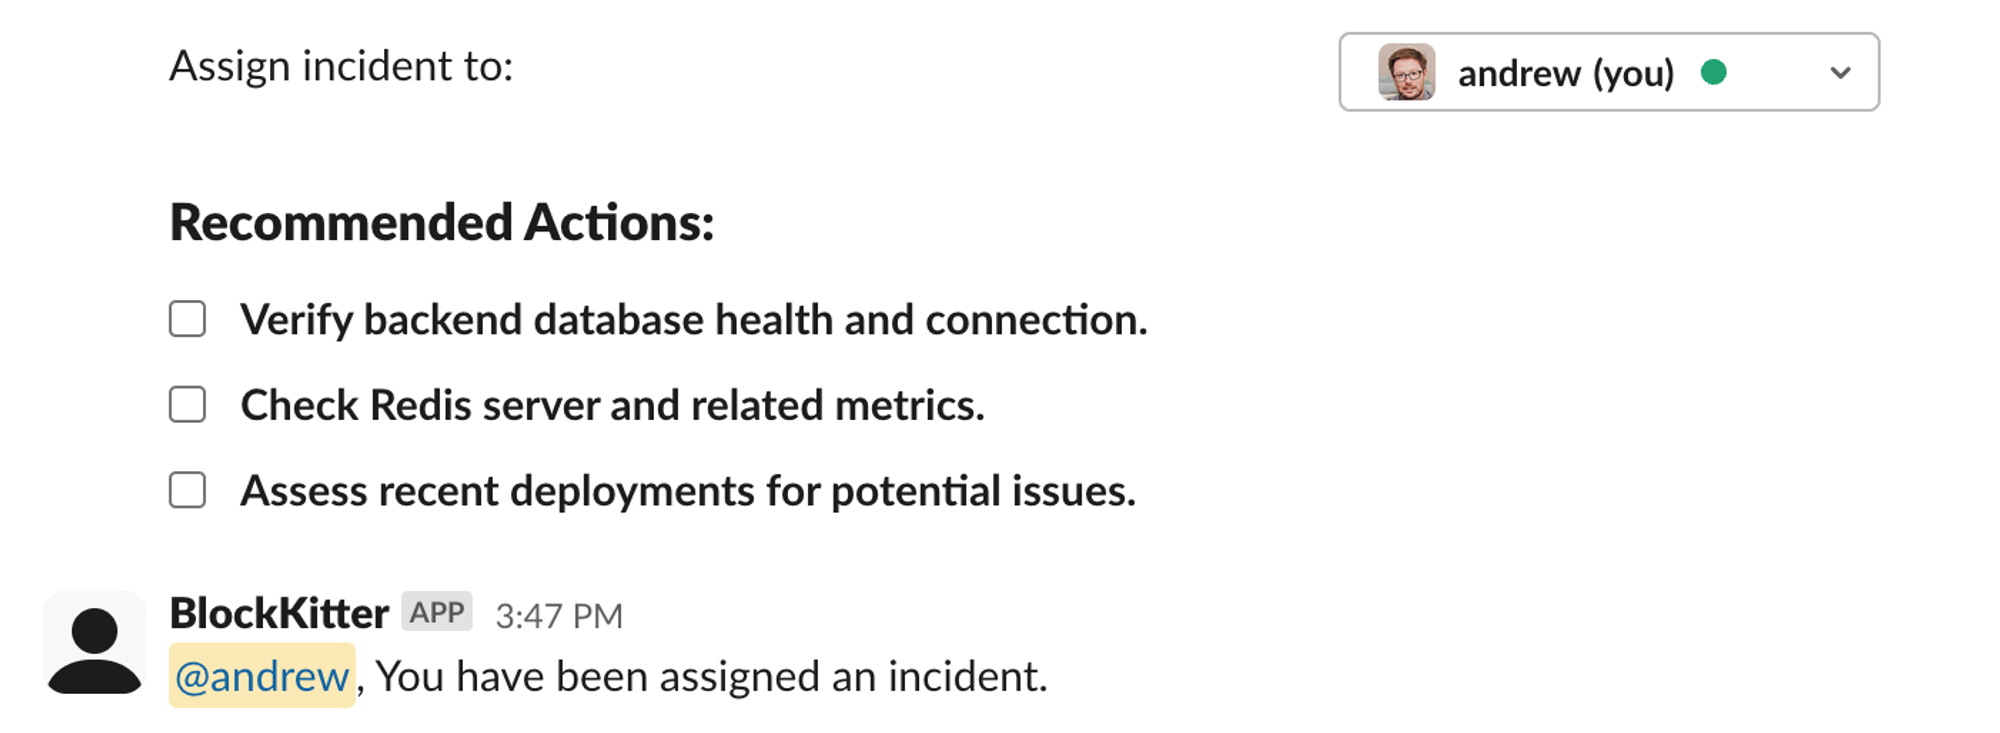
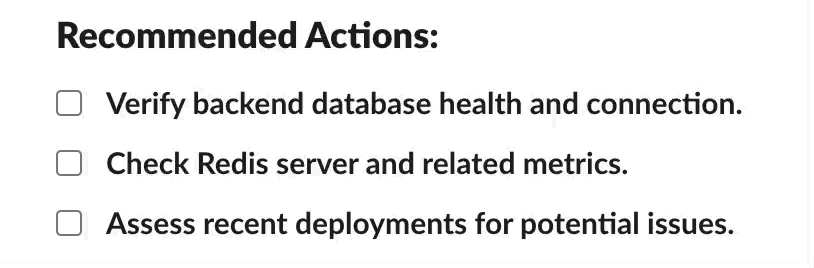
Now, this team member knows they have to deal with the incident. As they complete the recommended action, they can check off the items on the checklist.
Though the checks will show what has been completed, as each of those text descriptions is mrkdwn, we can also use formatting to highlight what has happened further by updating the message.
In our backend, we want to look through our payload to see what has been checked and strikethrough the text if something has been completed. If the interaction is generated by the checkboxes, we’ll loop through the blocks in the message and compare the checkbox values with the values that have been selected. If they have been selected, we can apply some additional formatting to the option text property.
if (actions.type === "checkboxes") {
  //loop through the blocks in the message payload
  payload.message.blocks.forEach((block) => {
    //if the current block triggered the interaction
    if (block.block_id === actions.block_id) {
      //loop through the options on that block
      block.elements[0].options.forEach((option) => {
        //compare the current option value to the list of
        //selected option values and generate a boolean
        const isSelectedOption =
          actions.selected_options.filter(
            (selectedOption) => selectedOption.value === option.value,
          ).length > 0
            ? true
            : false;

        if (isSelectedOption) {
          //if the current option is a selected option
          //add the strikethrough formatting if not already present
          option.text.text = option.text.text.includes("~")
            ? option.text.text
            : `~${option.text.text}~`;
        } else {
          //if not selected, remove any strikethrough formatting
          option.text.text = option.text.text.replaceAll("~", "");
        }
      });
    }
  });
  res = await updateMessage(
    channel,
    payload.message.ts,
    payload.message.blocks,
  );
}
Then, we need to update the message using the Slack API. We need the channel ID and the initial message timestamp (message.ts) to identify the message we are updating. We then pass that to our updateMessage function, which uses the chat.update API.
async function updateMessage(channelId, timestamp, blocks) {
  const url = `https://slack.com/api/chat.update`;
  const slackResponse = await fetch(url, {
    method: "POST",
    body: JSON.stringify({
      channel: channelId,
      ts: timestamp,
      blocks: blocks,
    }),
    headers: {
      Authorization: `Bearer ${process.env.SLACK_TOKEN}`,
      "Content-Type": "application/json; charset-utf8",
    },
  });

  const res = await slackResponse.json();
  return res;
}
When we select a checkbox, the text gets a strikethrough for all in the channel to see.
A good use for this style of updating is cleaning up after your notifications. If someone selects a choice from two buttons, you can remove the buttons and show the selection. You can see more design best practices for using Slack Block Kit in the Slack docs.
Depending on your product, a Slack integration can be a valuable addition to your feature set. At Knock, we're focused on helping developers leverage Slack as a notification channel, so here are a few additional posts we've written on using Slack:
- How to think about Slack as a notification channel for your app
- The developer's guide to Slack's Markdown formatting
- How to autheticate users in Slack using OAuth
- The product manager's guide to designing Slack notifications
Using Knock to Manage Your Slack Notification Design
Knock allows engineering and product teams to build their notification system, without dealing with the infrastructure required. You can manage notifications across multiple channels, such as email, in-app, Push, and Slack.
If you build out your Slack messages using Block Kit, you can quickly transfer your JSON to the Knock JSON block editor. A bonus is that you can use liquid within your blocks to inject variables and add control flows. You can follow the instructions to set up a Knock and Slack integration through DIY Slack OAuth or Knock’s SlackKit. With SlackKit, Knock handles authorization with Slack's APIs and provides pre-built components and React hooks for you to quickly build out the UI of your Slack integration.
If you want to try it out, sign up for a free account or chat with our team. 👋