Building a production-ready Slack notification system requires more than just calling the chat.postMessage endpoint. You need to handle authentication across multiple workspaces, respect user preferences, construct messages that work everywhere from mobile lock screens to desktop clients, handle failures gracefully, and understand what's happening when things go wrong. Here, we'll walk through each component with working code examples using Slack's HTTP API directly.
App setup and authentication
Creating your Slack app
Before you write any code, you need a Slack app. Head to api.slack.com/apps and create a new app. The available OAuth scopes you request determine what your bot can do. For notifications, you'll need several core permissions.
The chat:write scope lets you send messages. Add chat:write.public if you want to post to channels without joining them first. The users:read scope enables you to look up user information, which matters when you need to check someone's display name or time zone. The dnd:read scope lets you respect Do Not Disturb settings. For direct messages, add im:write.
If you need to verify channel access or work with private channels, add the channels:read and groups:read permissions. If your app responds to mentions, include app_mentions:read. Request only what you need. Users see the permission list during installation, and excessive permissions reduce trust.
Making authenticated requests
Your Slack app communicates with Slack's servers through their HTTP API. You'll need to make authenticated requests using your bot token. You can either create your own HTTP client to interact with Slack's API directly or use their Bolt framework for building Slack apps:
Node.js with fetch
import "dotenv/config";

async function makeSlackRequest(endpoint, data) {
  const response = await fetch(`https://slack.com/api/${endpoint}`, {
    method: "POST",
    headers: {
      Authorization: `Bearer ${process.env.SLACK_BOT_TOKEN}`,
      "Content-Type": "application/json",
    },
    body: JSON.stringify(data),
  });

  return await response.json();
}
Slack's Bolt framework
import "dotenv/config";
import { App } from "@slack/bolt";

const app = new App({
  token: process.env.SLACK_BOT_TOKEN,
  signingSecret: process.env.SLACK_SIGNING_SECRET,
  socketMode: process.env.SOCKET_MODE === "true",
  appToken: process.env.SLACK_APP_TOKEN,
});

app.error(async (error) => {
  console.error("Global error handler:", error);
});
The Bolt framework provides a higher-level abstraction over Slack's HTTP API. It handles connection logic, request verification, and event routing automatically. For Socket Mode development, it opens a WebSocket connection so you don't need a public URL. In production, disable Socket Mode and Slack will send events to your public endpoint instead.
Why use Bolt?
Bolt simplifies common patterns like handling slash commands, interactive components, and event subscriptions. It provides built-in middleware for authentication, logging, and error handling.
If you're building a complex Slack app with multiple features beyond notifications, Bolt can reduce boilerplate code significantly. However, for simple notification systems, direct HTTP API calls give you more control and transparency over what's happening under the hood.
Token management
Tokens are credentials that grant access to workspace data. Store them in environment variables during development and use a secrets manager in production. Never hardcode tokens.
# .env file (never commit this)
SLACK_BOT_TOKEN=xoxb-your-bot-token
SLACK_SIGNING_SECRET=your-signing-secret
SLACK_APP_TOKEN=xapp-your-app-token
SOCKET_MODE=true
In production, load secrets from AWS Secrets Manager, Google Cloud Secret Manager, or HashiCorp Vault. Load them once at startup, not on every request. Cache them in memory with a refresh mechanism when they rotate.
Multi-tenant OAuth
If your app serves multiple workspaces, each installation generates unique tokens. When a workspace administrator installs your app, Slack redirects them to your OAuth callback with a temporary code. Exchange that code for tokens and store them securely.
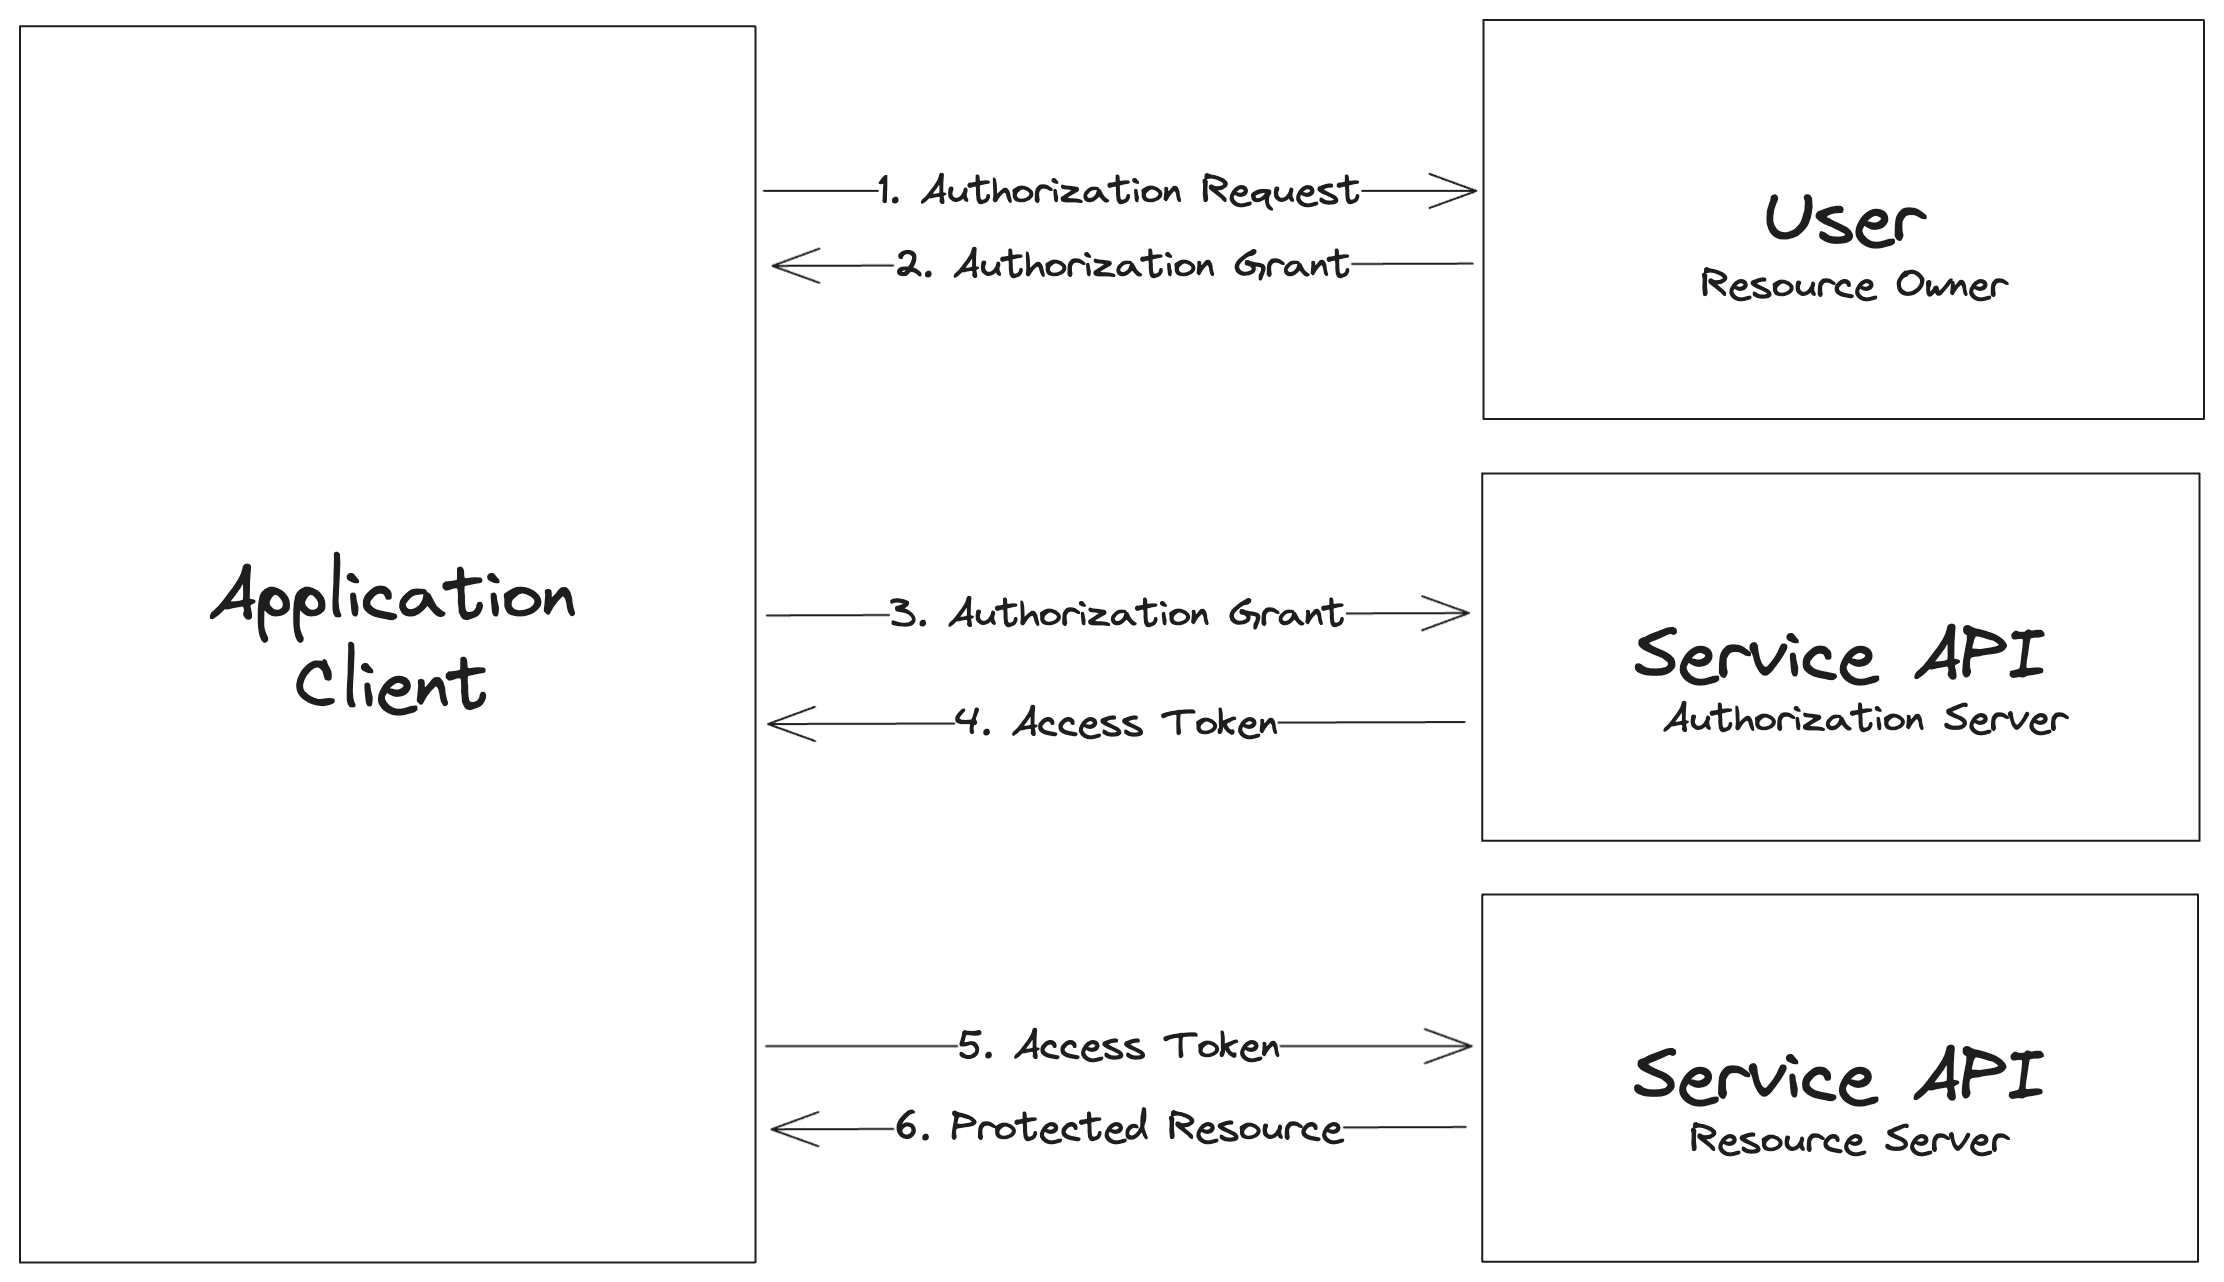
An example OAuth flow
The installation flow looks like this:
- The user clicks "Add to Slack" on your website
- Slack shows them the permission list and the user approves
- Slack redirects to your callback URL with a code
- You exchange the code for tokens
- You store those tokens mapped to the workspace
Each workspace requires its own token set due to differing permissions and access.
OAuth code example
The OAuth flow requires user interaction. When a user clicks "Add to Slack" on your website, they're redirected to Slack's authorization page where they review permissions and approve your app. After approval, Slack redirects back to your callback URL with a temporary authorization code.
Here's an example of how to handle the callback and exchange the code for tokens using Express.js:
require("dotenv").config();
const express = require("express");
const axios = require("axios");

const app = express();
const port = 3000;

// Redirect user to Slack's OAuth authorization page
app.get("/auth/slack", (req, res) => {
  const scopes = "channels:read";
  res.redirect(
    `https://slack.com/oauth/v2/authorize?client_id=${
      process.env.SLACK_CLIENT_ID
    }&user_scope=${encodeURIComponent(
      scopes,
    )}&redirect_uri=${encodeURIComponent(process.env.SLACK_REDIRECT_URI)}`,
  );
});

// Callback URI endpoint
app.get("/auth/slack/callback", async (req, res) => {
  const { code } = req.query;
  try {
    const tokenResponse = await axios.post(
      "https://slack.com/api/oauth.v2.access",
      null,
      {
        params: {
          code,
          client_id: process.env.SLACK_CLIENT_ID,
          client_secret: process.env.SLACK_CLIENT_SECRET,
          redirect_uri: process.env.SLACK_REDIRECT_URI,
        },
      },
    );

    if (tokenResponse.data.ok) {
      console.log(`Authorization successful!`);
      // Save the tokens in session or a secure place
      const accessToken = tokenResponse.data.authed_user.access_token;
      req.session.slack_access_token = accessToken;
      req.session.slack_user_id = tokenResponse.data.authed_user.id;
    } else {
      res
        .status(500)
        .send("Error authorizing with Slack: " + tokenResponse.data.error);
    }
  } catch (error) {
    console.error(error);
    res
      .status(500)
      .send(
        "Server error when exchanging code for token or fetching channels.",
      );
  }
});

// Start the server
app.listen(port, () => {
  console.log(`Server running on http://localhost:${port}`);
});
The initial authorization code you receive from Slack is single-use and expires quickly, usually within 10 minutes. You must exchange it for a token immediately. Never store the authorization code, only the resulting access tokens.
For a complete working example of implementing Slack OAuth in a Node.js application, including session management and error handling, see our guide to authenticating users with Slack using OAuth.
Storing workspace tokens
Store the bot token, team ID, and bot user ID. You'll need these to send notifications to that workspace. In your database, encrypt the tokens before storage. Use AES-256-GCM or similar. Never log tokens. Never send them to analytics services. Never include them in error messages.
For Enterprise Grid organizations, the approval process adds an extra step. Admins must approve apps before installation. Handle the app_requested event to notify admins when someone wants to install your app.
Message targeting
Channel selection
Deciding where to send a notification affects whether users see it as helpful or spam. Get this wrong, and your app will get muted or uninstalled. Get it right and you become part of their workflow.
Direct messages are helpful for personal alerts, such as password resets, account changes, individual task assignments, and sensitive information. Anything that applies to one person should go to a DM. Open the DM channel first, then send the message:
async function getDMChannel(userId) {
  const result = await makeSlackRequest("conversations.open", {
    users: userId,
  });
  return result.channel.id;
}
Channel messages are ideal for team updates, including deployments, incidents, system status, and shared workflows. If multiple people need to see it and collaborate on it, post to a channel. But verify your bot has access first:
async function isBotInChannel(channelId) {
  try {
    const result = await makeSlackRequest("conversations.info", {
      channel: channelId,
    });
    return result.channel.is_member;
  } catch (error) {
    return false;
  }
}
Check membership before every channel post. Slack apps can't post to channels they haven't joined or been invited to. The error message not_in_channel means precisely that. For public channels, you can call conversations.join to add your bot. For private channels, a user must invite the bot manually.
User lookup and targeting
Sometimes you need to notify someone but only have their email address, not their Slack user ID. The users.lookupByEmail method handles this:
async function notifyUserByEmail(email, message) {
  const result = await makeSlackRequest("users.lookupByEmail", { email });
  const channel = await getDMChannel(result.user.id);
  await makeSlackRequest("chat.postMessage", {
    channel,
    ...message,
  });
}
This pattern works when integrating with external systems that identify users by email. Your support ticket system knows the customer's email. Your app looks up their Slack user and sends them a DM. Just handle the case where the email doesn't match any Slack user in the workspace.
Private channels
Private channels require explicit invitation. Your bot can't discover, join, or post to them without being added by a member. When users configure notifications for private channels, check access immediately and provide clear feedback if the bot isn't a member.
The validation is simple: try to get channel info. If the bot fails to join or isn't a member, inform the user that they need to invite the bot first. Most users don't understand the technical distinction between public and private channels. They just know "it's not working." Clear error messages solve this.
Consent and preferences
Users must control their notifications. A notification system without preferences becomes spam. Build preference management from the start, not as an afterthought.
Preference storage
Start with a clear data model. What can users control? At minimum: turn on/off notifications, set frequency (realtime vs digest), filter by severity level, and configure quiet hours. A complete preference object looks like this:
{
  notifications_enabled: true,
  notification_channel: null,  // null = DM, otherwise channel ID
  frequency: 'realtime',  // 'realtime', 'digest_hourly', 'digest_daily'
  min_severity: 'low',  // 'low', 'medium', 'high', 'critical'
  quiet_hours: {
    enabled: false,
    start: '22:00',
    end: '08:00',
    timezone: 'America/New_York'
  },
  notification_types: {
    errors: true,
    warnings: true,
    info: true,
    updates: true
  }
}
Store preferences per user per workspace. A user in multiple workspaces might want different settings for each. In development, a Map works fine. In production, use a database. PostgreSQL, MongoDB, or Redis all work well for this pattern.
Provide sensible defaults. When someone first installs your app, they haven't set preferences yet. Default to enabled but respectful: all notifications types, medium severity threshold, and real-time delivery. Let them refine from there.
Preference checking
Before sending any notification, check if the user wants it. This filtering happens before you hit Slack's API, reducing unnecessary requests and respecting user choices.
The check examines several factors. First, are notifications enabled at all? If the user opted out entirely, stop. Second, does this notification type match their preferences? If they turned off error notifications, don't send errors. Third, does the severity meet their minimum threshold? If they only want critical alerts, filter out medium severity. Fourth, is it quiet hours? If so, only critical notifications break through.
function shouldNotify(userId, workspace, notification) {
  const prefs = getUserPreferences(userId, workspace);

  if (!prefs.notifications_enabled) return false;
  if (!prefs.notification_types[notification.type]) return false;

  const severityLevels = ["low", "medium", "high", "critical"];
  const minLevel = severityLevels.indexOf(prefs.min_severity);
  const notifLevel = severityLevels.indexOf(notification.severity);

  if (notifLevel < minLevel) return false;

  if (prefs.quiet_hours.enabled && isQuietHours(prefs.quiet_hours)) {
    if (notification.severity !== "critical") return false;
  }

  return true;
}
This filtering protects users from notification overload and protects your app from rate limits. If you're about to send 100 notifications but 90 would be filtered by preferences, checking first saves 90 API calls.
Respecting Slack's 'Do Not Disturb'
Slack has a built-in Do Not Disturb feature, where users can snooze notifications or set automatic quiet hours. Make sure to check the DND status before sending non-critical notifications:
async function checkDNDStatus(userId) {
  const result = await makeSlackRequest("dnd.info", { user: userId });
  return result.dnd_enabled || result.snooze_enabled;
}

// Usage
const isDND = await checkDNDStatus(userId);

if (isDND && notification.severity !== "critical") {
  queueForLater(notification);
  return;
}
Aim to always respect this. You can set critical alerts to break through DND, but low-priority notifications should always wait. Queue them for delivery after DND ends, or batch them into a digest. Users who set DND don't want to be interrupted during that window, and your app should listen.
Message construction
Every message needs both text and blocks. Incorporating these into standardized messages makes your app feel professional and consistent. Users recognize your notification style immediately. Templates also reduce code duplication and ensure you never forget the fallback text or proper structure.
Build templates for common patterns: error alerts, success messages, progress updates, system announcements, and digests. Each template takes parameters and returns a complete message object with both text and blocks.
export const MessageTemplates = {
  errorAlert(details) {
    return {
      text: `Error: ${details.title}`,
      blocks: [
        {
          type: "header",
          text: { type: "plain_text", text: "🚨 Error Alert" },
        },
        {
          type: "section",
          text: {
            type: "mrkdwn",
            text: `*${details.title}*\n${details.description}`,
          },
        },
        {
          type: "section",
          fields: [
            { type: "mrkdwn", text: `*Severity:*\n${details.severity}` },
            { type: "mrkdwn", text: `*Error ID:*\n${details.errorId}` },
          ],
        },
      ],
    };
  },
};
Use templates consistently across your codebase. Every error follows the same format. Every success message looks related. Users learn to parse your messages quickly because the structure is predictable.
Ephemeral vs persistent messages
Ephemeral messages appear only to one user and disappear when they refresh Slack. Use them for error messages, private responses, or temporary status that doesn't need to clutter the channel permanently. The user sees "Only visible to you" above ephemeral messages.
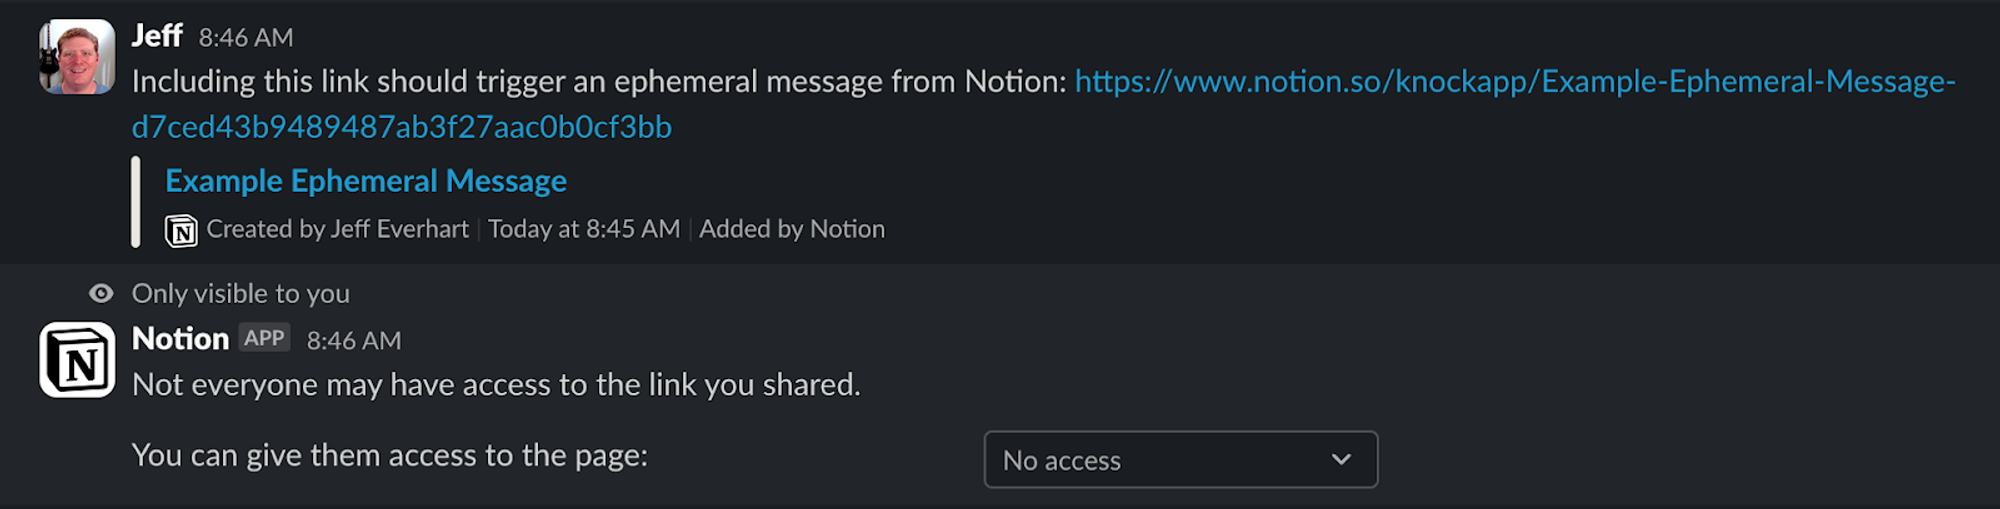
An example ephemeral message in Slack
Persistent messages stay in the channel forever (or until someone deletes them). Use them for notifications everyone should see and refer back to. Team alerts, deployment notifications, and shared status updates should be persistent.
The distinction matters for compliance and searchability. Ephemeral messages don't appear in channel search or exports. Persistent messages do. Choose based on whether the information has long-term value. For a more in-depth look at sending ephemeral message in products, you can read this blog post.
Sending ephemeral messages:
async function sendEphemeralMessage(channelId, userId, message) {
  return await makeSlackRequest("chat.postEphemeral", {
    channel: channelId,
    user: userId,
    ...message,
  });
}
Link formatting
Slack uses special syntax for links. Raw URLs are visually unappealing and fail to indicate what users are clicking. Slack's link format wraps URLs in angle brackets and adds optional labels: <https://example.com|Click here>. The URL is clickable, but users see the label text. You can learn more about Slack's markdown syntax here.
This extends to user mentions, channel mentions, and date formatting. Mention a user with <@U123456>. Mention a channel with <#C789012>. Format a date with <!date^1234567890^{date_short_pretty}|fallback>. Slack's clients render these specially.
const message = {
  type: "mrkdwn",
  text:
    `Alert handled by <@${userId}> at <!date^${timestamp}^{time}|now>\n` +
    `View logs: <https://logs.example.com|here>`,
};
Clean link formatting makes messages professional and easier to scan. Users see "View logs: here" instead of a 200-character URL with query parameters.
Sending semantics
Rate limits
Slack's API enforces rate limits to protect its infrastructure. The web API allows roughly one message per second
per channel. You can briefly burst higher, but sending at a sustained rate triggers
rate_limited errors. The error response includes a retry_after field indicating
how many seconds to wait.
Handle rate limits with exponential backoff. When you hit a rate limit, wait the specified time, then retry. If you hit it again, wait longer. Eventually give up if retries don't succeed. This pattern prevents your app from hammering Slack's API when it's already under pressure.
async function sendWithRetry(channel, message) {
  let attempt = 0;
  const maxRetries = 3;

  while (attempt < maxRetries) {
    try {
      return await makeSlackRequest("chat.postMessage", {
        channel,
        ...message,
      });
    } catch (error) {
      if (error.data?.error === "rate_limited") {
        const delay = (error.data.retry_after || Math.pow(2, attempt)) * 1000;
        await sleep(delay);
        attempt++;
        continue;
      }
      throw error;
    }
  }
}
This implementation respects Slack's retry_after hint but caps the maximum delay to prevent indefinite waiting. After three failures, it gives up and throws the error. Your calling code can then decide whether to queue the notification for later or alert an operator.
Deduplication
Prevent sending the same notification twice. In distributed systems, the same event might trigger multiple times due to retries, duplicate messages, or race conditions. Use deduplication keys to detect and skip duplicates.
Cache recent message keys and their timestamps. Before sending, check if that key exists in the cache with a recent timestamp. If so, skip sending and return the cached result. If not, send the message and add the key to the cache.
const messageCache = new Map();

async function sendDeduplicated(channel, message, dedupeKey) {
  if (messageCache.has(dedupeKey)) {
    const cached = messageCache.get(dedupeKey);
    if (Date.now() - cached.timestamp < 60000) {
      // 1 minute window
      return cached.result;
    }
  }

  const result = await makeSlackRequest("chat.postMessage", {
    channel,
    ...message,
  });
  messageCache.set(dedupeKey, { result, timestamp: Date.now() });

  return result;
}
Choose dedupe keys that uniquely identify the notification. For deployment notifications, use the deployment ID. For error alerts, use a hash of the error details. The key should be the same for identical events but different for distinct events.
Clean up old cache entries periodically. After five minutes, a message is no longer "recent" enough to worry about duplicates. Let the cache entry expire to prevent memory growth.
Message updates
Update existing messages instead of posting new ones. This keeps channels clean and provides live status tracking. Send an initial message, save its timestamp, then call chat.update with that timestamp to replace it.
// Send initial message
const msg = await makeSlackRequest('chat.postMessage', {
  channel: channelId,
  text: 'Progress: 0%',
  blocks: [...]
});

// Update the same message
await makeSlackRequest('chat.update', {
  channel: channelId,
  ts: msg.ts,
  text: 'Progress: 50%',
  blocks: [...]
});
Message updates are effective for tracking progress bars, status changes, and any value that evolves. Users see a single message that updates, rather than twenty messages displaying each percentage point. The message timestamp (ts) identifies which message to update.
Don't update too frequently. Updating every 100ms creates unnecessary API load and doesn't improve user experience since humans can't process updates that fast. Update every few seconds at most. For long-running operations, update every 5-10% progress increment.
Security
Encryption at rest
Encrypt sensitive data before storing it. Bot tokens, user tokens, and any personally identifiable information should be encrypted in your database. Use AES-256-GCM or similar authenticated encryption. Generate a unique initialization vector for each encryption operation.
Store the encryption key separately from the database. Rotate keys periodically. When rotating, decrypt with the old key and re-encrypt with the new key.
PII protection in logs
Never log personally identifiable information. User emails, names, message content, and similar data should not appear in logs. If you need to track a user for debugging, hash their user ID with a salt. The hash is meaningless to anyone without the salt, but it lets you correlate log entries.
function hashUserId(userId) {
  return crypto
    .createHash("sha256")
    .update(userId + process.env.HASH_SALT)
    .digest("hex")
    .substring(0, 16);
}

console.log("Notification sent:", {
  user: hashUserId(userId),
  timestamp: Date.now(),
});
Logs often flow to third-party services for analysis. Those services shouldn't see user data. Sanitize logs before they leave your infrastructure.
Request verification
When Slack sends events to your webhook endpoints, verify the request signature to ensure it came from Slack. Every request from Slack includes a signature in the X-Slack-Signature header and a timestamp in the X-Slack-Request-Timestamp header.
The signature is an HMAC-SHA256 hash of the timestamp and request body, keyed with your signing secret. Verify it by computing the same hash and comparing. If they match, the request came from Slack. If they don't match, reject it.
function verifySlackSignature(body, signature, timestamp, signingSecret) {
  const hmac = crypto.createHmac("sha256", signingSecret);
  const [version, hash] = signature.split("=");

  hmac.update(`${version}:${timestamp}:${body}`);
  const expectedHash = hmac.digest("hex");

  return crypto.timingSafeEqual(
    Buffer.from(hash, "hex"),
    Buffer.from(expectedHash, "hex"),
  );
}
The timestamp check prevents replay attacks. Reject requests older than five minutes. An attacker who intercepts a request can't replay it later because the timestamp will be stale.
Observability
Track everything about your notification system. You can't fix problems you can't see. Log all notification attempts, track success and failure metrics, monitor delivery latency, and alert when things go wrong.
What to track
Log each notification with structured data: notification type, severity, channel, timestamp, and result. Track key metrics over time: notifications sent per minute, failures, retry attempts, rate limit hits, average delivery latency, and how many notifications get filtered by user preferences.
These metrics tell your system's health story. If the sent rate drops suddenly, your app stopped working. If failed rate spikes, Slack's API might be having issues. If rate limit hits increase, you're sending too fast. If preference filters increase, users are tuning down your notifications.
Export metrics to monitoring systems like Datadog, CloudWatch, Prometheus, New Relic, or similar. Set up dashboards showing the critical metrics, and create alerts for when metrics cross thresholds. If failure rate exceeds 5%, page someone.
For error tracking, integrate services like Sentry or Rollbar to capture exceptions with full context. When notifications fail, you'll see stack traces, environment details, and the exact parameters that caused the failure.
Implement a health check endpoint that verifies your app can still communicate with Slack:
app.get("/health", async (req, res) => {
  try {
    const result = await makeSlackRequest("auth.test", {});
    res.json({ status: "healthy", timestamp: Date.now() });
  } catch (error) {
    res.status(503).json({ status: "unhealthy", error: error.message });
  }
});
Load balancers use health checks to route traffic. If your health check fails, traffic stops flowing to that instance until it recovers.