In this post, we'll explore how to create a custom inbox using Knock's Feed API and React hooks. The app itself is built using Next.js and ShadCN UI.
Inbox vs. feed
Both feeds and inboxes are types of in-app messaging components, but they generally serve different purposes inside your application.
Feeds are typically persistent components that display a stream of notifications or updates. If we consider the NotificationFeedPopover component from the @knocklabs/react package, it's a good example of a feed. It's generally included in your application's header, shows a real-time count of unread messages, and persists across navigations.
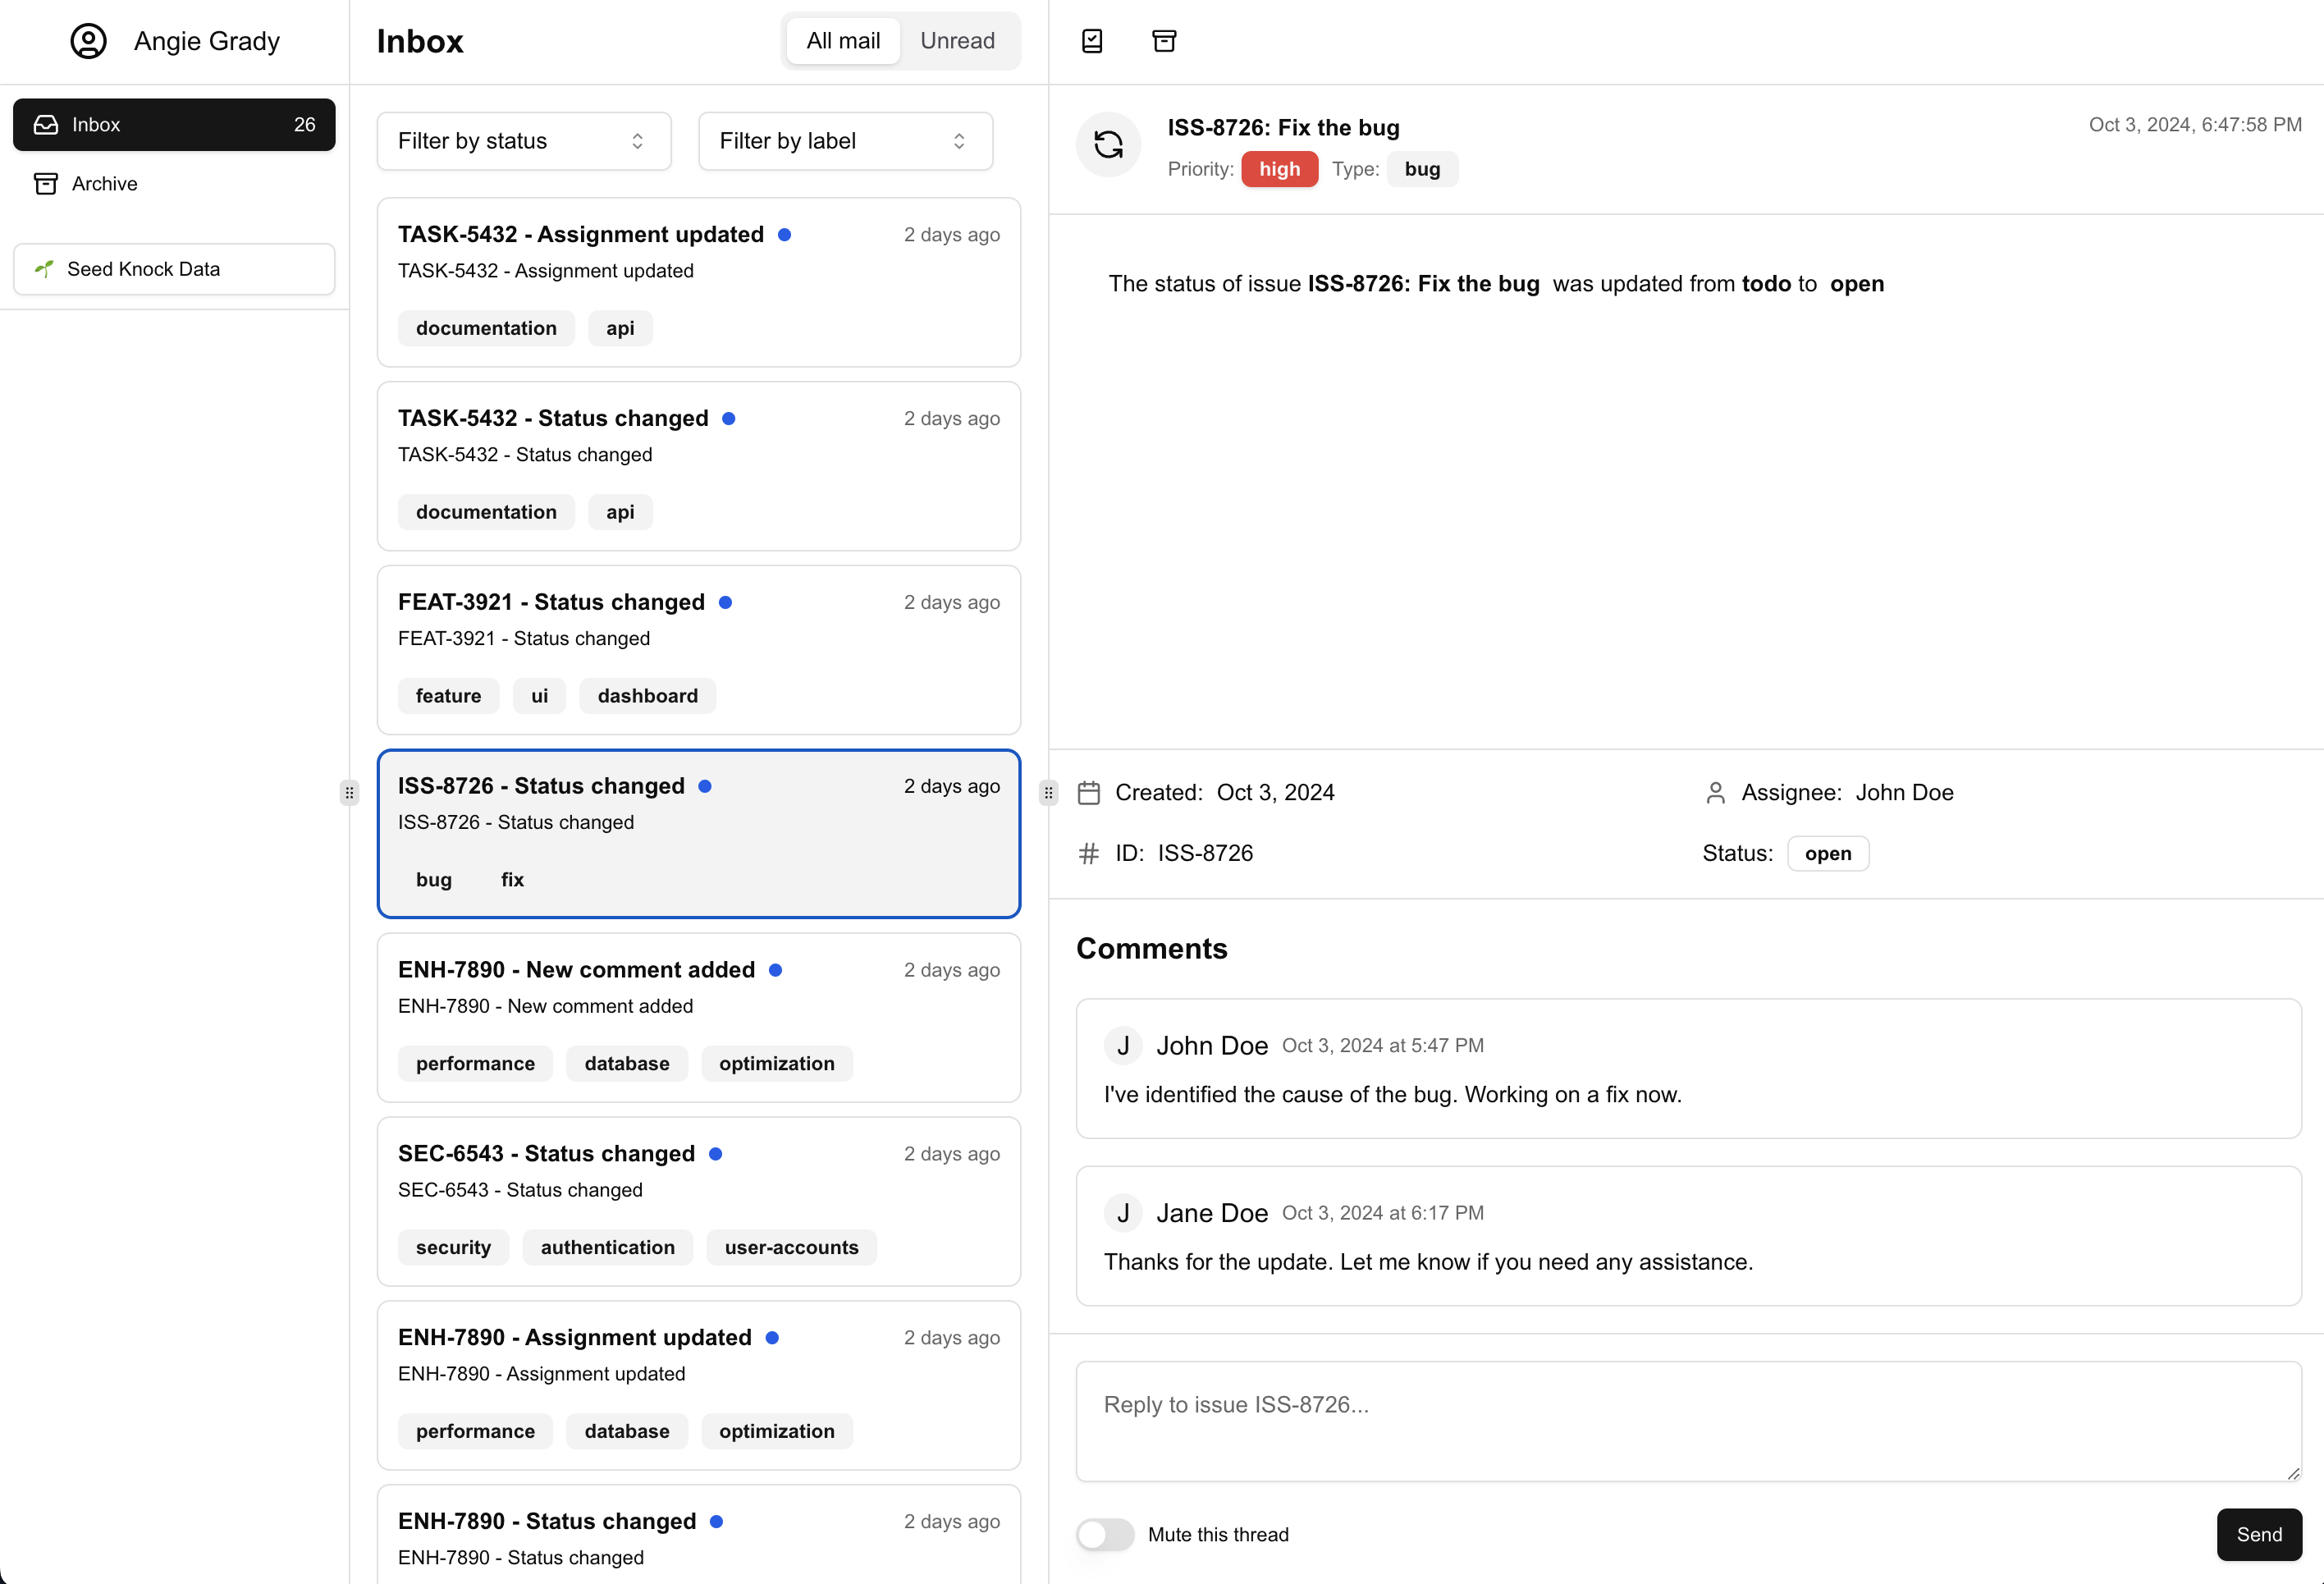
Inboxes on the other hand are usually a full-page experiences that allow users to interact with their messages in more detail. They often include features like filtering and sorting, and they may allow users to take actions on individual messages.
In a lot of cases, the information displayed in both components comes from the same source, but you use both an inbox and feed in the same application to give users different ways to interact with their messages.
As always, there are also no hard and fast rules here, so you may see feeds and inboxes used in different ways in different applications. In a recent interview with Thena, they discussed how they use Knock's feed API to power their in-app notifications and how they've built a custom inbox experience on top of it.
Getting started
-
Clone the repository:
git clone https://github.com/knocklabs/inbox-example-app.git -
Configure the environment variables:
Update the
.env.localfile in the root of your project and add the following variables:NEXT_PUBLIC_KNOCK_API_KEY=your_public_knock_api_key NEXT_PUBLIC_KNOCK_USER_ID=your_knock_user_id NEXT_PUBLIC_KNOCK_FEED_CHANNEL_ID=your_knock_feed_channel_id KNOCK_SECRET_API_KEY=your_secret_knock_api_keyReplace the values with your actual Knock API credentials. The value for
NEXT_PUBLIC_KNOCK_USER_IDcan be taken from anaccountfound indata.tsx. -
Push and commit the Knock workflow:
Use the Knock CLI to push and commit the
inbox-demoworkflow in the.knock/inbox-demodirectory:knock workflow push .knock/inbox-demo --commit -
Install dependencies:
npm install -
Run the development server:
npm run dev -
Open http://localhost:3000 with your browser to see the result.
Seeding Knock data
To populate your Knock feed with sample data:
- Navigate to the home page of the application.
- Look for the "Seed Knock Data" button in the left-hand navigation.
- Click the button to trigger the
seedKnockDataserver action.
The seedKnockData function iterates through each issue in the issues array stored in data.tsx and triggers the inbox-demo workflow for three event types: statusChange, assignment, and comment. Each trigger sends the issue data along with the event type to Knock. This server-side logic is powered by Knock's server-side Node SDK.
try {
  await knock.workflows.trigger("inbox-demo", {
    recipients: [
      {
        id: account.id,
        email: account.email,
        name: account.label,
      },
    ],
    actor: {
      id: account.id,
      email: account.email,
      name: account.label,
    },
    data: {
      id: "ENH-7890",
      event: "statusChange",
      title: "ENH-7890: Optimize database queries",
      description:
        "Improve performance by optimizing frequently used database queries",
      date: new Date(Date.now() - 86400000), // Yesterday
      status: "closed",
      previousStatus: "in progress",
      priority: "high",
      type: "enhancement",
      assignee: "David Lee",
      reporter: "Sarah Brown",
      labels: ["performance", "database", "optimization"],
      comments: [
        {
          text: "I've optimized the main query. Seeing a 50% performance improvement.",
          datetime: new Date(Date.now() - 432000000), // 5 days ago
          author: "David Lee",
        },
      ],
    },
  });
  console.log(`Triggered ${eventType} workflow for issue ${issue.id}`);
} catch (error) {
  console.error(
    `Error triggering ${eventType} workflow for issue ${issue.id}:`,
    error,
  );
}
Creating a custom inbox using the feed API
This project uses components and hooks from the @knocklabs/react package to create a custom inbox view. Here's how these are utilized:
-
KnockProvidercomponent:In
inbox-provider.tsx, we wrap our application with theKnockProviderto initialize the Knock client:import { KnockProvider } from "@knocklabs/react"; export function InboxProvider({ children }: InboxProviderProps) { return ( <KnockProvider apiKey={process.env.NEXT_PUBLIC_KNOCK_API_KEY || ""} userId={process.env.NEXT_PUBLIC_KNOCK_USER_ID || ""} > {children} </KnockProvider> ); }This provider sets up the Knock client with the necessary API key and user ID, making it available to all child components.
-
useKnockClienthook:const knockClient = useKnockClient();The
useKnockClienthook provides access to the Knock client instance for interacting with the Knock API. It's automatically exposed by theKnockProviderand can be used to interact with Knock's client-side methods. -
useNotificationshook:const feed = useNotifications( knockClient, process.env.NEXT_PUBLIC_KNOCK_FEED_CHANNEL_ID || "", { archived: "include", }, );The
useNotificationshook fetches and manages notifications for a specific feed channel. It returns aFeedobject with methods to interact with the notifications. -
useNotificationStorehook:const { items, metadata } = useNotificationStore(feed);The
useNotificationStorehook provides access to notification items and metadata, automatically updating when the feed changes. -
Fetch notifications on component mount:
useEffect(() => {
  feed.fetch();
}, [feed]);
Lastly, we need to perform a
fetchof the feed to load its initial state. Any realtime updates to the feed are handled automatically by theuseNotificationStorehook.
Implementing inbox functionality
Generally, inboxes allow the user to create separate views for their inbox items and offer more advanced filtering and sorting options than feeds. Let's look at how we can implement these features using Knock's built-in messages statues and some custom filtering logic.
-
Separate feed items and archived items. This allows us to create separate views for the inbox and archived items:
const [feedItems, archivedItems] = useMemo(() => { const feedItems = items?.filter((item) => !item.archived_at); const archivedItems = items?.filter((item) => item.archived_at); return [feedItems, archivedItems]; }, [items]); -
Apply additional filtering based on status and label. The
labelFilterandstatusFiltervariables are used to store the current filter state:const filteredFeedItems = useMemo(() => { return feedItems?.filter((item) => { const issue = issues.find((i) => i.id === item.data?.id); return ( (statusFilter === undefined || statusFilter === "all" || issue?.status === statusFilter) && (labelFilter === undefined || labelFilter === "all" || issue?.labels.includes(labelFilter)) ); }); }, [feedItems, issues, statusFilter, labelFilter]); -
Render filtered items in the
MessageListcomponent:<MessageList items={filteredFeedItems} /> -
Display selected item details in the
MessageDisplaycomponent. Themessage.selectedvariable is used to store the currently selected message:<MessageDisplay item={items.find((item) => item.id === message.selected) || null} feed={feed} issues={issues} />
By leveraging these hooks, the component loads and displays notifications from Knock, handles real-time updates, and provides filtering and viewing capabilities for the inbox.
But inboxes often facilitate additional interactions with the messages, such as marking as read/unread, archiving/unarchiving, and even replying to comments. Let's look at how we can implement these features.
Managing message status with knockClient
In the MessageDisplay component, we utilize the knockClient through the feed prop to manage the status of messages. This includes marking messages as read/unread and archiving/unarchiving them. Here's how it's implemented:
-
Receiving the feed prop:
The
MessageDisplaycomponent receives thefeedobject as a prop from its parent component as well as the current selecteditem:export function MessageDisplay({ item, feed, issues, }: { item: FeedItem | null; feed: Feed; issues: Issue[]; }) { // ... component implementation ... }This
feedobject is an instance of the Knock Feed object, which provides methods for interacting with Knock's Feed API. -
Marking as Read/Unread:
// ... existing code ...

{!item?.read_at ? (
  <Button
    // ... other props ...
    onClick={() => {
      if (item) {
        feed.markAsRead(item);
      }
    }}
  >
    <BookCheck className="h-4 w-4" />
    <span className="sr-only">Mark as read</span>
  </Button>
) : (
  <Button
    // ... other props ...
    onClick={() => {
      if (item) {
        feed.markAsUnread(item);
      }
    }}
  >
    <BookX className="h-4 w-4" />
    <span className="sr-only">Mark as unread</span>
  </Button>
)}

// ... existing code ...
We use the
feed.markAsRead(item)andfeed.markAsUnread(item)methods to toggle the read status of a message. -
Archiving/Unarchiving:
// ... existing code ...

{!item?.archived_at ? (
  <Button
    // ... other props ...
    onClick={() => {
      if (item) {
        feed.markAsRead(item);
        feed.markAsArchived(item);
      }
    }}
  >
    <Archive className="h-4 w-4" />
    <span className="sr-only">Archive</span>
  </Button>
) : (
  <Button
    // ... other props ...
    onClick={() => {
      if (item) {
        feed.markAsUnarchived(item);
      }
    }}
  >
    <Unarchive className="h-4 w-4" />
    <span className="sr-only">Unarchive</span>
  </Button>
)}

// ... existing code ...
We use the
feed.markAsArchived(item)andfeed.markAsUnarchived(item)methods to toggle the archived status of a message. Since Knock's message engagement statuses are mutually inclusive, we mark the message as read when archiving.
Handling comment replies
The application provides a feature for users to reply to issues directly from the inbox. This functionality shows how you can integrate Knock notifications with your existing systems. Here's how it works:
-
Comment form: In the
MessageDisplaycomponent, there's a form at the bottom for users to submit comments:<form onSubmit={handleSubmit}> <div className="grid gap-4"> <Textarea className="p-4" placeholder={`Reply to issue ${item?.data?.id}...`} value={comment} onChange={(e) => setComment(e.target.value)} /> <div className="flex items-center"> <Label htmlFor="mute" className="flex items-center gap-2 text-xs font-normal" > <Switch id="mute" aria-label="Mute thread" /> Mute this thread </Label> <Button type="submit" size="sm" className="ml-auto"> Send </Button> </div> </div> </form> -
Handling form submission: When a user submits a comment, the app displays a dialog to simulate sending the comment to your system:
const handleSubmit = (e: React.FormEvent) => {
  e.preventDefault();
  setIsDialogOpen(true);
};
<Dialog open={isDialogOpen} onOpenChange={handleDialogClose}> <DialogContent> <DialogHeader> <DialogTitle>Comment Submitted</DialogTitle> <DialogDescription> Your comment has been received and needs to be sent to the system for Issue #{item?.data?.id}. </DialogDescription> </DialogHeader> <div className="mt-4 p-4 bg-muted rounded-md"> <p className="text-sm">{comment}</p> </div> <DialogFooter> <Button onClick={handleDialogClose}>Close</Button> </DialogFooter> </DialogContent> </Dialog> -
Integration with your system and Knock: In a real-world scenario, submitting a comment would typically involve the following steps:
- Send the comment to your backend system (e.g., your issue tracking system).
- Your backend system processes the comment and updates the issue.
- After successful processing, your backend triggers a Knock workflow.
- Knock sends out notifications about the new comment to relevant users.
It's important to note that Knock doesn't actually process or save comments. Instead, Knock's role is to send notifications about new comments to the appropriate users based on the workflows you define.
-
Triggering Knock workflows: After your system processes the comment, you would trigger a Knock workflow similar to how it's done in the
seedKnockDatafunction:await knock.workflows.trigger("inbox-demo", { recipients: [ // ... recipient details ], actor: { // ... actor details }, data: { id: "ENH-7890", event: "comment", title: "ENH-7890: Optimize database queries", // ... other issue details comments: [ { text: "New comment text", datetime: new Date(), author: "Current User", }, ], }, });
By integrating Knock in this way, you can ensure that all relevant parties are notified about new comments and issue updates in real-time, while maintaining the core data and business logic in your own systems.
Wrapping up
Awesome! Thanks so much for reading. In this post, we covered how to build a custom inbox experience using Knock's React hooks and feed API.
We looked at:
- Using Knock's React hooks to build a custom inbox view
- Creating different filtered views for inbox and archived items
- Managing engagement statuses on feed messages
The feed client gives developers pretty much unlimited flexibility in the types of experiences they can create, so we're excited to see what you'll build.
You can get started with Knock for free by signing up here. Knock on.