If you’re looking for ways to provide value to your app’s users, a Slack integration is worth building . But adding Slack support to an existing app has historically been a large engineering task: you need to map your app’s data model onto Slack’s users and channels, provide a way to authenticate and store credentials, manage notification templates in domain-specific formats like mrkdwn and Block Kit, and then create UI to handle the self-serve aspects of this process.
SlackKit is a library of drop-in components powered by the KnockSlackProvider, and it uses components like the SlackAuthButton and SlackChannelsCombobox. Engineering teams can add support for Slack channel notifications in Knock in hours, not days or weeks.
In this post, we'll take a high-level look at SlackKit in action and walk through an example Next.js application that implements it.
Getting started
For this project, there are quite a few configuration variables you need before you can get started. Some of these are typical environment variables you would supply to your application, like API keys, tokens, or client ids.
The other set of values would typically be determined by your product's business logic, but you can hardcode these values for the time being.
You can access the repository for this project directly or clone it to your local machine using the following command:
git clone https://github.com/knocklabs/slack-kit-example.gitVideo walkthrough
If you prefer to learn with video, watch it here.
Setting up a Slack app
You can either follow the setup steps outlined here, or use the official instruction in the SlackKit docs.
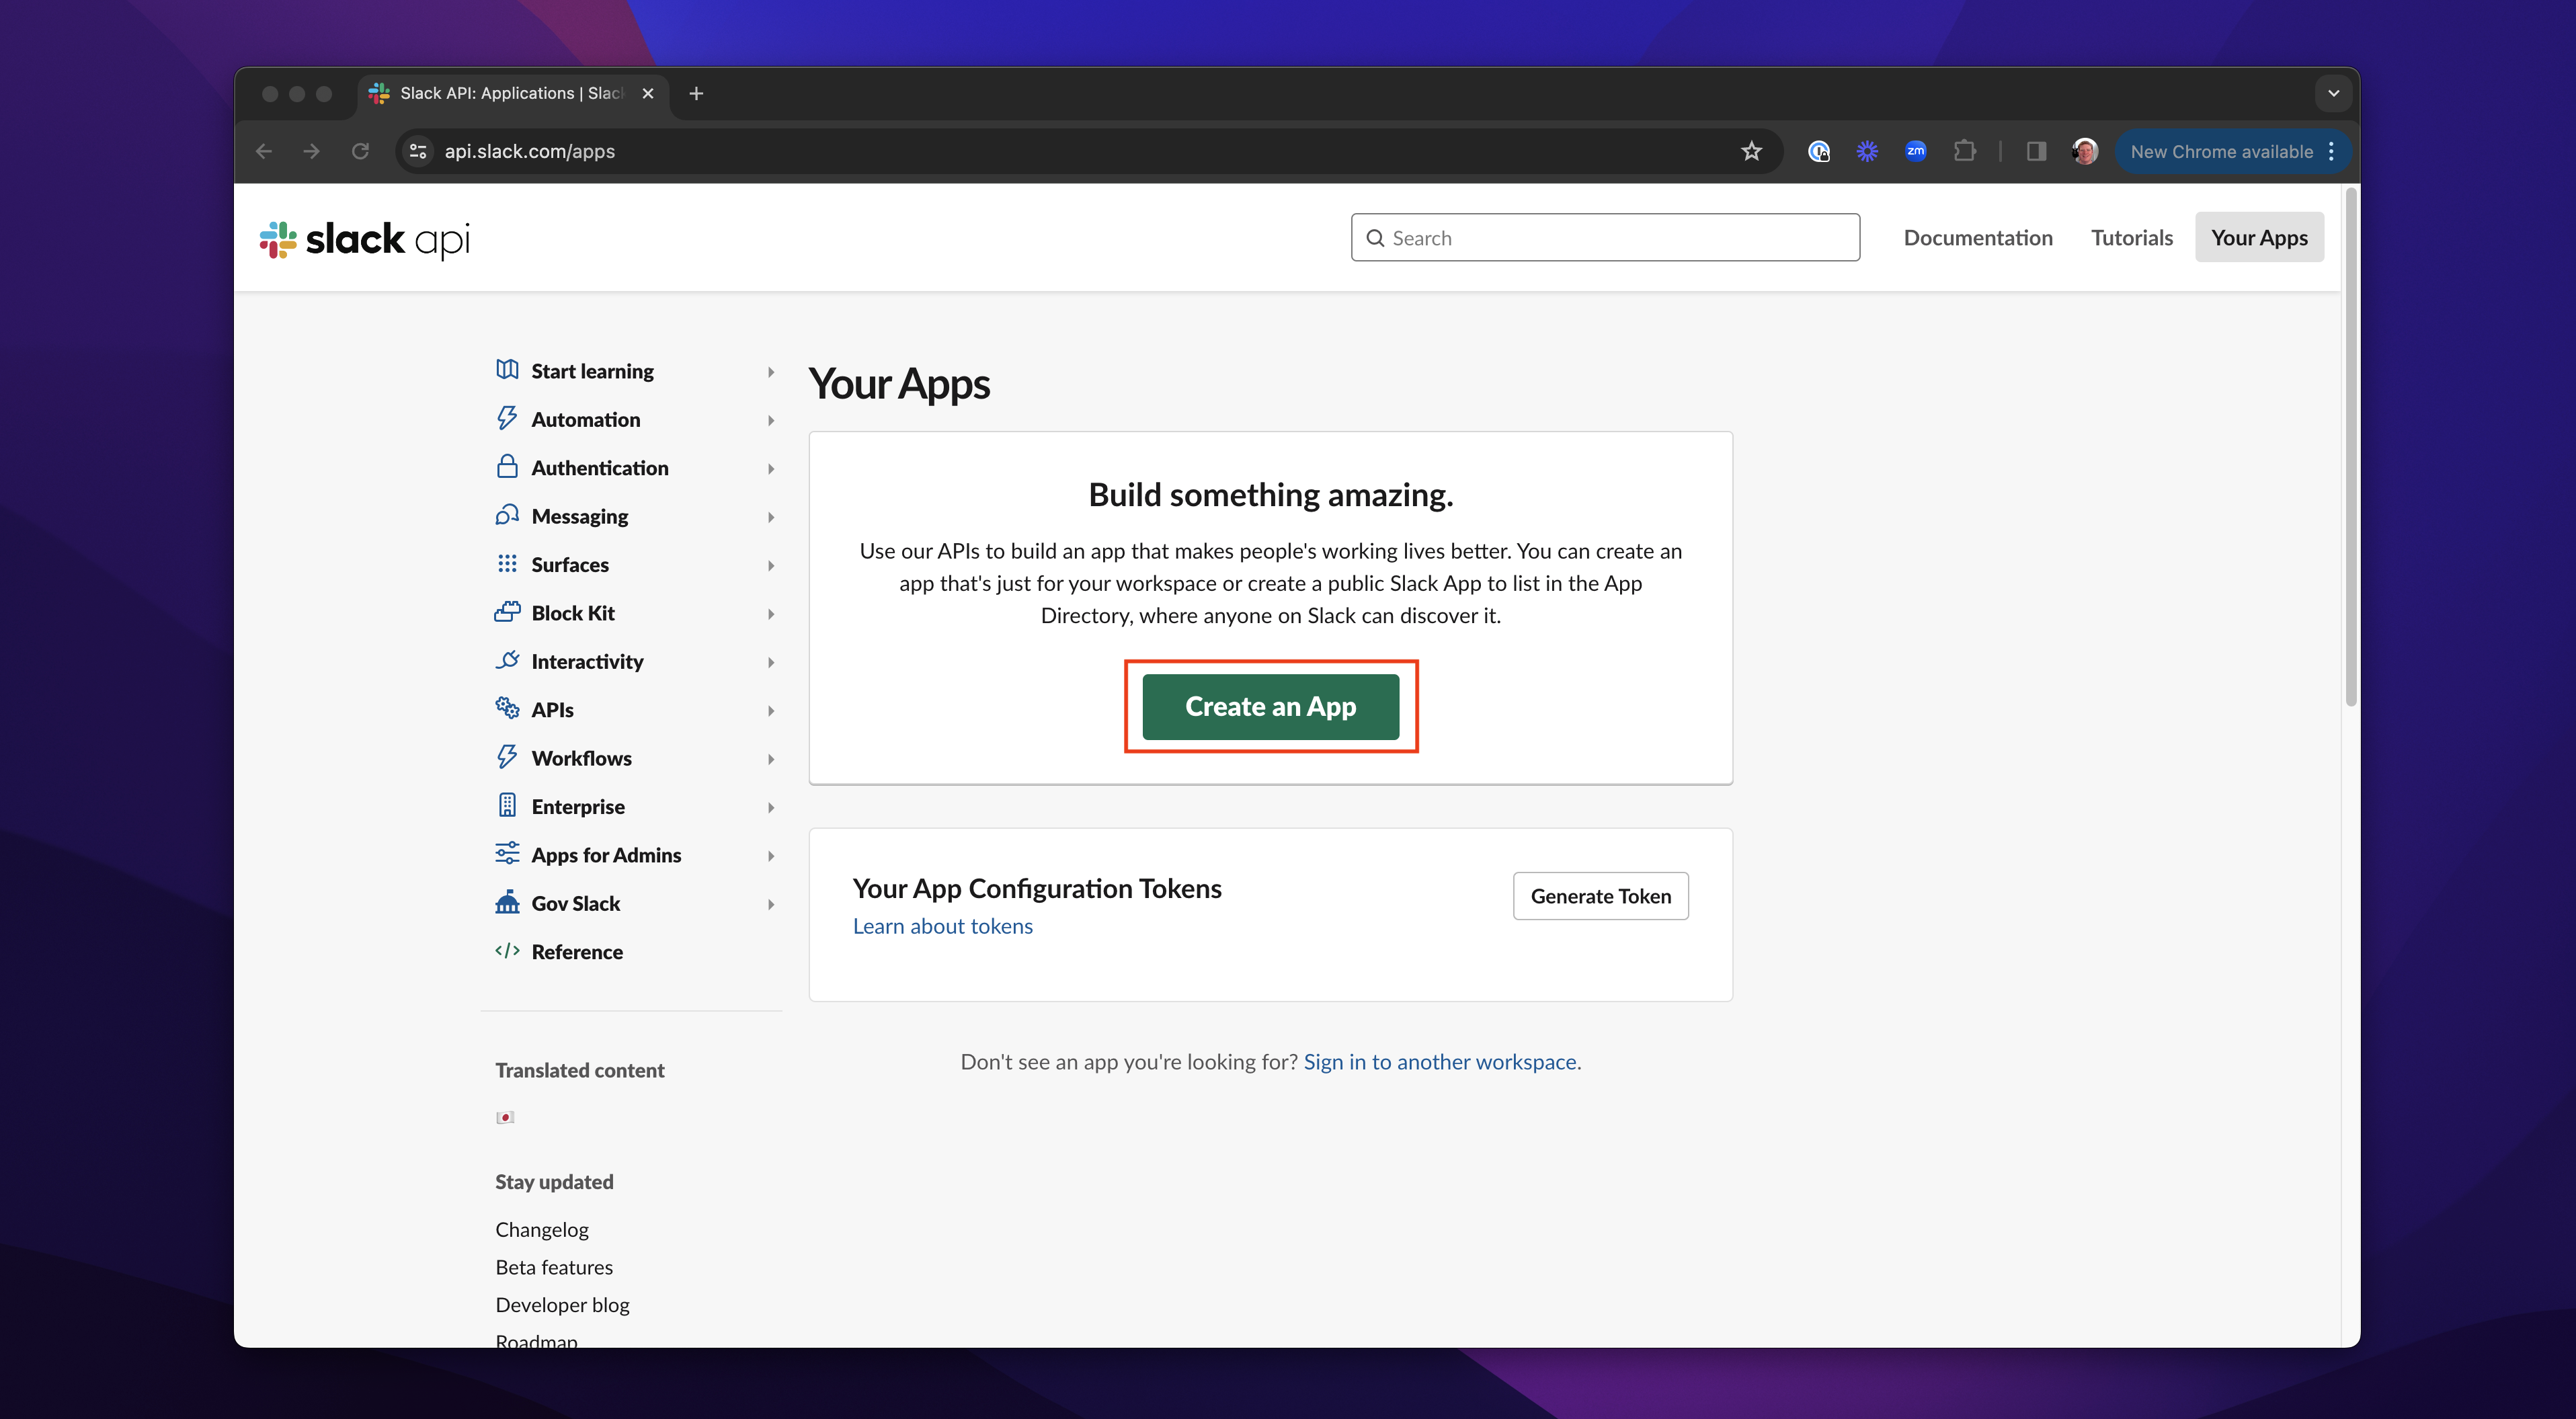
Create a new app
First, visit https://api.slack.com/apps and sign into your account. Then, click Create an App and select the From scratch option. Next, select which workspace to develop it in. You'll still be able to use it in other workspaces, so this selection isn't critical.
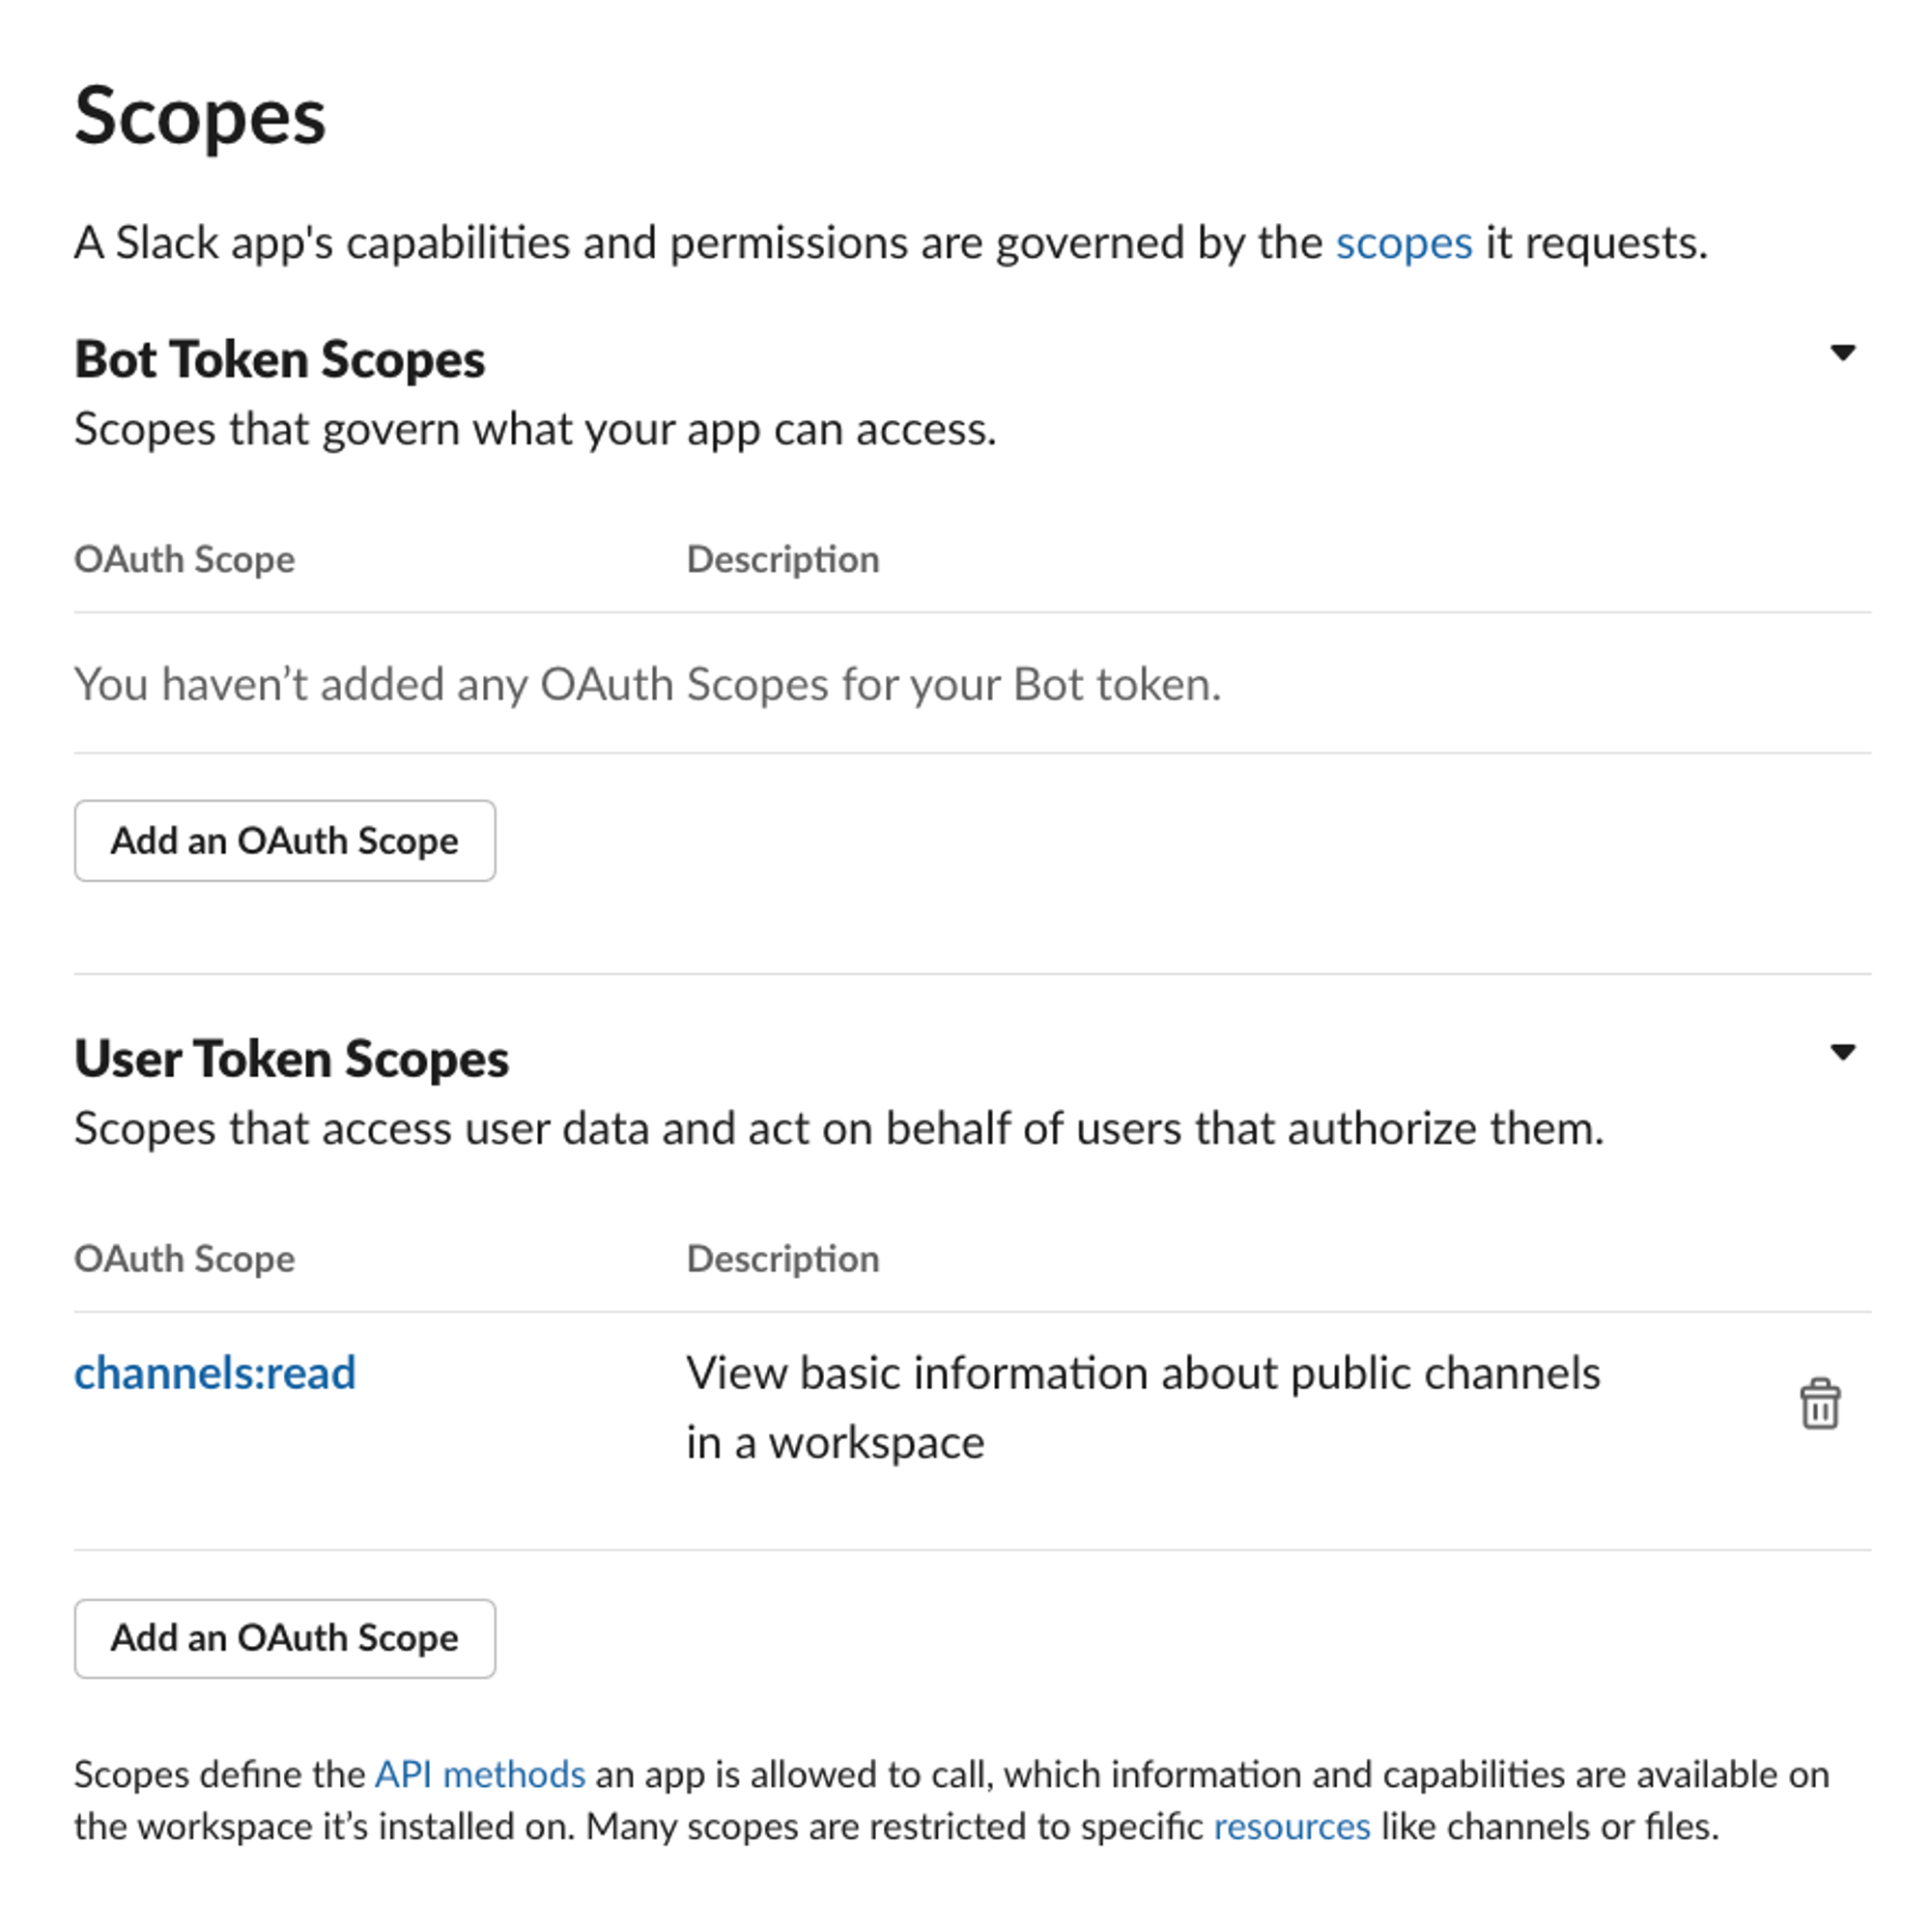
Add bot features
Under Add features and functionality select Bots features. Then, under OAuth and Permissions, give it the channels:read scope. It doesn’t need any scopes here since we’ll be sending the scopes we need from the component, but we need to do this so we can expose the redirect url form.
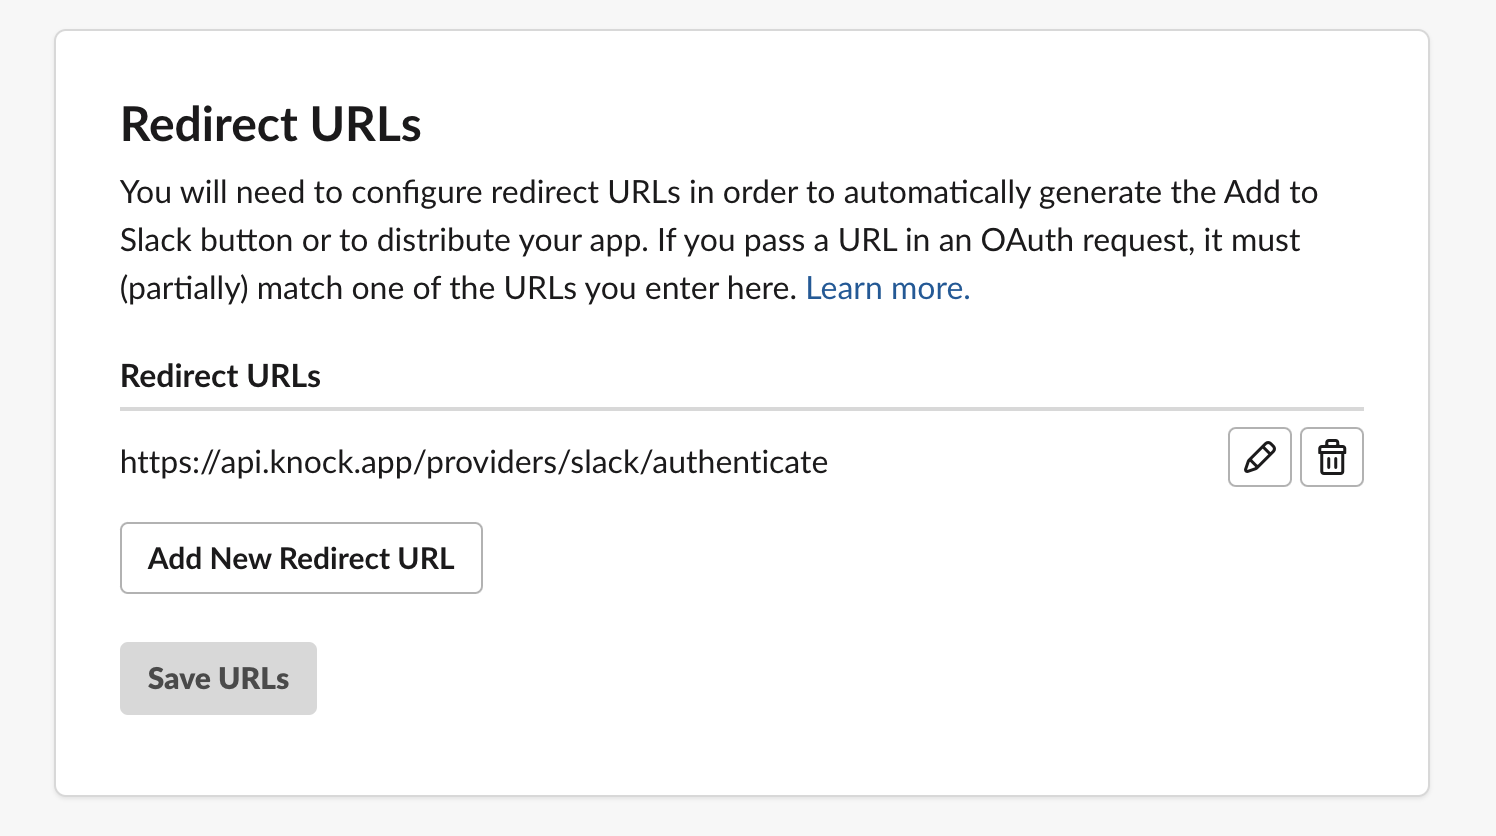
Add redirect URL
Under OAuth and Permissions, find the redirect URL section and add this Knock URL to that field: https://api.knock.app/providers/slack/authenticate. Knock's API endpoint will handle the OAuth callback for you and store a Slack access token. Finally, Under Manage distribution, allow it to be publicly distributed.
Setting up Knock
For this tutorial, you'll need a Knock account. If you don't already have one, you can sign up on this page. You can also find these steps outlined in the official SlackKit docs.
Create a Slack channel
Add a Slack channel in Knock with the Client Id and Client Secret from the Basic Info section of your Slack. Take note of this channel id for use in the next step.
Create a new workflow
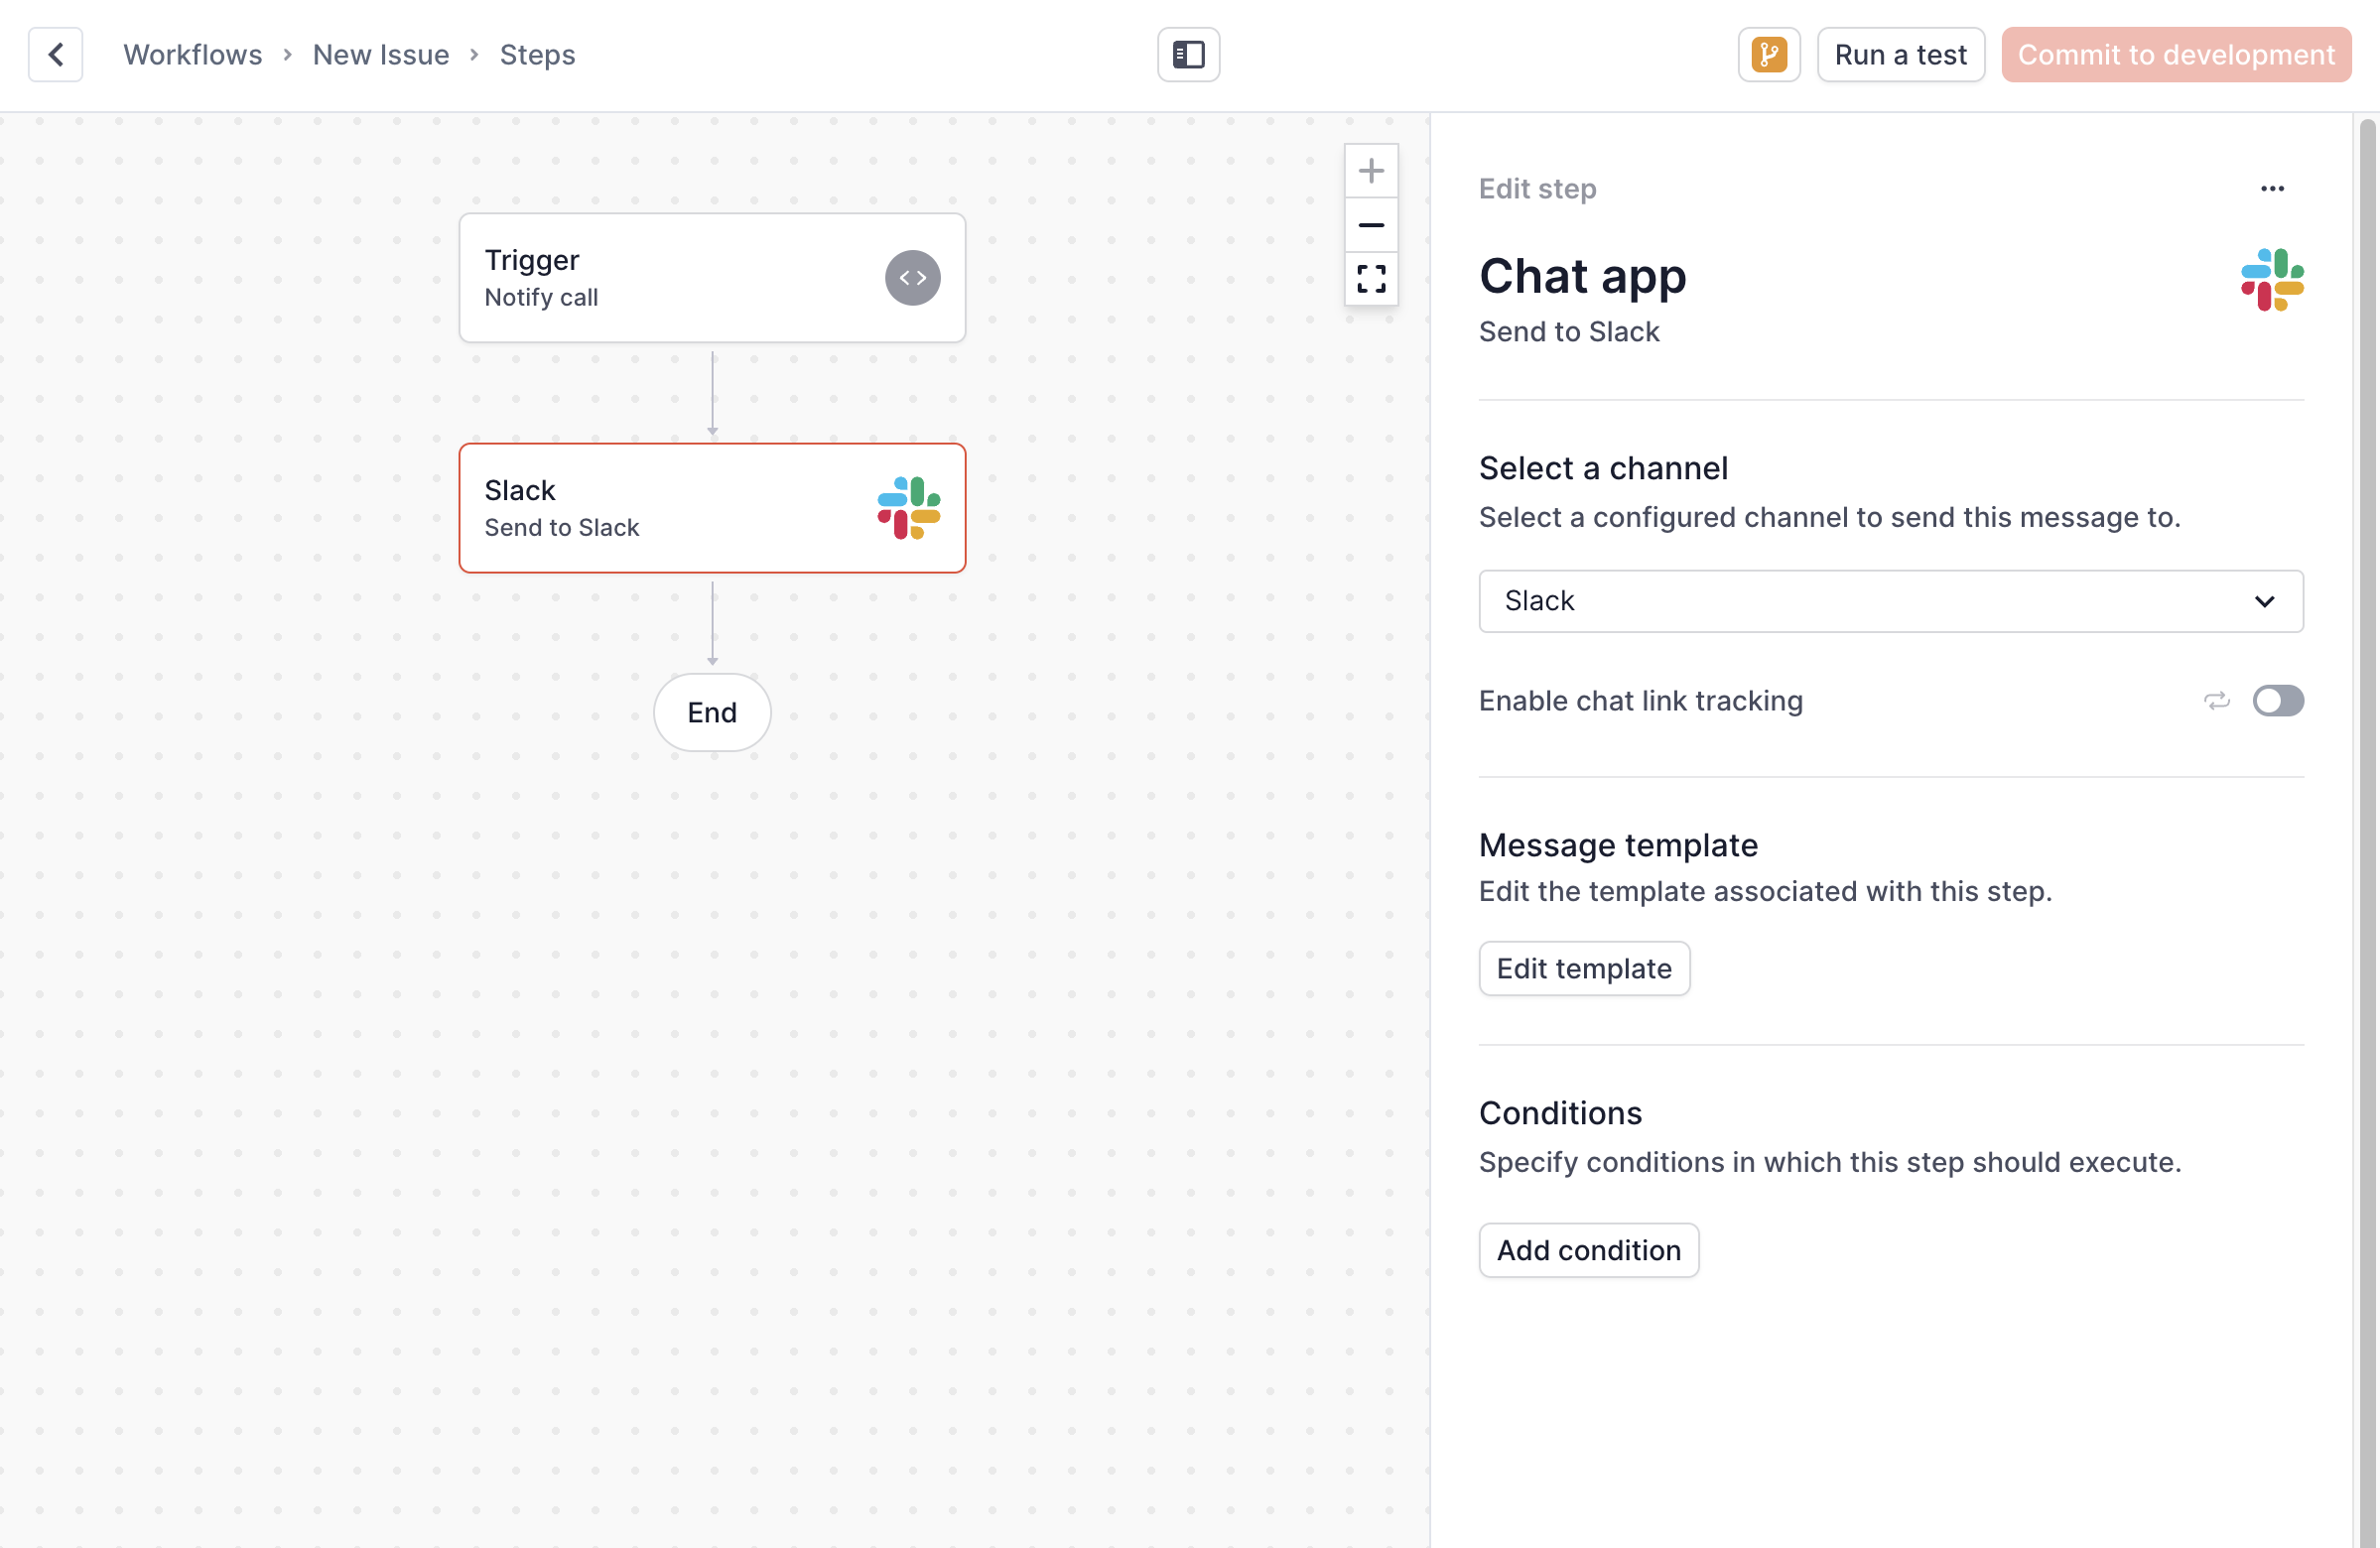
Create a new workflow with a Slack channel step pointing to this Slack channel. Take note of this workflow key for use in the following steps, and the example project uses a default workflow key of new-issue. In the message template use the following liquid tag to send messages: A new issue was submitted: {{message}}
Environment variables
All of these values are sourced from environment variables at runtime. The example app will check for these values as the first step. Make a copy of .env.sample using the following command: cp .env.sample .env.local
NEXT_PUBLIC_KNOCK_SLACK_CHANNEL_ID
This value comes from Knock after you create a Slack channel in the dashboard.
NEXT_PUBLIC_SLACK_CLIENT_ID
This value comes from Slack when you create a new Slack app. You can find it in your app's "Basic Info" section.
KNOCK_SIGNING_KEY
This value comes from Knock and is used to sign a JWT on behalf of a user to store channel data for Slack tokens and channel ids. You can generate a signing key under "Developers" > "API keys." This is a secret value and should not be exposed publicly.
KNOCK_API_KEY
This value comes from Knock and is used to authenticate server-side API requests. You can find it listed as the secret key under "Developers" > "API keys." This is a secret value and should not be exposed publicly.
NEXT_PUBLIC_KNOCK_CLIENT_ID
This value comes from Knock and is used to authenticate public API requests from the browser. You can find it listed as the public key under "Developers" > "API keys."
NEXT_PUBLIC_KNOCK_API_URL
This value comes from Knock and is used to construct the URL for API endpoints. You can keep the default value for this.
NEXT_PUBLIC_REDIRECT_URL
This value comes from your application. It is where Knock will redirect your user after the OAuth flow with Slack. The default of http://localhost:3000 is valid when running this project locally.
Knock resource variables
To make the connection between Slack channels and Knock objects, you'll also need to provide details for several types of resources in Knock. To do this, you can replace the values in the getAppDetails function inside of the /app/lib/app-details.ts file. These values would typically be determined by your application's business logic, but we can hardcode them for this example:
export function getAppDetails() {
  return {
    tenant: "knock-projects",
    collection: "repositories",
    objectId: "repo-2",
    userId: "123",
    workflowKey: "new-issue",
  };
}
You should already have a value for workflowKey from a previous step, and you can choose a user identifier to use from the dashboard.
Create a tenant
In SlackKit, tenants are used to store the access token for an organization's Slack workspace. You can create a new tenant from the dashboard and include its ID as the value for the tenant property in the getAppDetails function. You can also use this cURL command to create a tenant by replacing the values for tenant-id, KNOCK_API_KEY, and tenant-name:
curl --location --request PUT 'https://api.knock.app/v1/tenants/<tenant-id>' \
--header 'Content-Type: application/json' \
--header 'Authorization: Bearer <KNOCK_API_KEY>' \
--data '{
  "name": "<tenant-name>",
}'You do NOT have to create your tenant before using SlackKit. If you pass a tenant ID into the KnockSlackProvider that doesn't exist, SlackKit will create it for you on completion of the OAuth process. However, tenants are an important concept in Knock so we'd recommend reading about these key concepts in the SlackKit overview.
Create an object
In SlackKit, objects are used to store channels and act as the recipient of your workflows. You can't create a new object from the dashboard, so you can use this cURL command to create an object by replacing the values for object-collection, object-id, KNOCK_API_KEY, and object-name:
curl --location --request PUT 'https://api.knock.app/v1/objects/<object-collection>/<object-id>' \
--header 'Content-Type: application/json' \
--header 'Authorization: Bearer <KNOCK_API_KEY>' \
--data '{
    "name": "<object-name>"
}'
Once you've done that, update the values in the getAppDetails function to point to your new object.
You do NOT have to create your object before using SlackKit. If you pass an object ID into the SlackChannelsCombobox that doesn't exist, SlackKit will create it for you on the completion when the user registers a channel. However, objects are an important concept in Knock so we'd recommend reading about these key concepts in the SlackKit overview.
Running the app locally
Now that you have all of the configuration out of the way, you can install your dependencies using one of the following commands:
npm install
#or
yarn install
After your dependencies have installed, you can run the app in dev mode:
npm run dev
#or
yarn dev
If you open the app in a browser at http://localhost:3000 you should see a screen that looks like this:
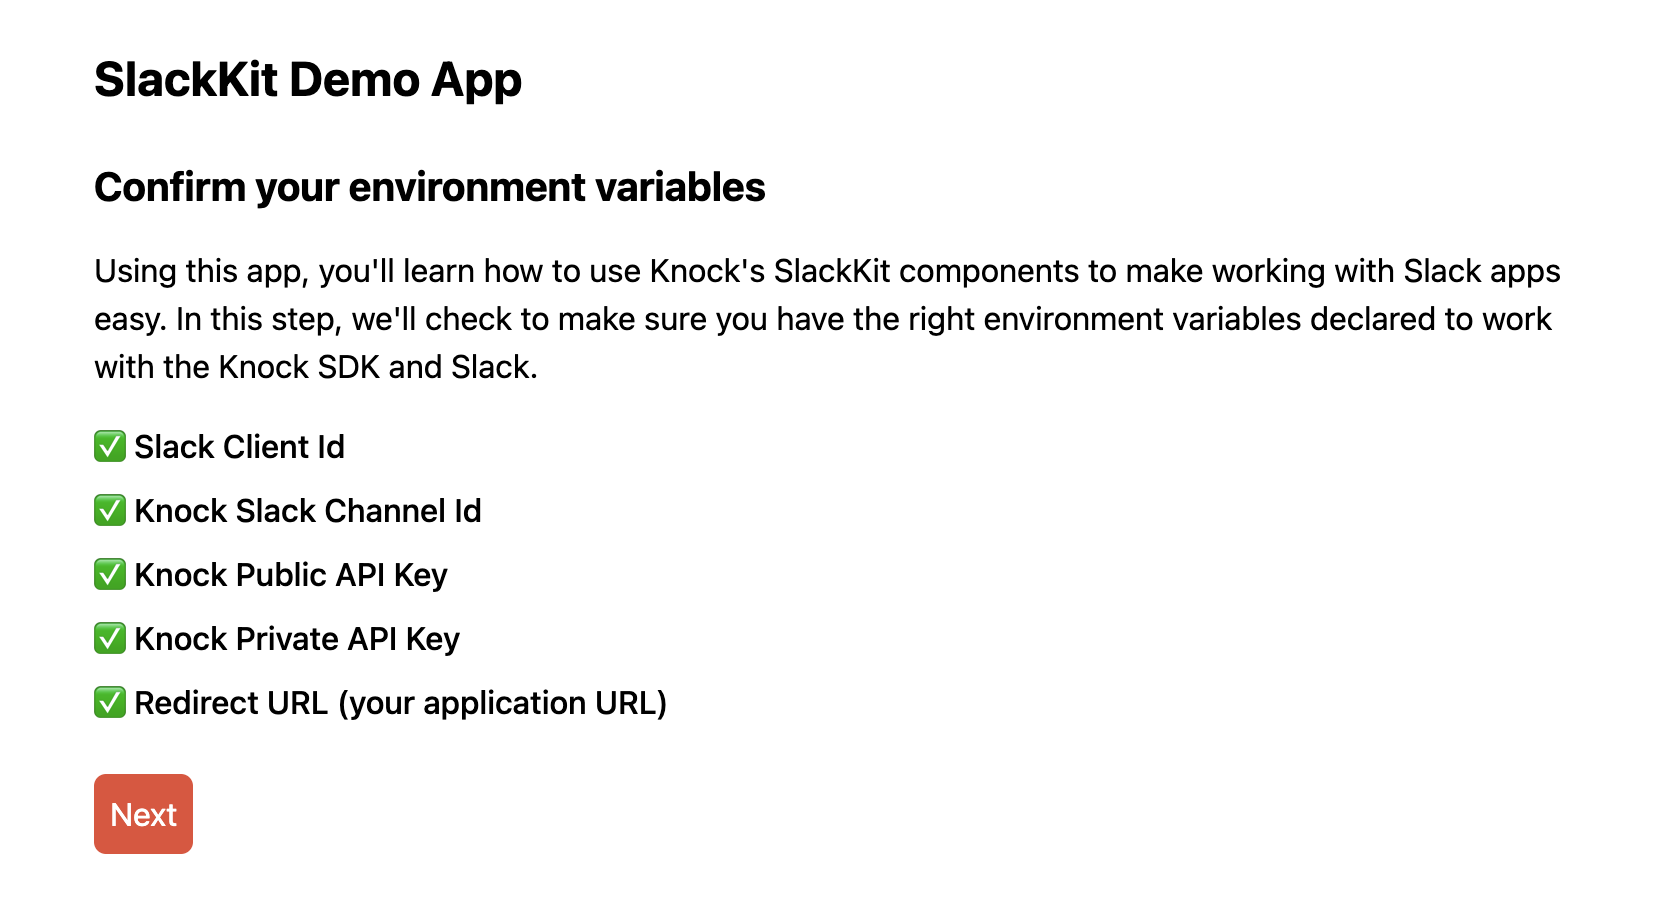
This step gives you an opportunity to confirm that you have all of the necessary environment variables needed to use the application.
If you click Next you'll navigate to a screen where you can confirm the Knock resources you'll use to connect your Slack app:
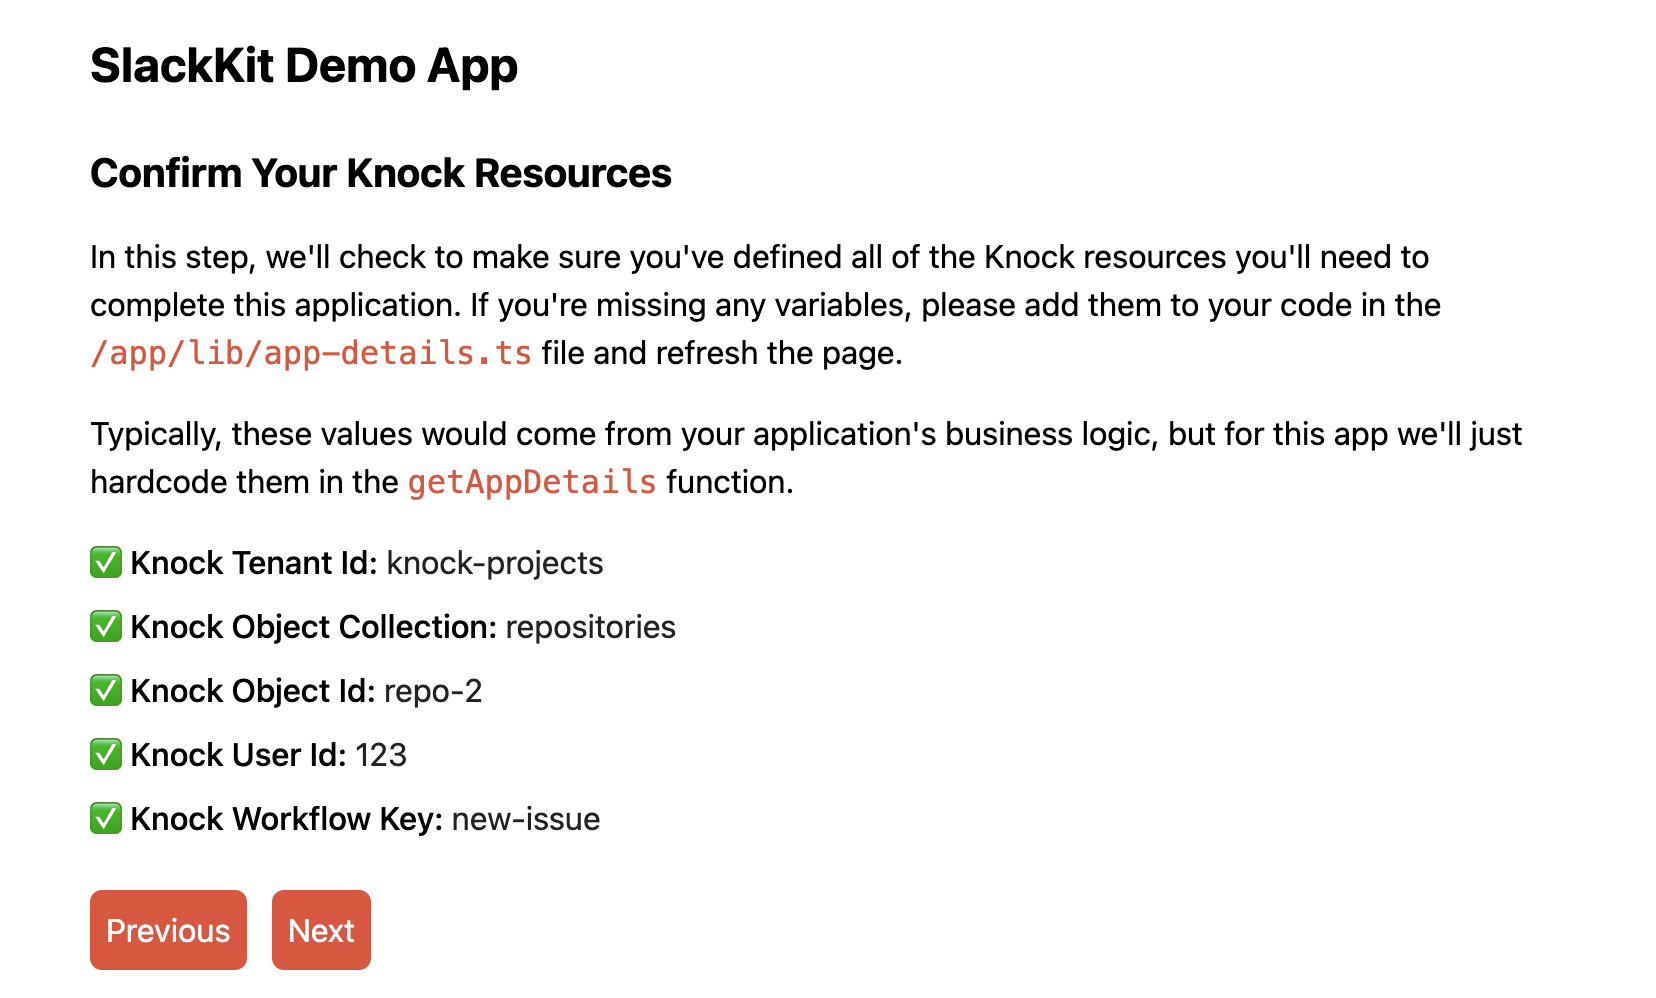
If all of the values in this step look good, you can click Next to authenticate with your Slack app and store the access_token in Knock.
Sharing Knock and Slack state
Before we dig into the actual SlackKit UI components and their functionality, let's look at how we share certain values across those components in our application.
In the @knocklabs/react package, Knock already exposes a KnockProvider component that is meant to provide top-level authentication and authorization to components farther down in the component tree.
With the SlackKit release, the @knocklabs/react package now also contains a Slack-specific provider, called KnockSlackProvider. Since these both rely on React context, they are implemented as client-side components in /app/components/providers.tsx in the following manner:
"use client";

import { KnockProvider, KnockSlackProvider } from "@knocklabs/react";

export default function Providers({
  userToken,
  knockUserId,
  tenant,
  children,
}: {
  userToken: string;
  knockUserId: string;
  tenant: string;
  children: JSX.Element;
}) {
  return (
    <>
      <KnockProvider
        apiKey={process.env.NEXT_PUBLIC_KNOCK_CLIENT_ID!}
        userId={knockUserId}
        host={process.env.NEXT_PUBLIC_KNOCK_API_URL}
        userToken={userToken}
      >
        {/*
        The KnockProvider handles authentication with Knock, while the KnockSlackProvider
        provides shared context to all Slack-related components.
        Both are required for Slack-related apps.
        */}
        <KnockSlackProvider
          knockSlackChannelId={process.env.NEXT_PUBLIC_KNOCK_SLACK_CHANNEL_ID!}
          tenant={tenant}
        >
          {children}
        </KnockSlackProvider>
      </KnockProvider>
    </>
  );
}
To create some of the necessary authentication data, like userToken and userId, we implement the Providers component inside of the root layout.tsx file. In this code, which runs on the server, we also add some additional grants to the userToken JWT to allow the user to interact with the Slack resources stored in Knock. You can read more about these resource access grants in the docs.
Note: this is necessary because the user in this context is an end user in your application who does not have access to Knock as a member of the account. Therefore, these grants provide them elevated privileges to operate on specific resources using the API.
import { Knock } from "@knocklabs/node";
import { Grants } from "@knocklabs/node/dist/src/common/userTokens";
import "@knocklabs/react/dist/index.css";

import Providers from "./components/providers";
import "./global.css";
import { getAppDetails } from "./lib/app-details";

const { userId, tenant, collection, objectId } = getAppDetails();

const signingKey = process.env.KNOCK_SIGNING_KEY!;

async function MyApp({ children }: { children: React.ReactElement }) {
  //Generate a production build in CI/CD even if we're missing the env vars
  const userToken = signingKey
    ? await Knock.signUserToken(userId, {
        grants: [
          Knock.buildUserTokenGrant({ type: "tenant", id: tenant }, [
            Grants.SlackChannelsRead,
          ]),
          Knock.buildUserTokenGrant(
            { type: "object", id: objectId, collection: collection },
            [Grants.ChannelDataRead, Grants.ChannelDataWrite]
          ),
        ],
      })
    : "secretOrPrivateKey";

  return (
    <>
      <html lang="en">
        <body className="px-12 py-6">
          <h1 className="text-2xl font-bold mb-6">SlackKit Demo App</h1>
          <Providers userToken={userToken} knockUserId={userId} tenant={tenant}>
            {children}
          </Providers>
        </body>
      </html>
    </>
  );
}

export default MyApp;
Authenticating with Slack
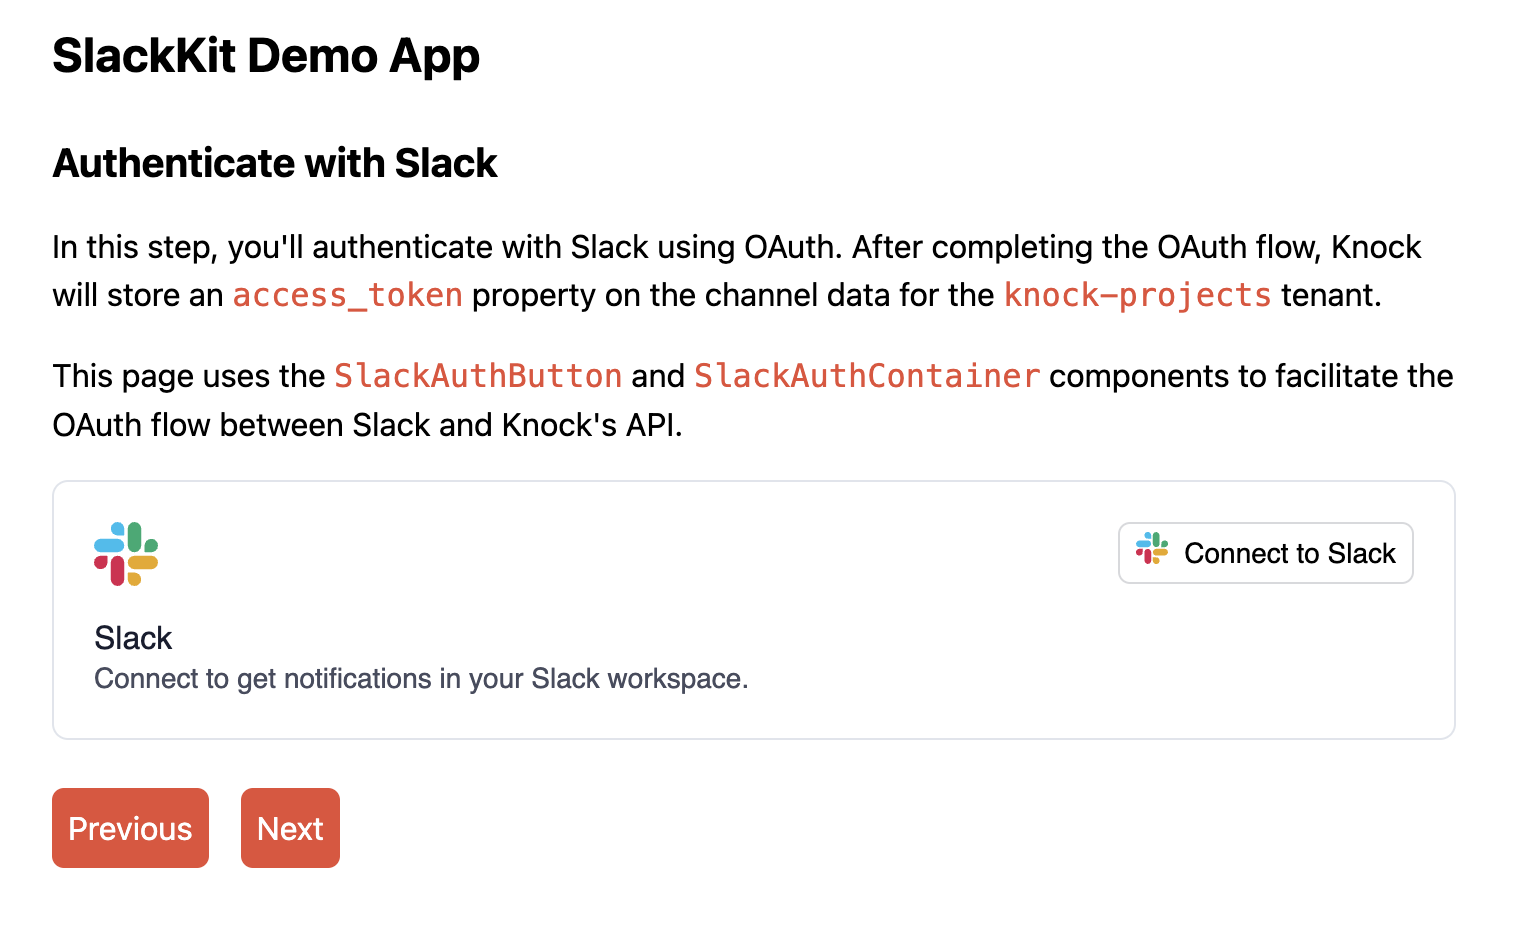
On this screen, you can initiate the OAuth flow with Slack. This page uses two SlackKit components to help facilitate this interaction: SlackAuthButton and SlackAuthContainer.
Both of these components are client-side components. The SlackAuthButton component takes your redirectUrl and slackClientId as props:
<SlackAuthContainer
  actionButton={
    <SlackAuthButton
      slackClientId={process.env.NEXT_PUBLIC_SLACK_CLIENT_ID!}
      redirectUrl={process.env.NEXT_PUBLIC_REDIRECT_URL}
      onAuthenticationComplete={onAuthComplete}
    />
  }
/>
When this button is clicked, it will initiate an OAuth flow in a pop-up window where the user can authenticate with Slack and choose a workspace to install the app. Once the flow is complete, the pop-up window should close and the state of the component should update to show it is Connected to Slack. Behind the scenes, Knock handles the OAuth callback from Slack and stores an access_token on the tenant you provided to the KnockSlackProvider as channel data.
Note: if the pop-up window does not close, double check that the
redirectUrl matches your current environment.
From here, you can click Next to choose one or more Slack channels to associate with your object recipient.
Choosing Slack channels
On this route, you can associate your Knock object recipient with one or more Slack channels using the SlackChannelCombobox component. It accepts a slackChannelsRecipientObject as a prop that specifies a collection and objectId for the recipient object:
"use client";

import { SlackChannelCombobox } from "@knocklabs/react";

export default function SlackChannelWrapper({
  collection,
  objectId,
  className,
}: {
  collection: string,
  objectId: string,
  className: string,
}) {
  const slackChannelsRecipientObject = {
    objectId: objectId,
    collection: collection,
  };
  return (
    <div className={className}>
      <SlackChannelCombobox
        slackChannelsRecipientObject={slackChannelsRecipientObject}
      />
    </div>
  );
}
As you select channels using the combobox input, the component will update the channel data for that object to store the Slack channel ids.
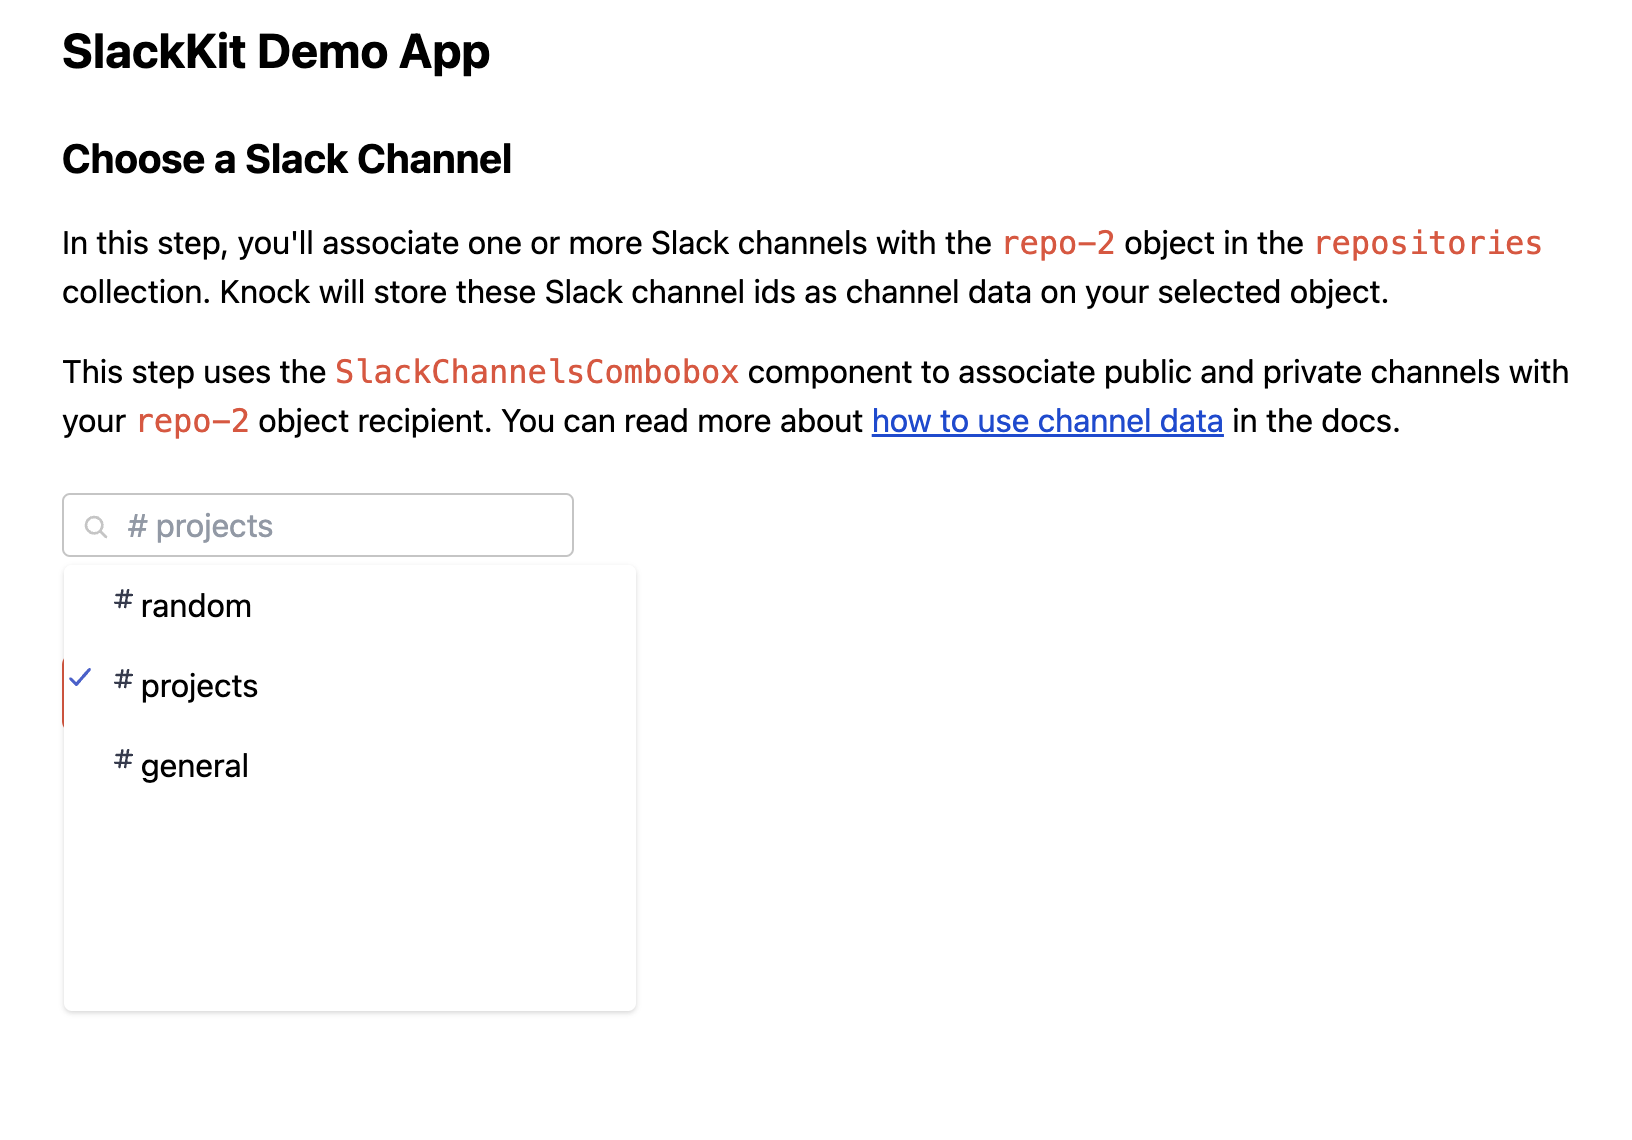
Note: if you want to use a private Slack channel, you need to make sure that the Slack Bot has been invited to that channel.
At this point, Knock has all of the information it needs to send Slack messages to your selected channels. Click Next to examine the channel data for your object and tenant.
Examine channel data
In this step, you're not required to take any action, but this page uses the Node SDK to pull channel data for your object recipient and tenant. This will give you an idea of how Knock is storing the data and how these two abstractions interact.
This data is pulled dynamically, so if you make different channel selections or disconnect and reconnect your Slack auth, the value for access_token and connections.channelIds will change as well.
If you click Next you can test your workflow end-to-end.
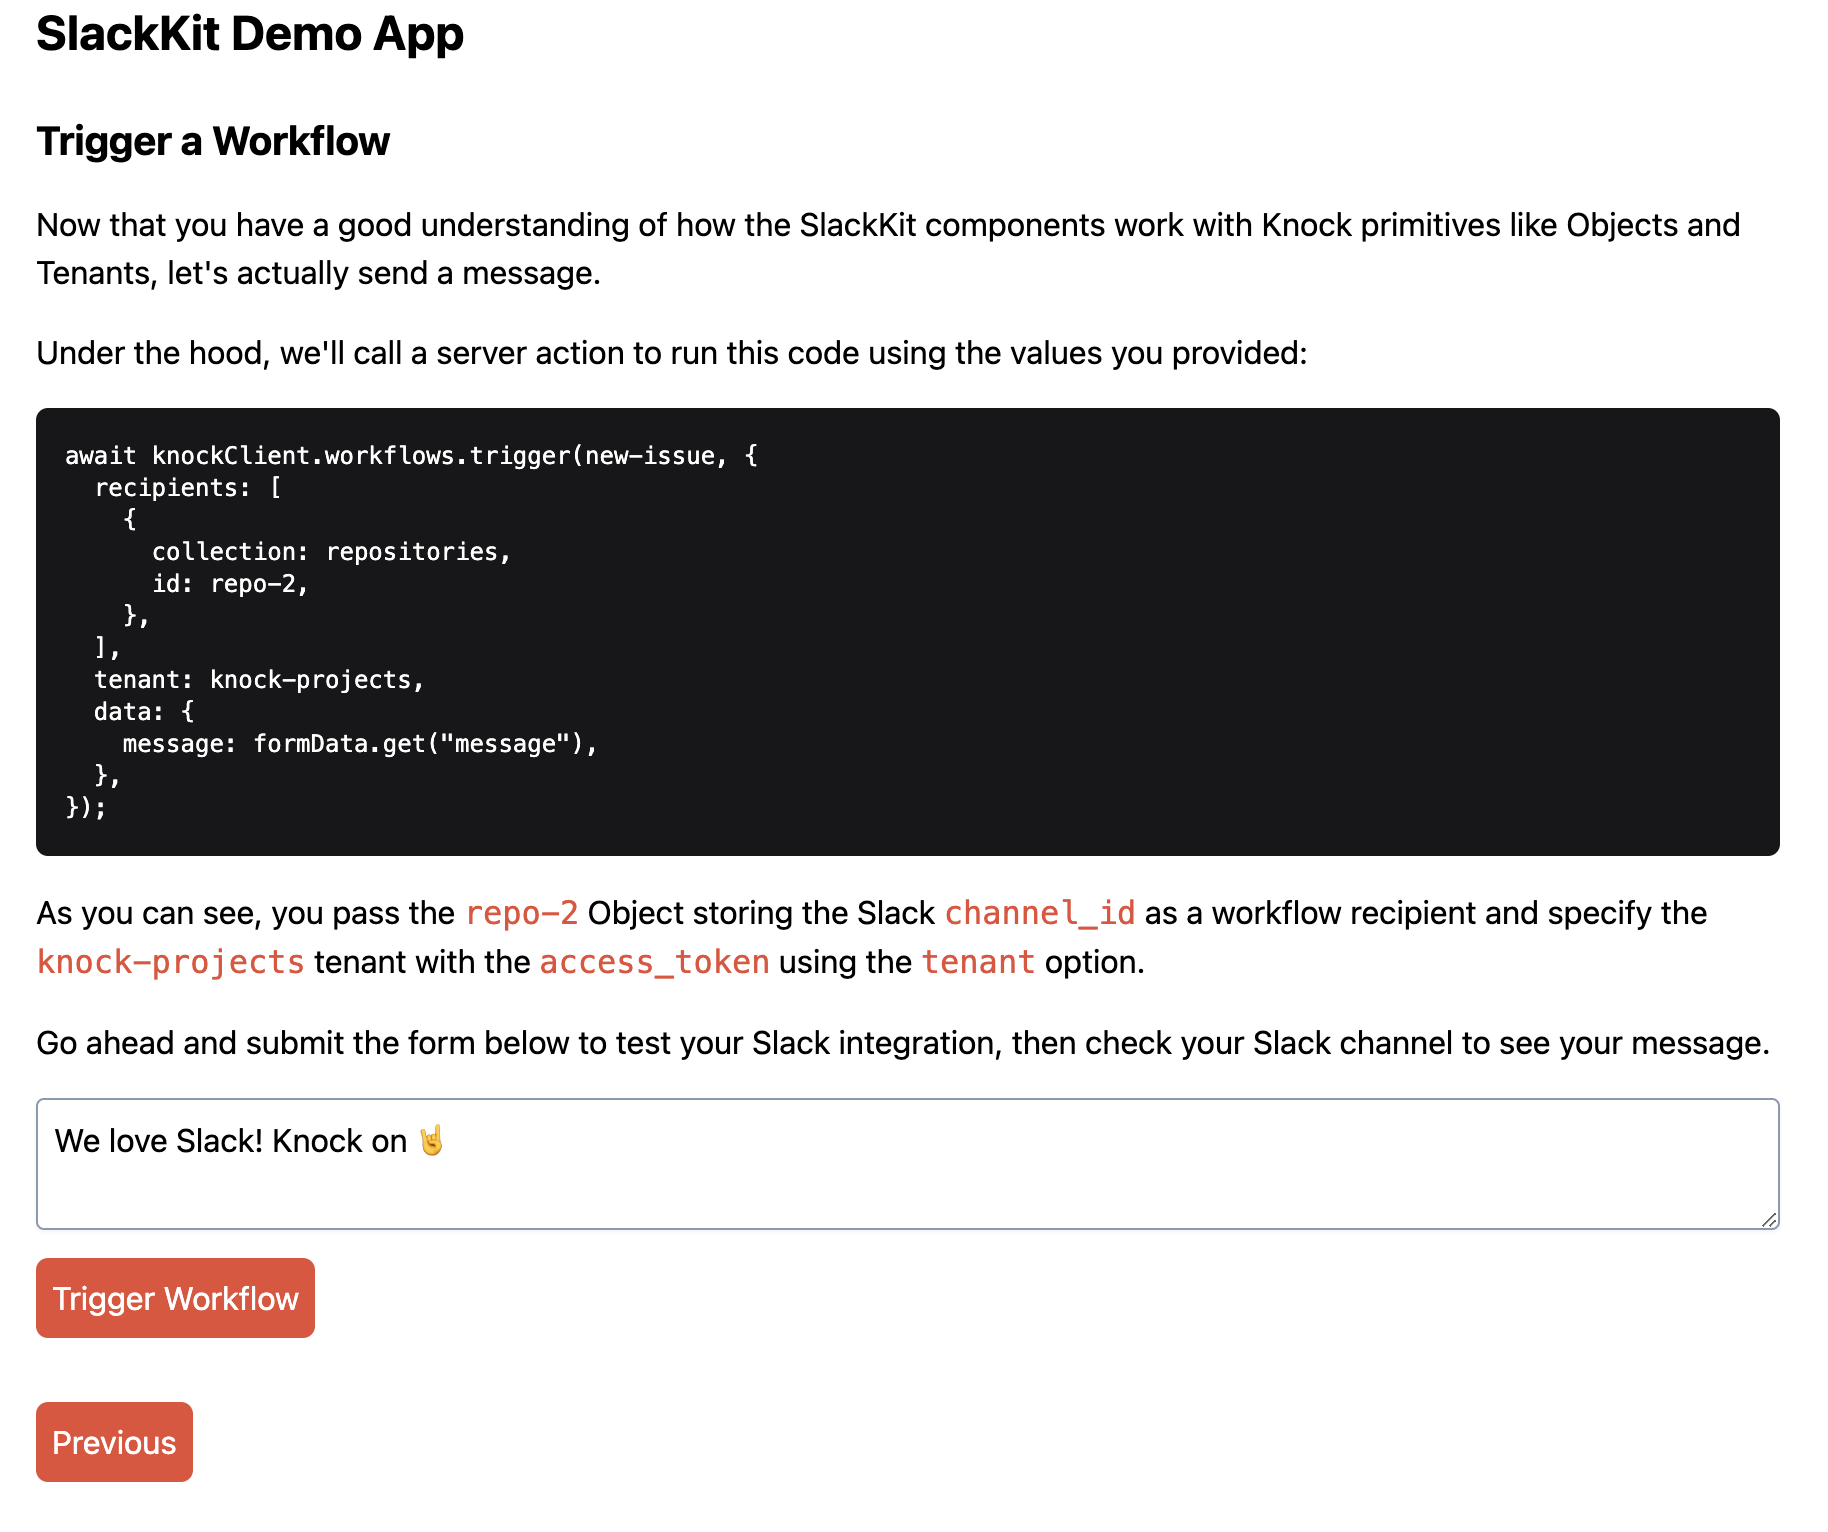
Trigger your workflow
In this step, you can see a code sample using the Node SDK of how you'd trigger your workflow. This is actually the code that runs in a server action when you submit the form on this page. Go ahead and submit a form to send a Slack message into your designated channels:
Wrapping up
If you need help implementing any of the code in this example app, consider joining our Slack community. We've got over 500 other developers learning how to improve their notification experiences with Knock.
Thanks for reading and Knock on 🤘