Webhooks are a crucial component in the modern SaaS ecosystem, enabling communication between different services by sending real-time data. Webhooks make your product more useful by allowing customers to create integrations without you having to build them yourself. However, poorly designed webhooks become a support headache for your team.
As you plan your own architecture, it’s important to consider how you’ll secure your webhooks, make them reliable and fault tolerant, and give developers enough access to debug their connections.
You can read more about why and how we developed our own customer-facing webhooks at Knock and approached the build vs. buy decision.
In this article, we’ll look at a few best practices around designing customer-facing webhook features for your users, and then we’ll walkthrough how you can build those features in an example app using Next.js and Knock’s notification infrastructure.
Best practices in designing webhooks
If you provide developers self-service webhooks, you should think about implementing some affordances to make sure they are secure, reliable, and easy to use. Companies like Stripe and WorkOS have documented best practices around webhook design that we used when approaching our own outbound webhooks, and we’ll use them to inform our discussion of what a ‘great’ webhook experience should look like.
Let’s cover a few best practices for creating self-service webhooks for your SaaS product: signing and verifying webhooks, implementing retries, and providing debug logs.
Signing and verifying webhooks
Security is a top concern when dealing with webhooks. A study by ngrok found that almost “1 in 3 webhook implementations lack or present weak authentication or message validation mechanisms.” Without proper security measures, your webhooks can be vulnerable to tampering or unauthorized access. Signing webhooks and verifying their signatures ensures that the data received is authentic and hasn’t been altered in transit.
Generate a secret key
For each webhook endpoint a user creates, generate a unique secret key. This key will be used to sign the payload.
Sign the payload
When sending a webhook, create a hash of the payload using the secret key and a hashing algorithm (e.g., HMAC with SHA-256). Include this signature in the request headers. For example, Knock includes this signature in the x-webhook-signature header when request signing is enabled.
Verify the signature
On the receiving end, use the same secret key to generate a hash of the received payload and compare it to the signature sent in the headers. If they match, the payload is authentic. In some implementations, like Stripe and Knock for example, the request header may contain additional data like a timestamp to help you determine authenticity. It’s important that you provide clear instructions to your user on how to extract and validate the signature.
Implementing Retries
Network issues and server downtime are an inevitable part of delivering modern software. To ensure the reliable delivery of webhooks, you should implement a retry mechanism that reattempts delivery if the initial attempt fails. This typically involves adding some additional logic to the service that sends your webhook events.
Track Delivery Attempts
Maintain a log of each delivery attempt, including timestamps, response statuses, request headers, and payload. Since you’ll need this data to display debug logs for delivery attempts, it would be helpful to consider how you’ll store these attempts and their associated data to support your entire use case.
Set Retry Policies
Define your retry policies, such as the number of retries, the interval between retries, and the backoff strategy (e.g., exponential backoff). For example, Knock will retry delivery up to 8 times over a thirty minute period using an exponential backoff strategy with jitter.
There are a lot of good resources on implementing timeouts and other backoff strategies, but if you have the ability to send a high volume of webhooks to your clients you should consider adding jitter to your backoff strategy. Jitter introduces an element of randomness to your retries to avoid too many retries happening at the same time, which can overwhelm a server at high volume.
Implement Retry Logic
Incorporate the retry logic in your webhook delivery service. If a delivery fails, wait for the specified interval before retrying. Continue until the maximum number of retries is reached or the delivery succeeds.
Providing Debug Logs
Debug logs are invaluable for troubleshooting issues with webhook delivery. They provide insight into the webhook events, payloads, delivery attempts, and responses, helping both your team and your users diagnose and resolve problems quickly. This is even more important when creating self-service webhooks, since you want your customers to be able to create and troubleshoot connections without involving support.
Log payloads and responses
For each webhook event, log the payload, the URL it was sent to, the response status, and any error messages. It could also be useful to log headers on the webhook request so that your users can inspect them.
Provide user access to logs
Allow users to access their webhook logs through your SaaS platform. This can be a dedicated section in your user interface where users can view logs related to their webhooks.
Monitor and alert
Set up monitoring and alerting for webhook failures. This proactive approach helps in quickly identifying and addressing issues before they escalate. For example, Knock will send message delivery status webhooks that your application could ingest. If a message.undelivered event happens on a webhook channel, you could alert that user to the failed webhook request.
Building webhook UI with Next.js
Now that you have a good understanding of what’s required of a customer-facing webhook interface, let’s look at how to build that with Next.js and shadcn/ui. This example app builds on this guide from the official docs. It provides you an easy way to implement the steps outlined there and demonstrates how to create debugging logs for developers using Knock's APIs.
The app itself is built with Next.js and shadcn/ui using server components to render the interface and server actions to trigger actions in Knock using the Node SDK.
Video walkthrough
If you prefer to learn with video, watch it here.
Getting started
To get started, you can clone this repository with the following command and then install the dependencies:
git clone https://github.com/knocklabs/customer-facing-webhooks-example.git
npm install
Next, you'll want to create a new copy of the .env.sample file to use in your project:
cp .env.sample .env.localFrom here, you'll need to provide values for the following environment variables. You may also need to create a few resources in Knock:
| Env Var | Description |
|---|---|
| KNOCK_API_KEY | This value comes from Knock and is used to authenticate server-side API requests. You can find it listed as the secret key under "Developers" > "API keys." This is a secret value and should not be exposed publicly. |
| KNOCK_WEBHOOK_CHANNEL_ID | This value comes from Knock after you create a webhook channel in the "Integrations" section of the dashboard. |
| KNOCK_WEBHOOK_COLLECTION | This value will provide the name for your collection of webhook configuration objects. You can use 'webhooks' as a default if you're using this as a PoC |
| KNOCK_WEBHOOK_WORKFLOW_KEY | This value comes from Knock after you create the workflow that will generate your webhook messages. |
| KNOCK_TENANT_ID | This value corresponds to a tenant in Knock, which may also be known as account or organization in your application data model. |
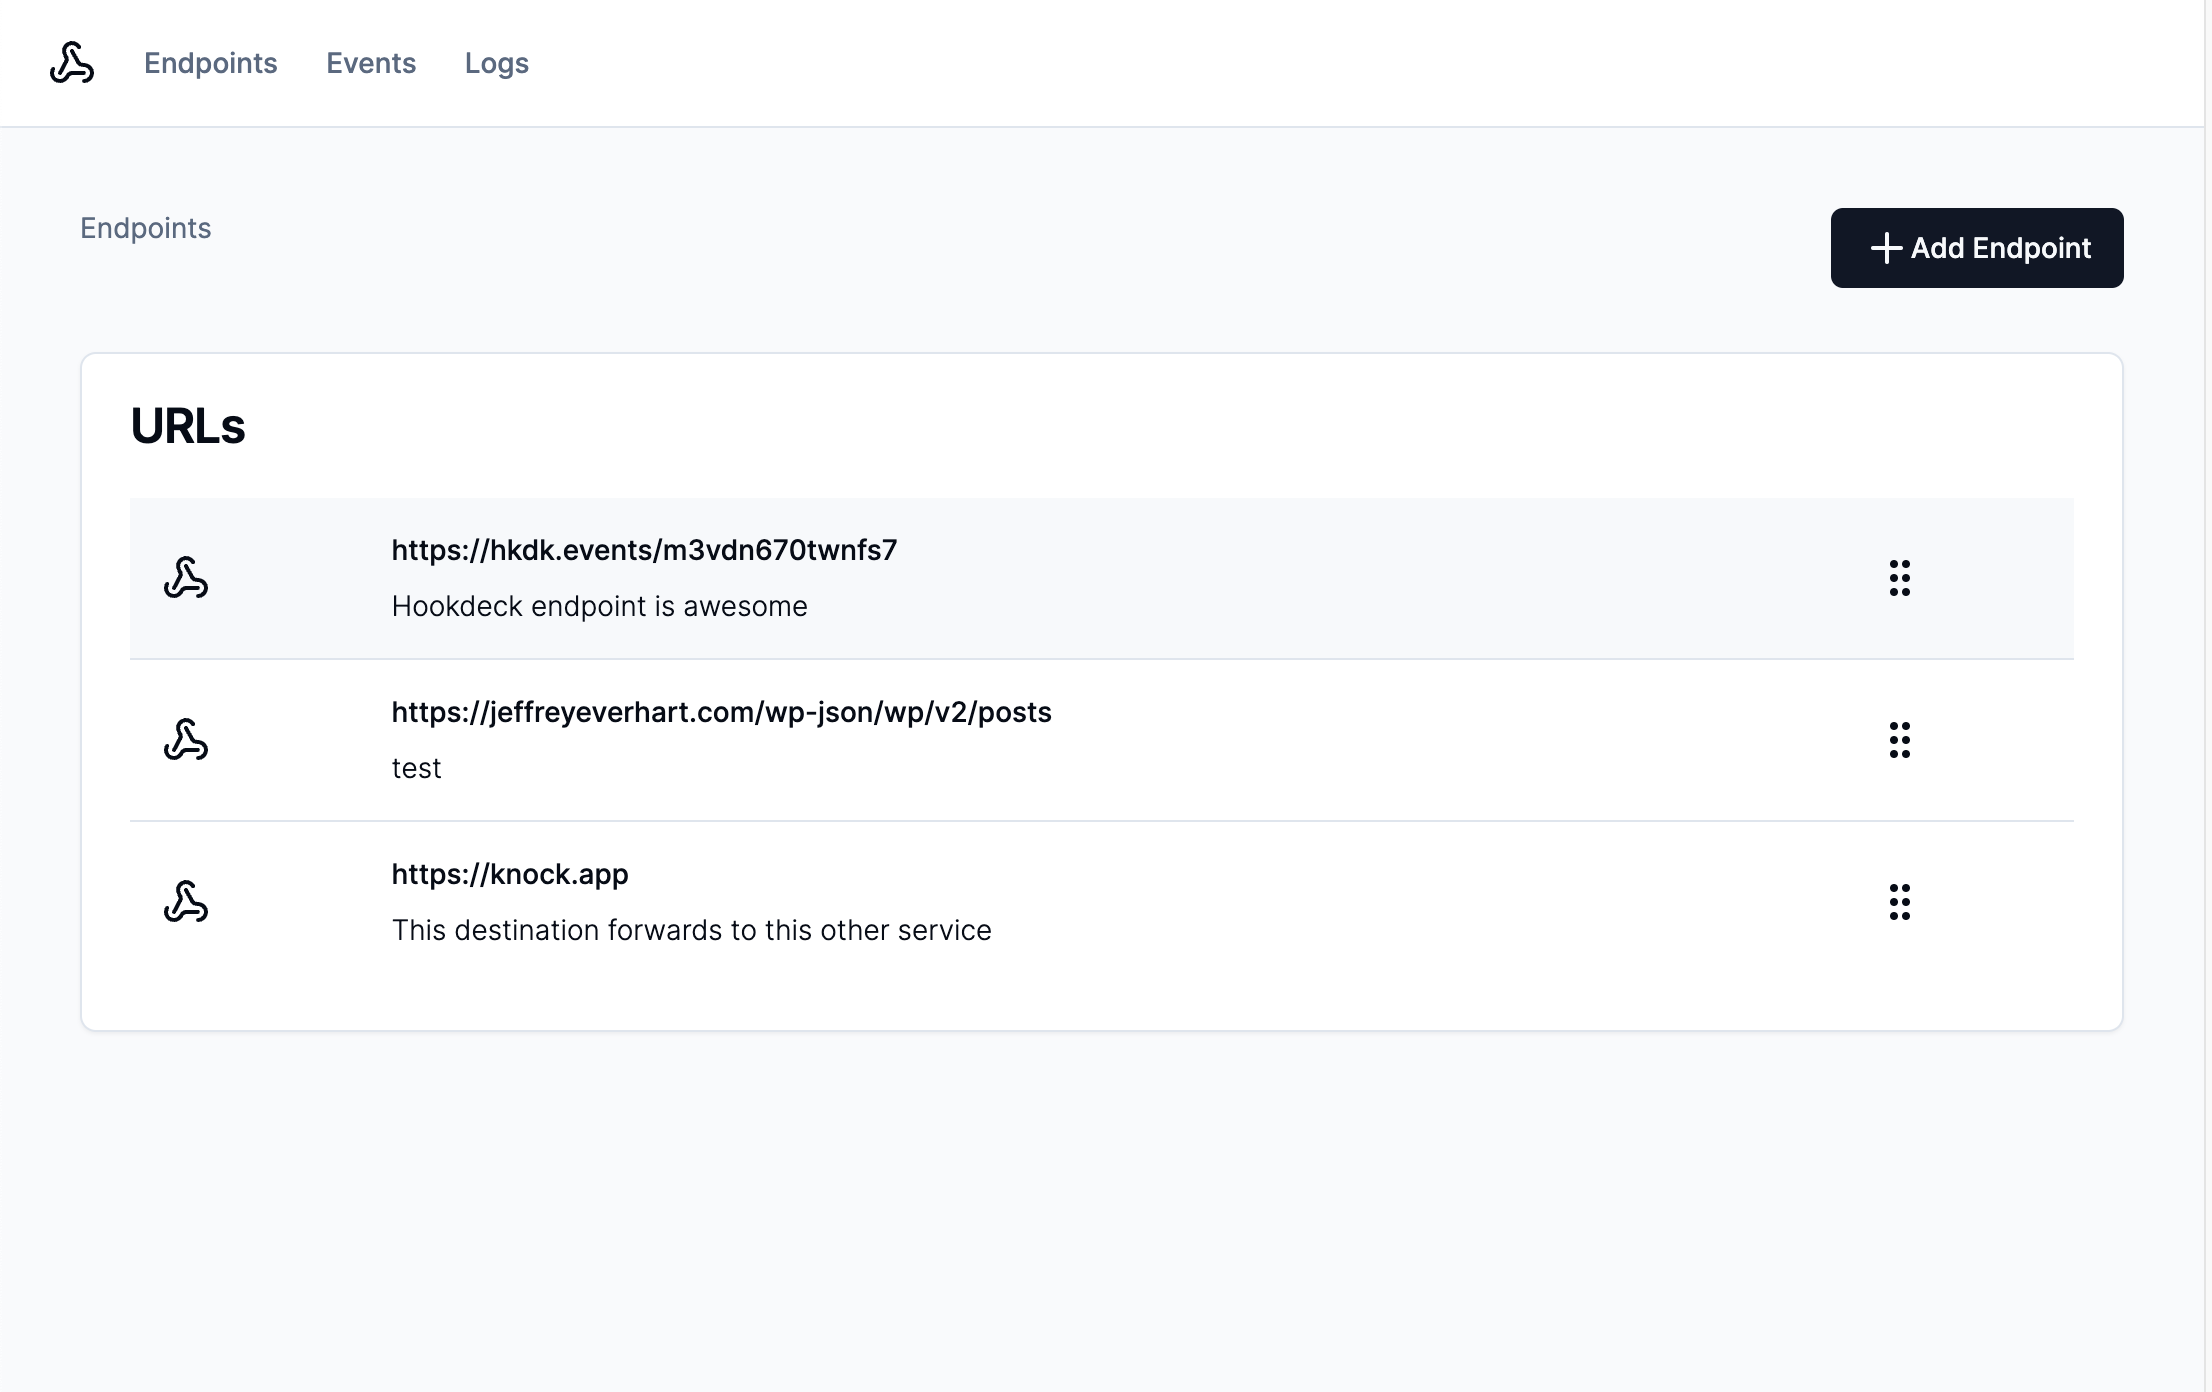
Modeling webhook connections with objects in Knock
In this section, we will explore how to model webhook connections using objects in Knock. In Knock, you can think of Objects as a NoSQL data store for non-user entities. In other words, you can create JSON-shaped entities inside of collections that map to parts of your application's data model.
In this app, we'll create an entity inside of the webhooks collection to store information about the webhook endpoint. Each object can have custom properties like a url or an array of events the webhook is subscribed to.
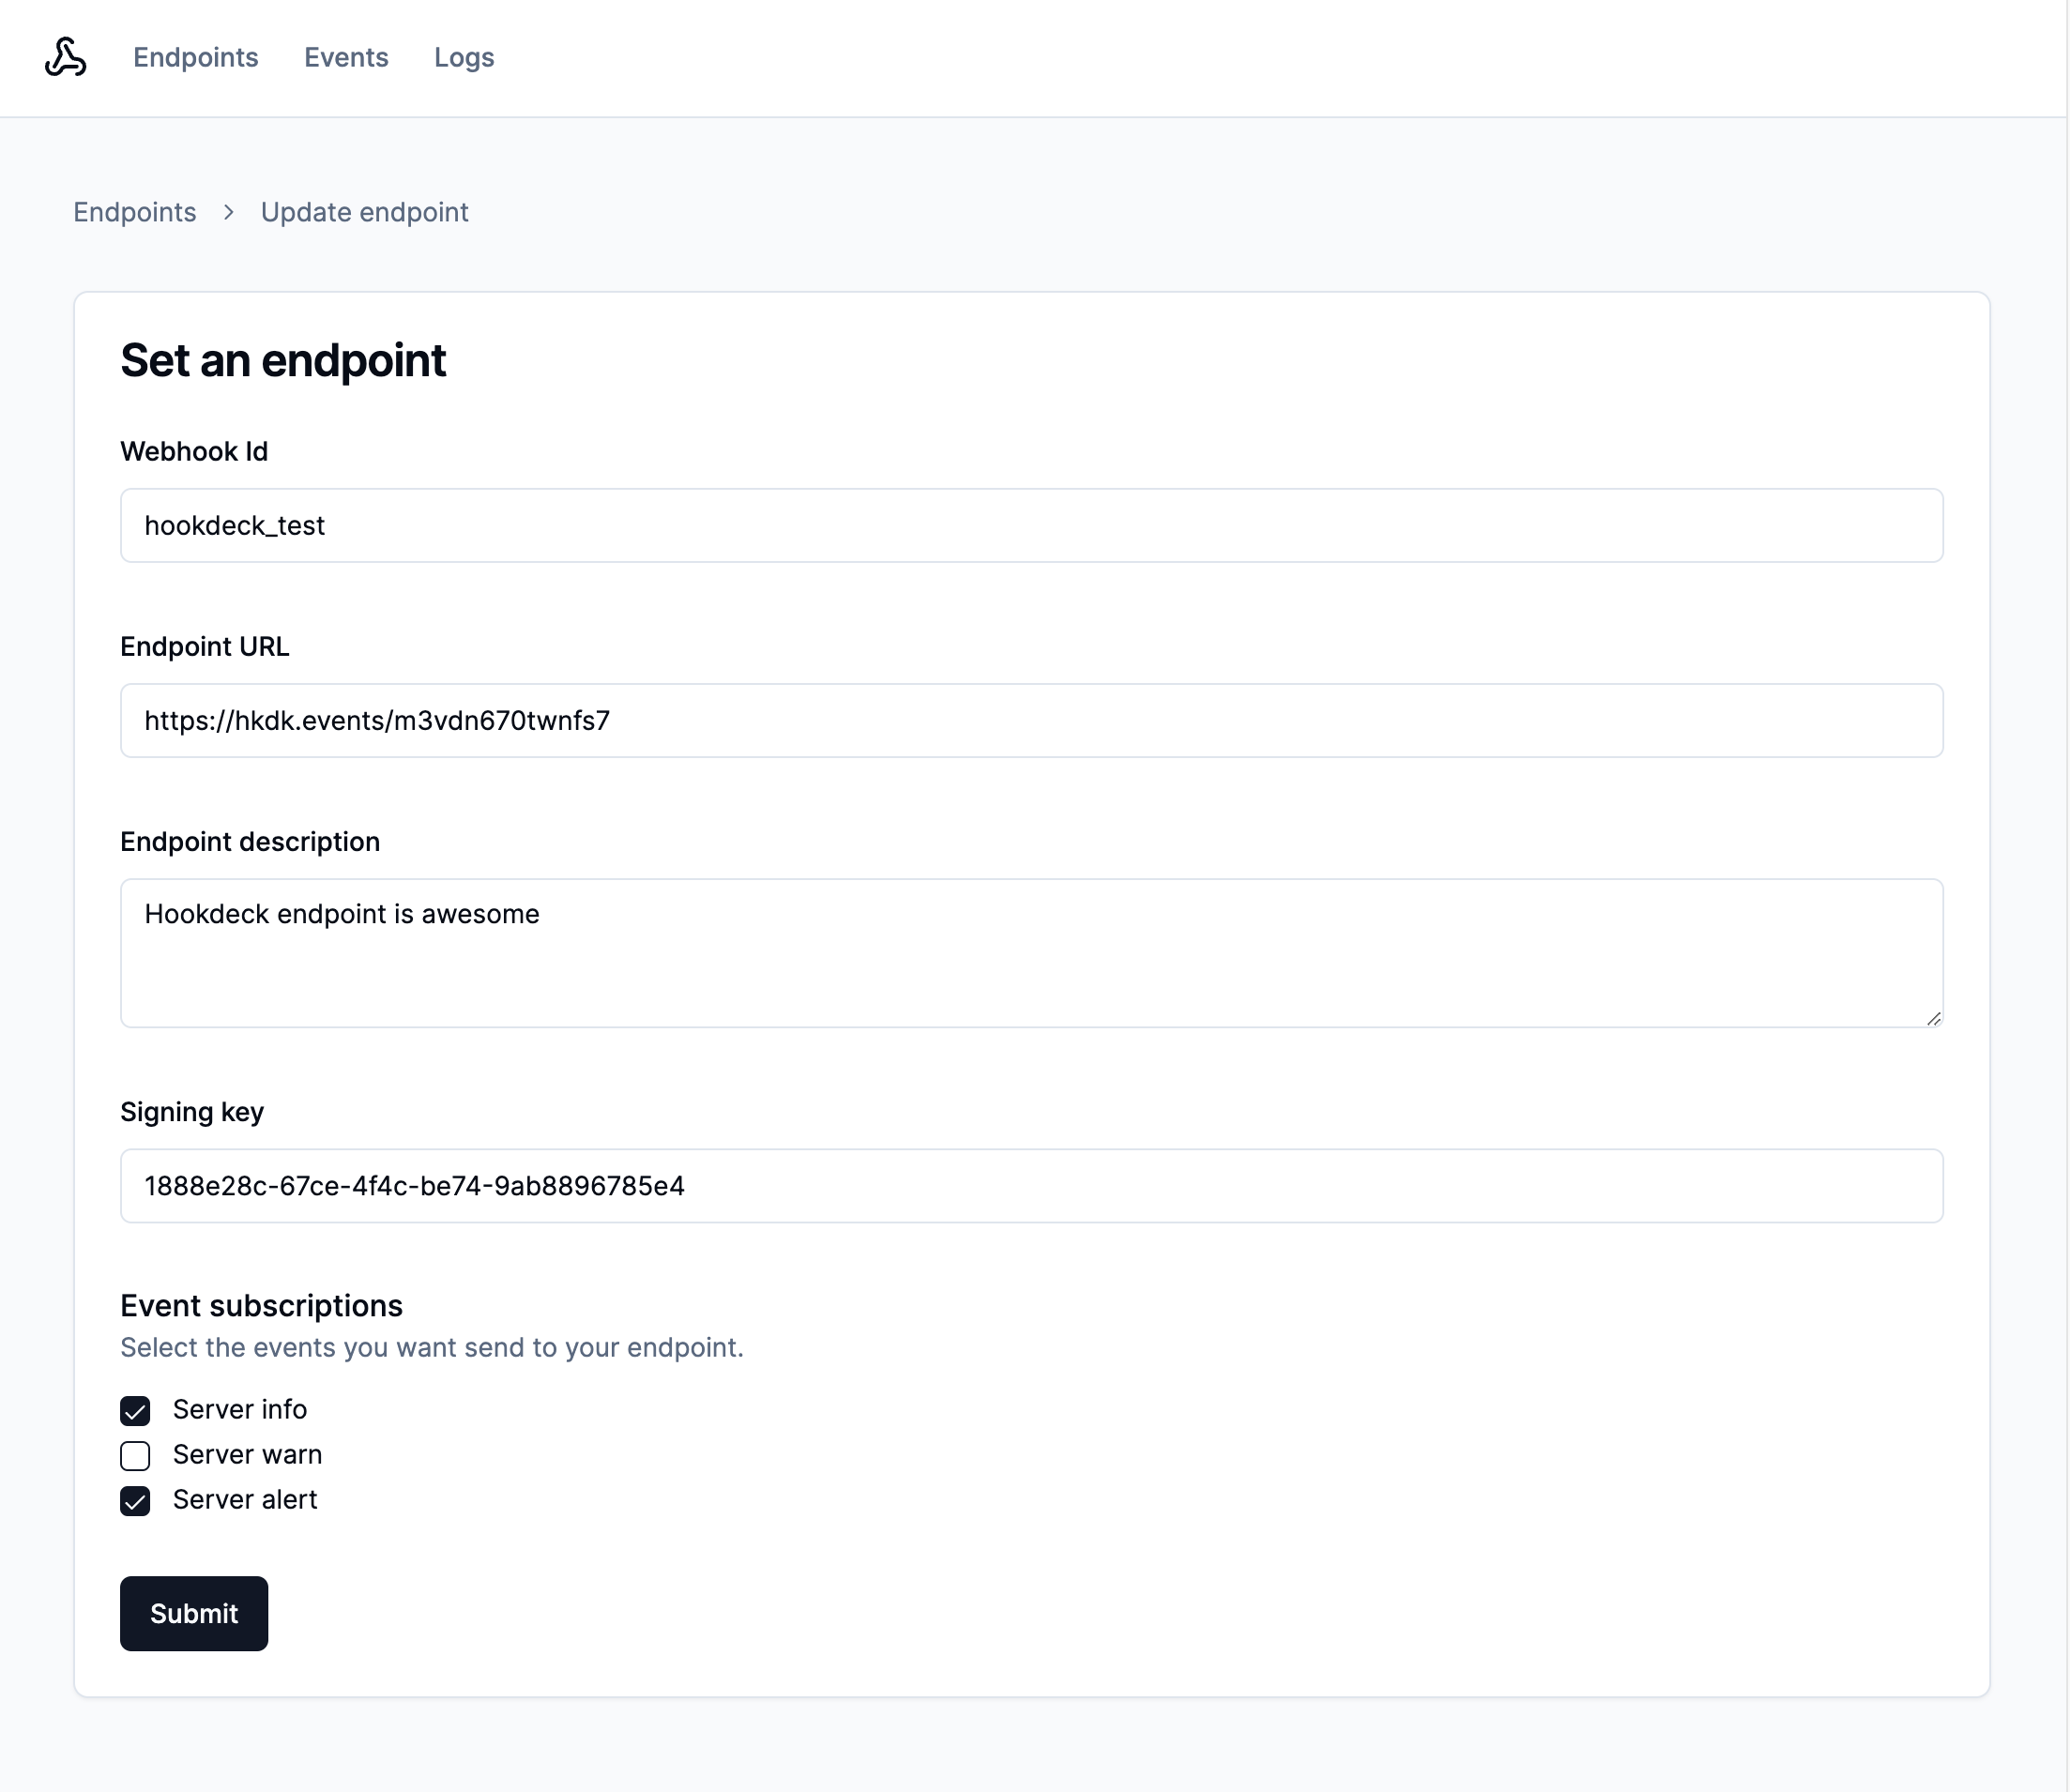
In this application, the SetEndpointForm component calls a server action that runs
the following code to create or update our webhook endpoint entity:
const knock = new Knock(process.env.KNOCK_API_KEY);
await knock.objects.set(
  process.env.KNOCK_WEBHOOK_COLLECTION as string,
  slugify(values.id),
  {
    name: values.id,
    description: values.description,
    url: values.endpointURL,
    signingKey: values.signingKey,
    events: values.events,
  }
);
You can also use objects to power subscriptions, which is a powerful pattern that simplifies triggering workflows.
Triggering test events in Next.js with Knock workflows
In this section, we will learn how to trigger test events from Next.js by utilizing Knock workflows. Knock workflows are triggered using an API request or SDK method call that contains a recipient that will receive the notification, payload data that can be used in the message template, as well as other optional properties like tenant.
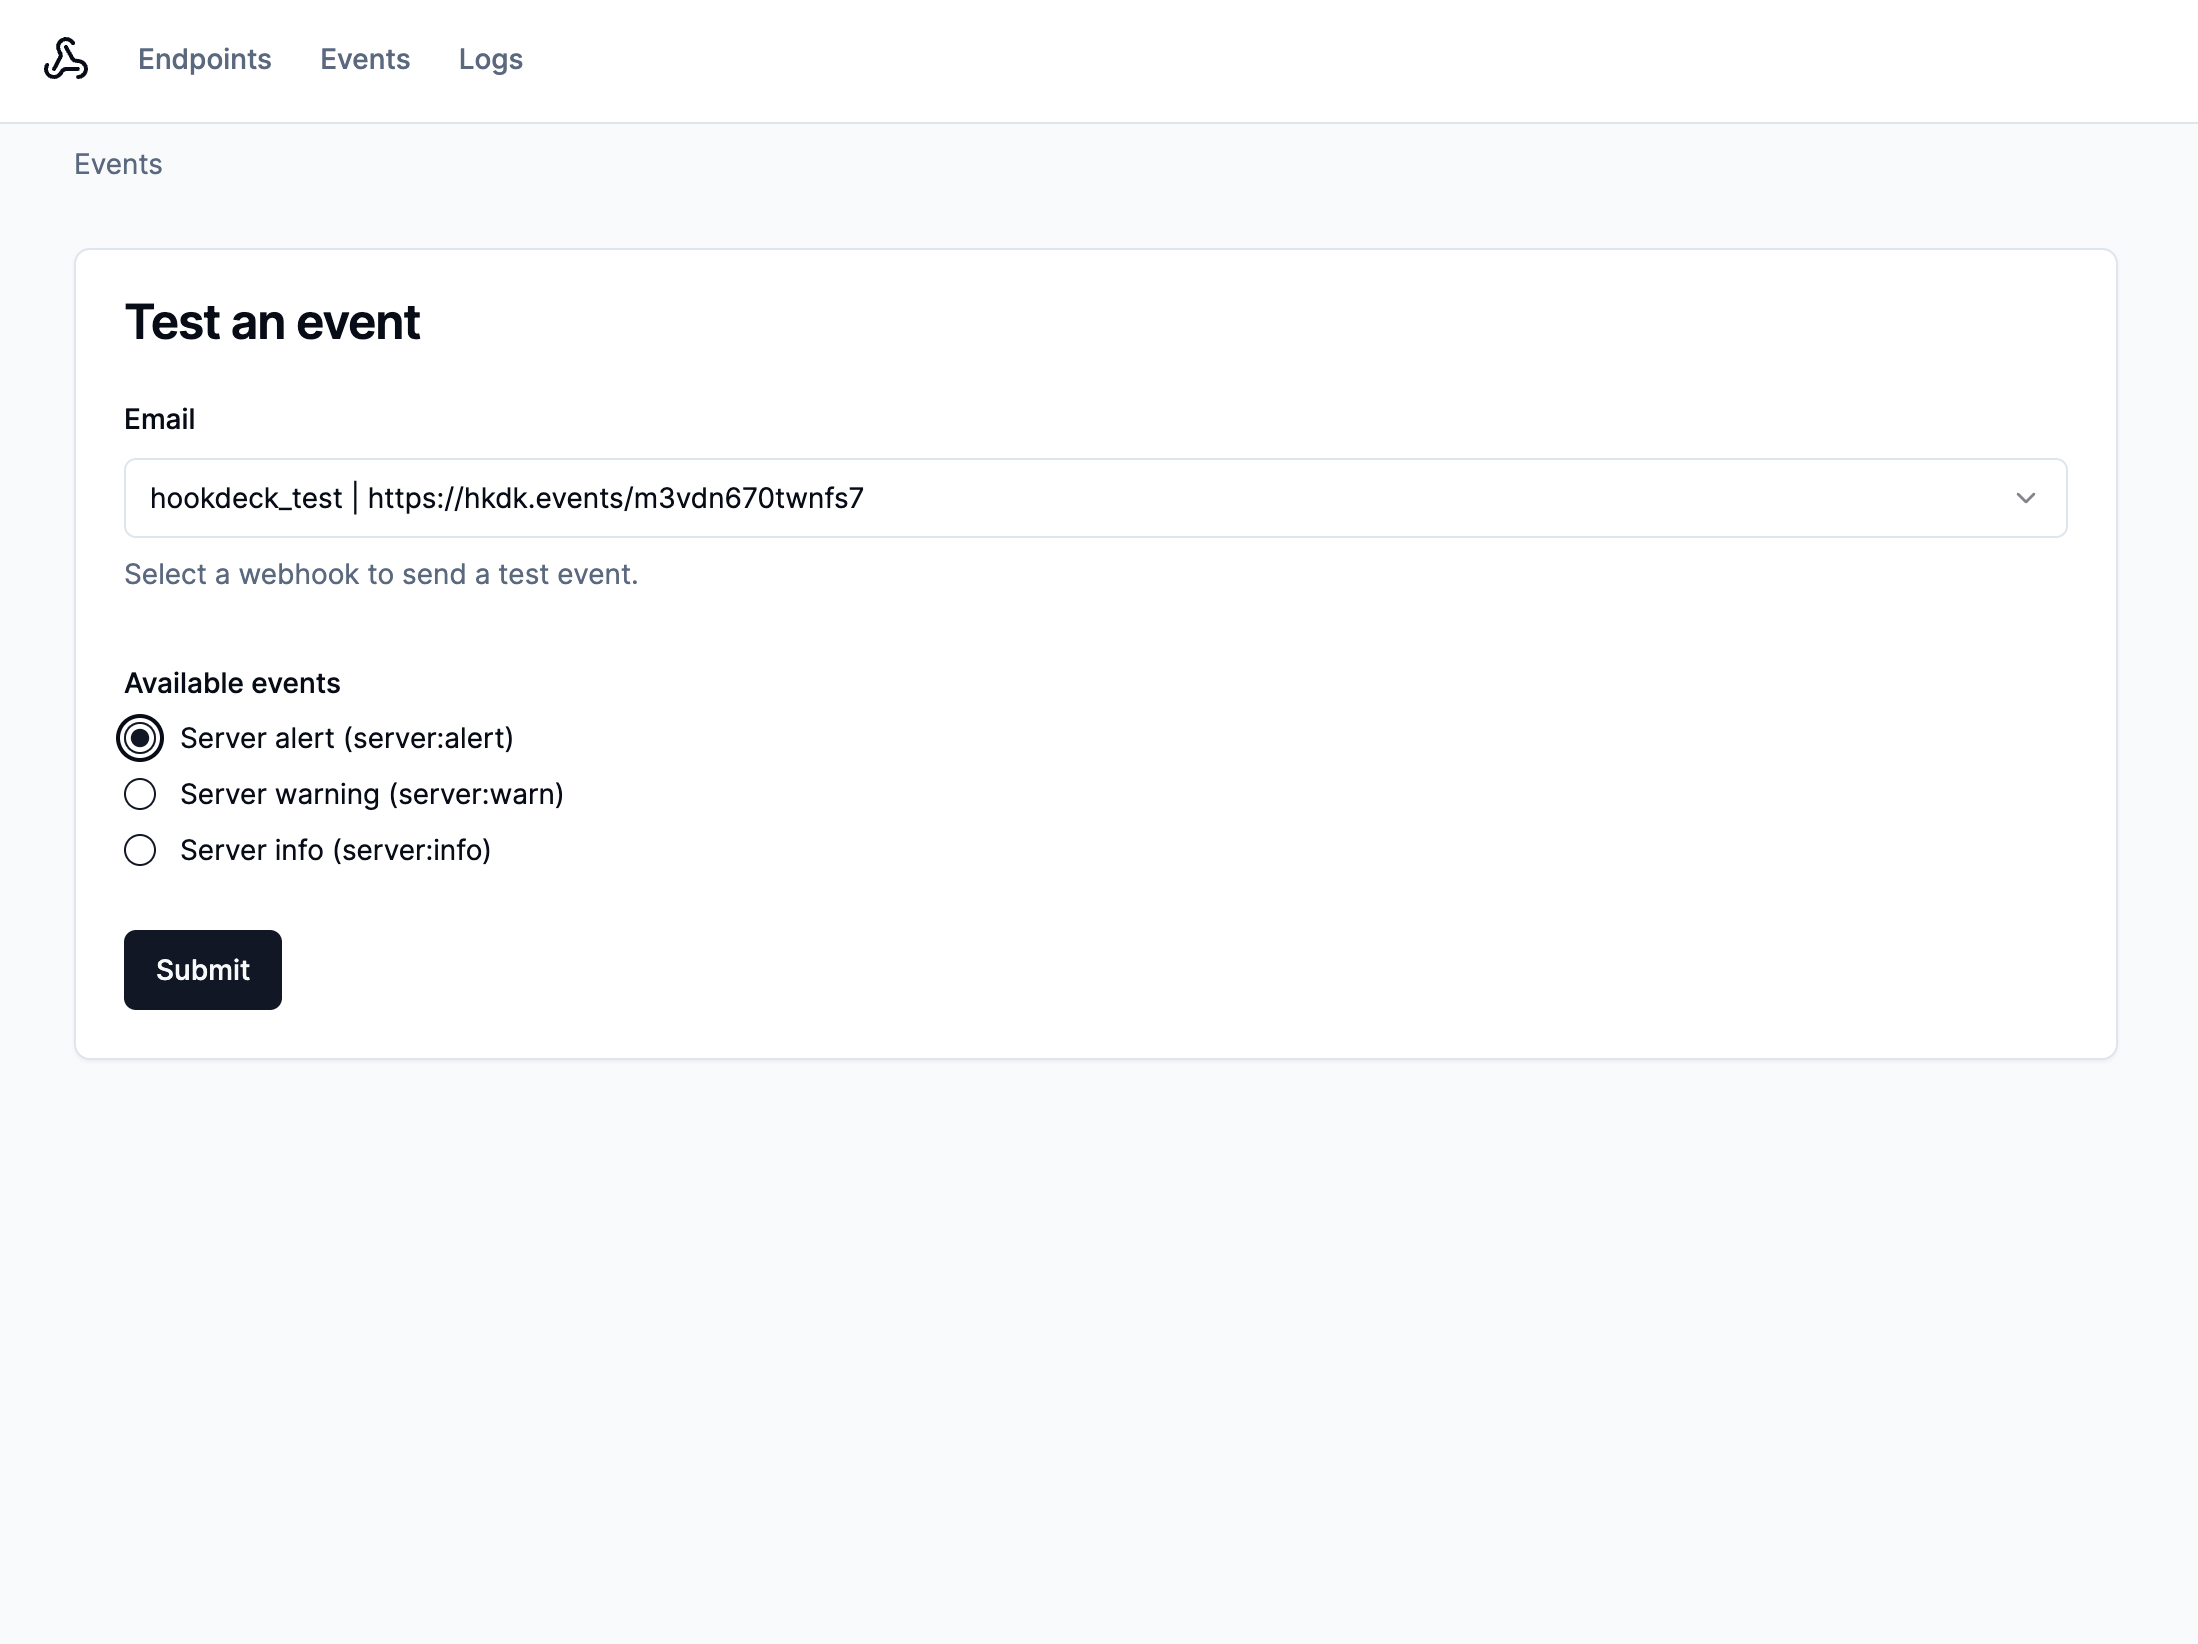
The TestEventForm component calls a server action that triggers your workflow using the following code:
const knock = new Knock(process.env.KNOCK_API_KEY);
const workflow_run_id = await knock.workflows.trigger(
  process.env.KNOCK_WEBHOOK_WORKFLOW_KEY as string,
  {
    recipients: [
      {
        id: values.webhookId,
        collection: process.env.KNOCK_WEBHOOK_COLLECTION as string,
      },
    ],
    data: {
      eventType: values.eventType,
      payload: {
        message: "This is a test message",
        timestamp: new Date().toISOString(),
      },
    },
    tenant: process.env.KNOCK_TENANT_ID as string,
  }
);
First, we use the KNOCK_WEBHOOK_WORKFLOW_KEY environment variable to make sure we're triggering the correct workflow.
Then, we provide the id and collection of the selected webhook connection as an entry in the recipients array.
The data key is a JSON object that contains the custom payload for our webhooks, which contains an eventType that will be matched against allowed events on our webhook connection object and a payload object.
In this example, we also pass in a tenant to make it easier to query for webhook messages that belong to a particular organization.
Debugging webhook requests and responses with message delivery logs
In this section, we'll explore message delivery logs and how they can help us examine webhook requests and responses. Knock normalizes message delivery statuses across all channel types.
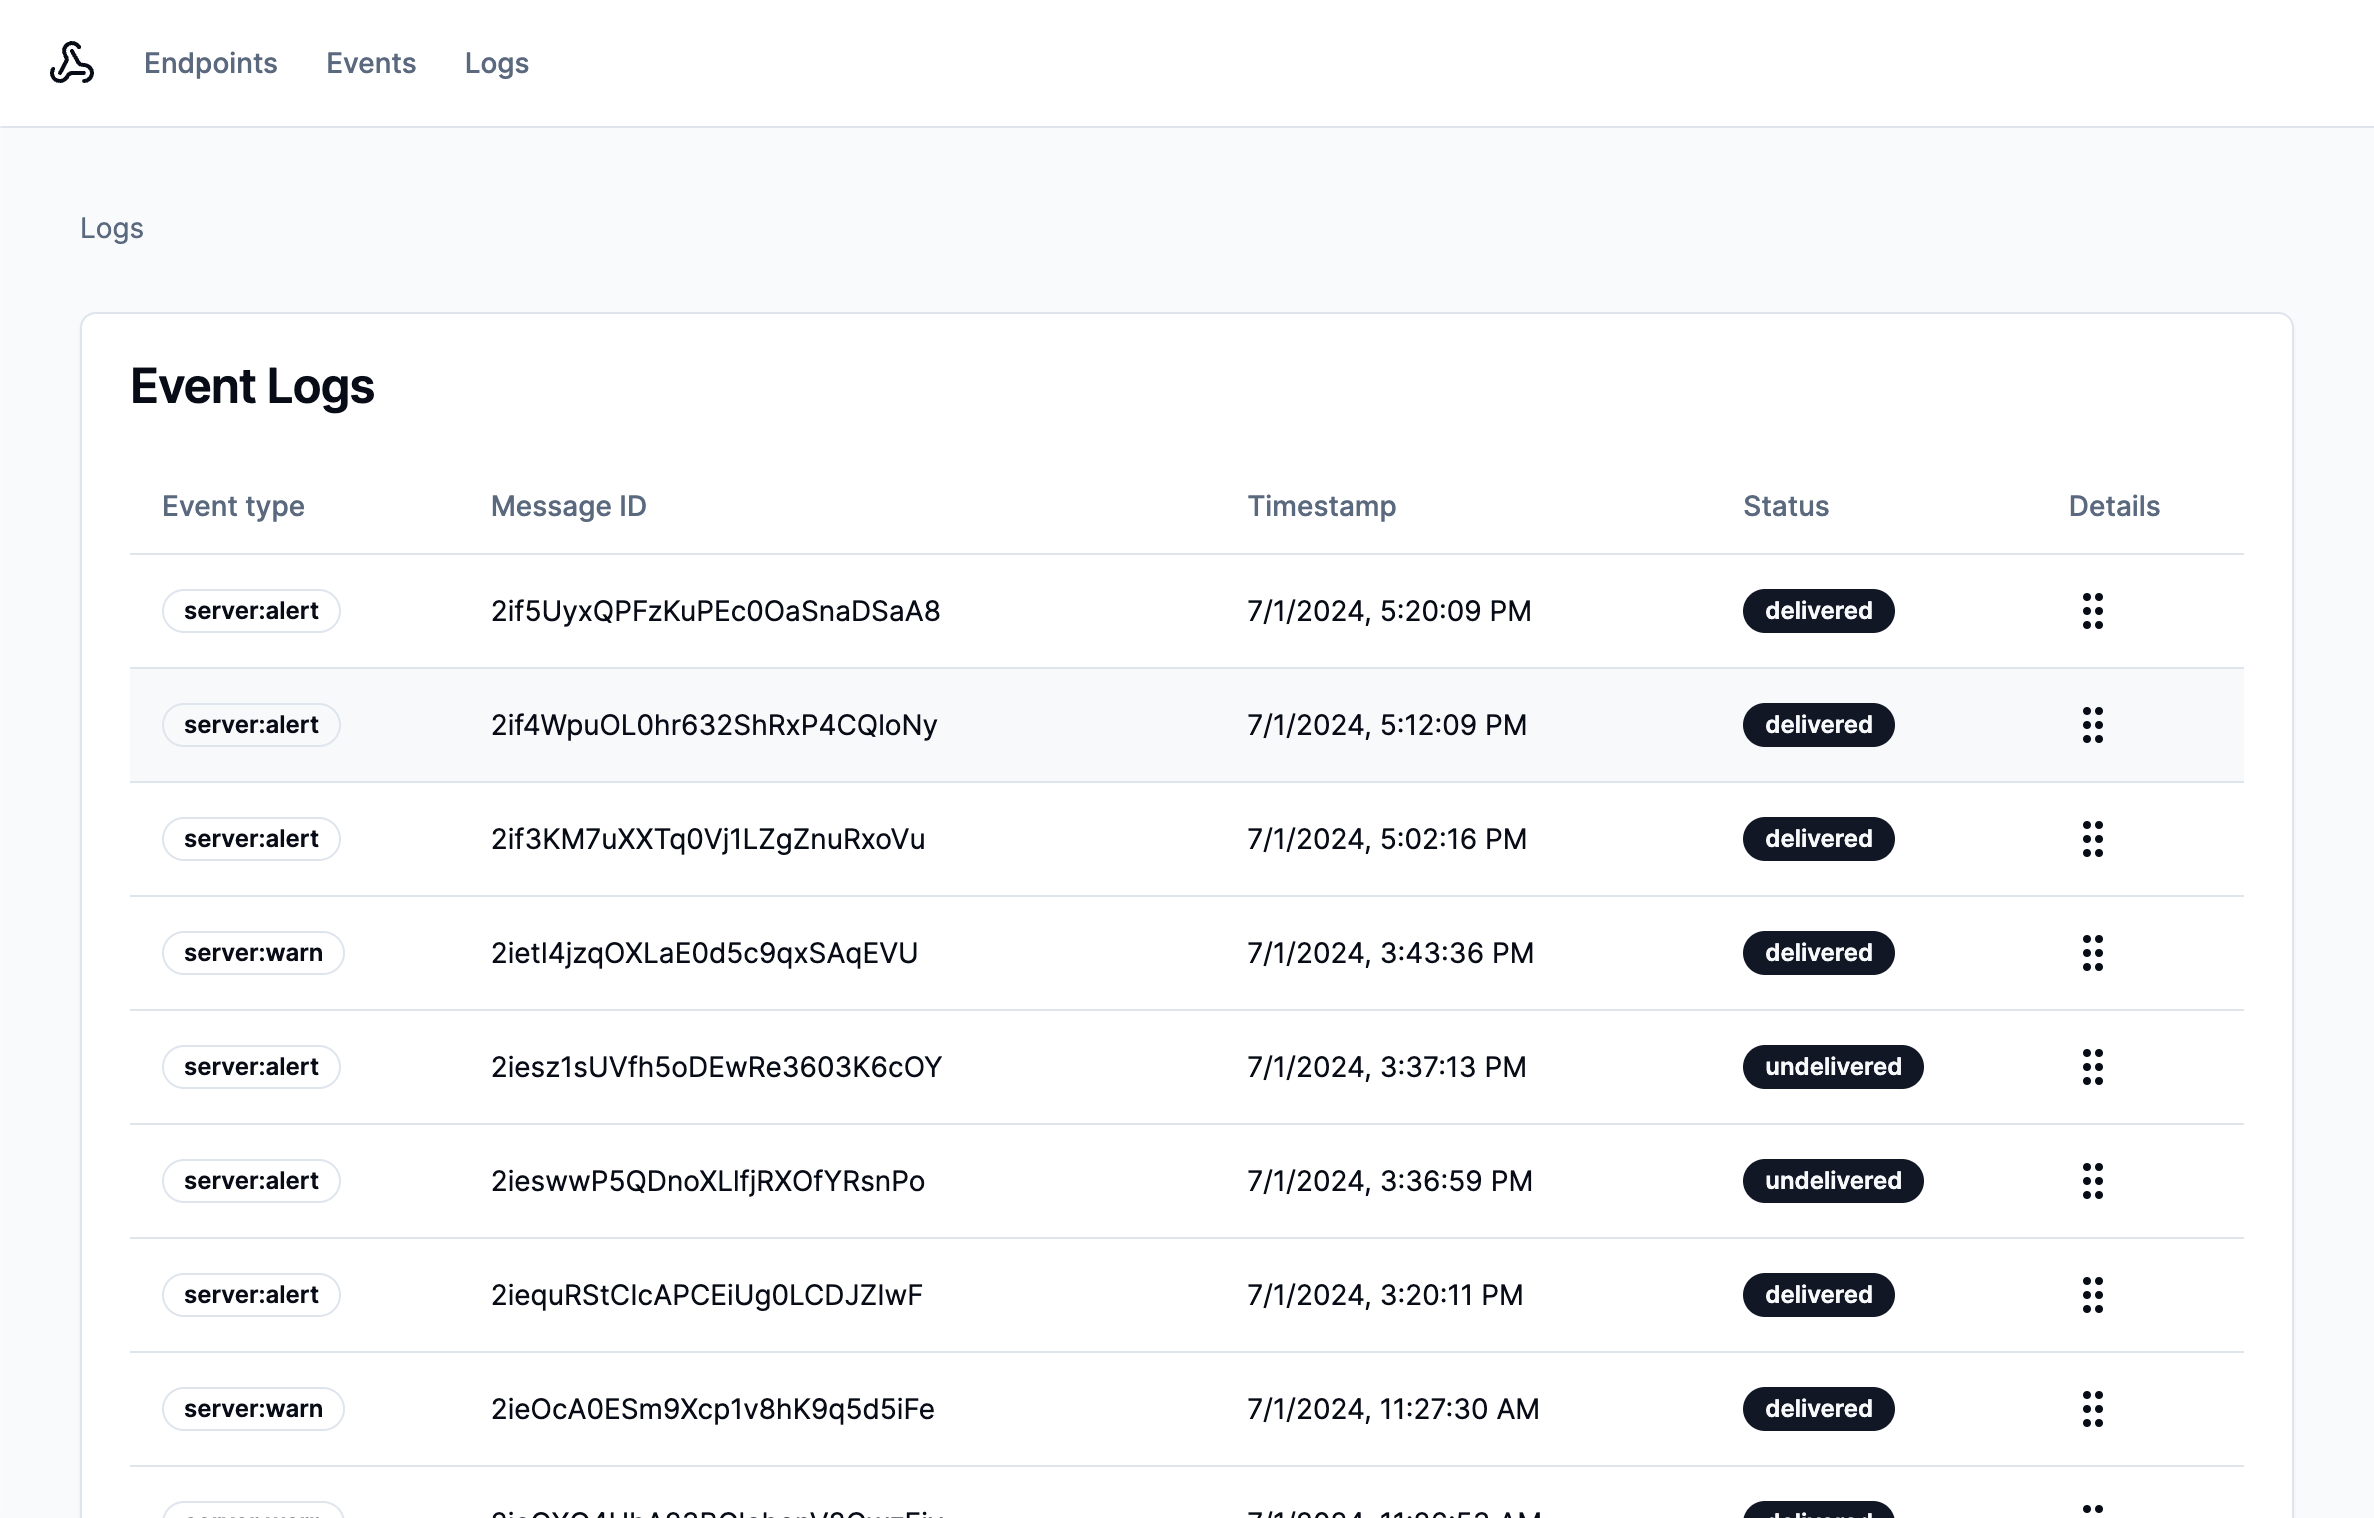
To list messages, you can use this SDK method to fetch them. You can provide additional query options to filter your results. In this example, the tenant option filters results to only the user's tenant, and then source and channel_id filter to a specific webhook channel and workflow:
const knock = new Knock(process.env.KNOCK_API_KEY);
let messages = null;
try {
  messages = await knock.messages.list({
    tenant: process.env.KNOCK_TENANT_ID as string,
    source: process.env.KNOCK_WEBHOOK_WORKFLOW_KEY as string,
    channel_id: process.env.KNOCK_WEBHOOK_CHANNEL_ID as string,
  });
} catch (e) {
  console.log(e);
}
These message delivery statuses are valuable to developers using your webhooks, but they don't include the full details of a request, which might be necessary if a message is undelivered. Knock provides access to an additional layer of detail about message delivery using the message delivery log API.
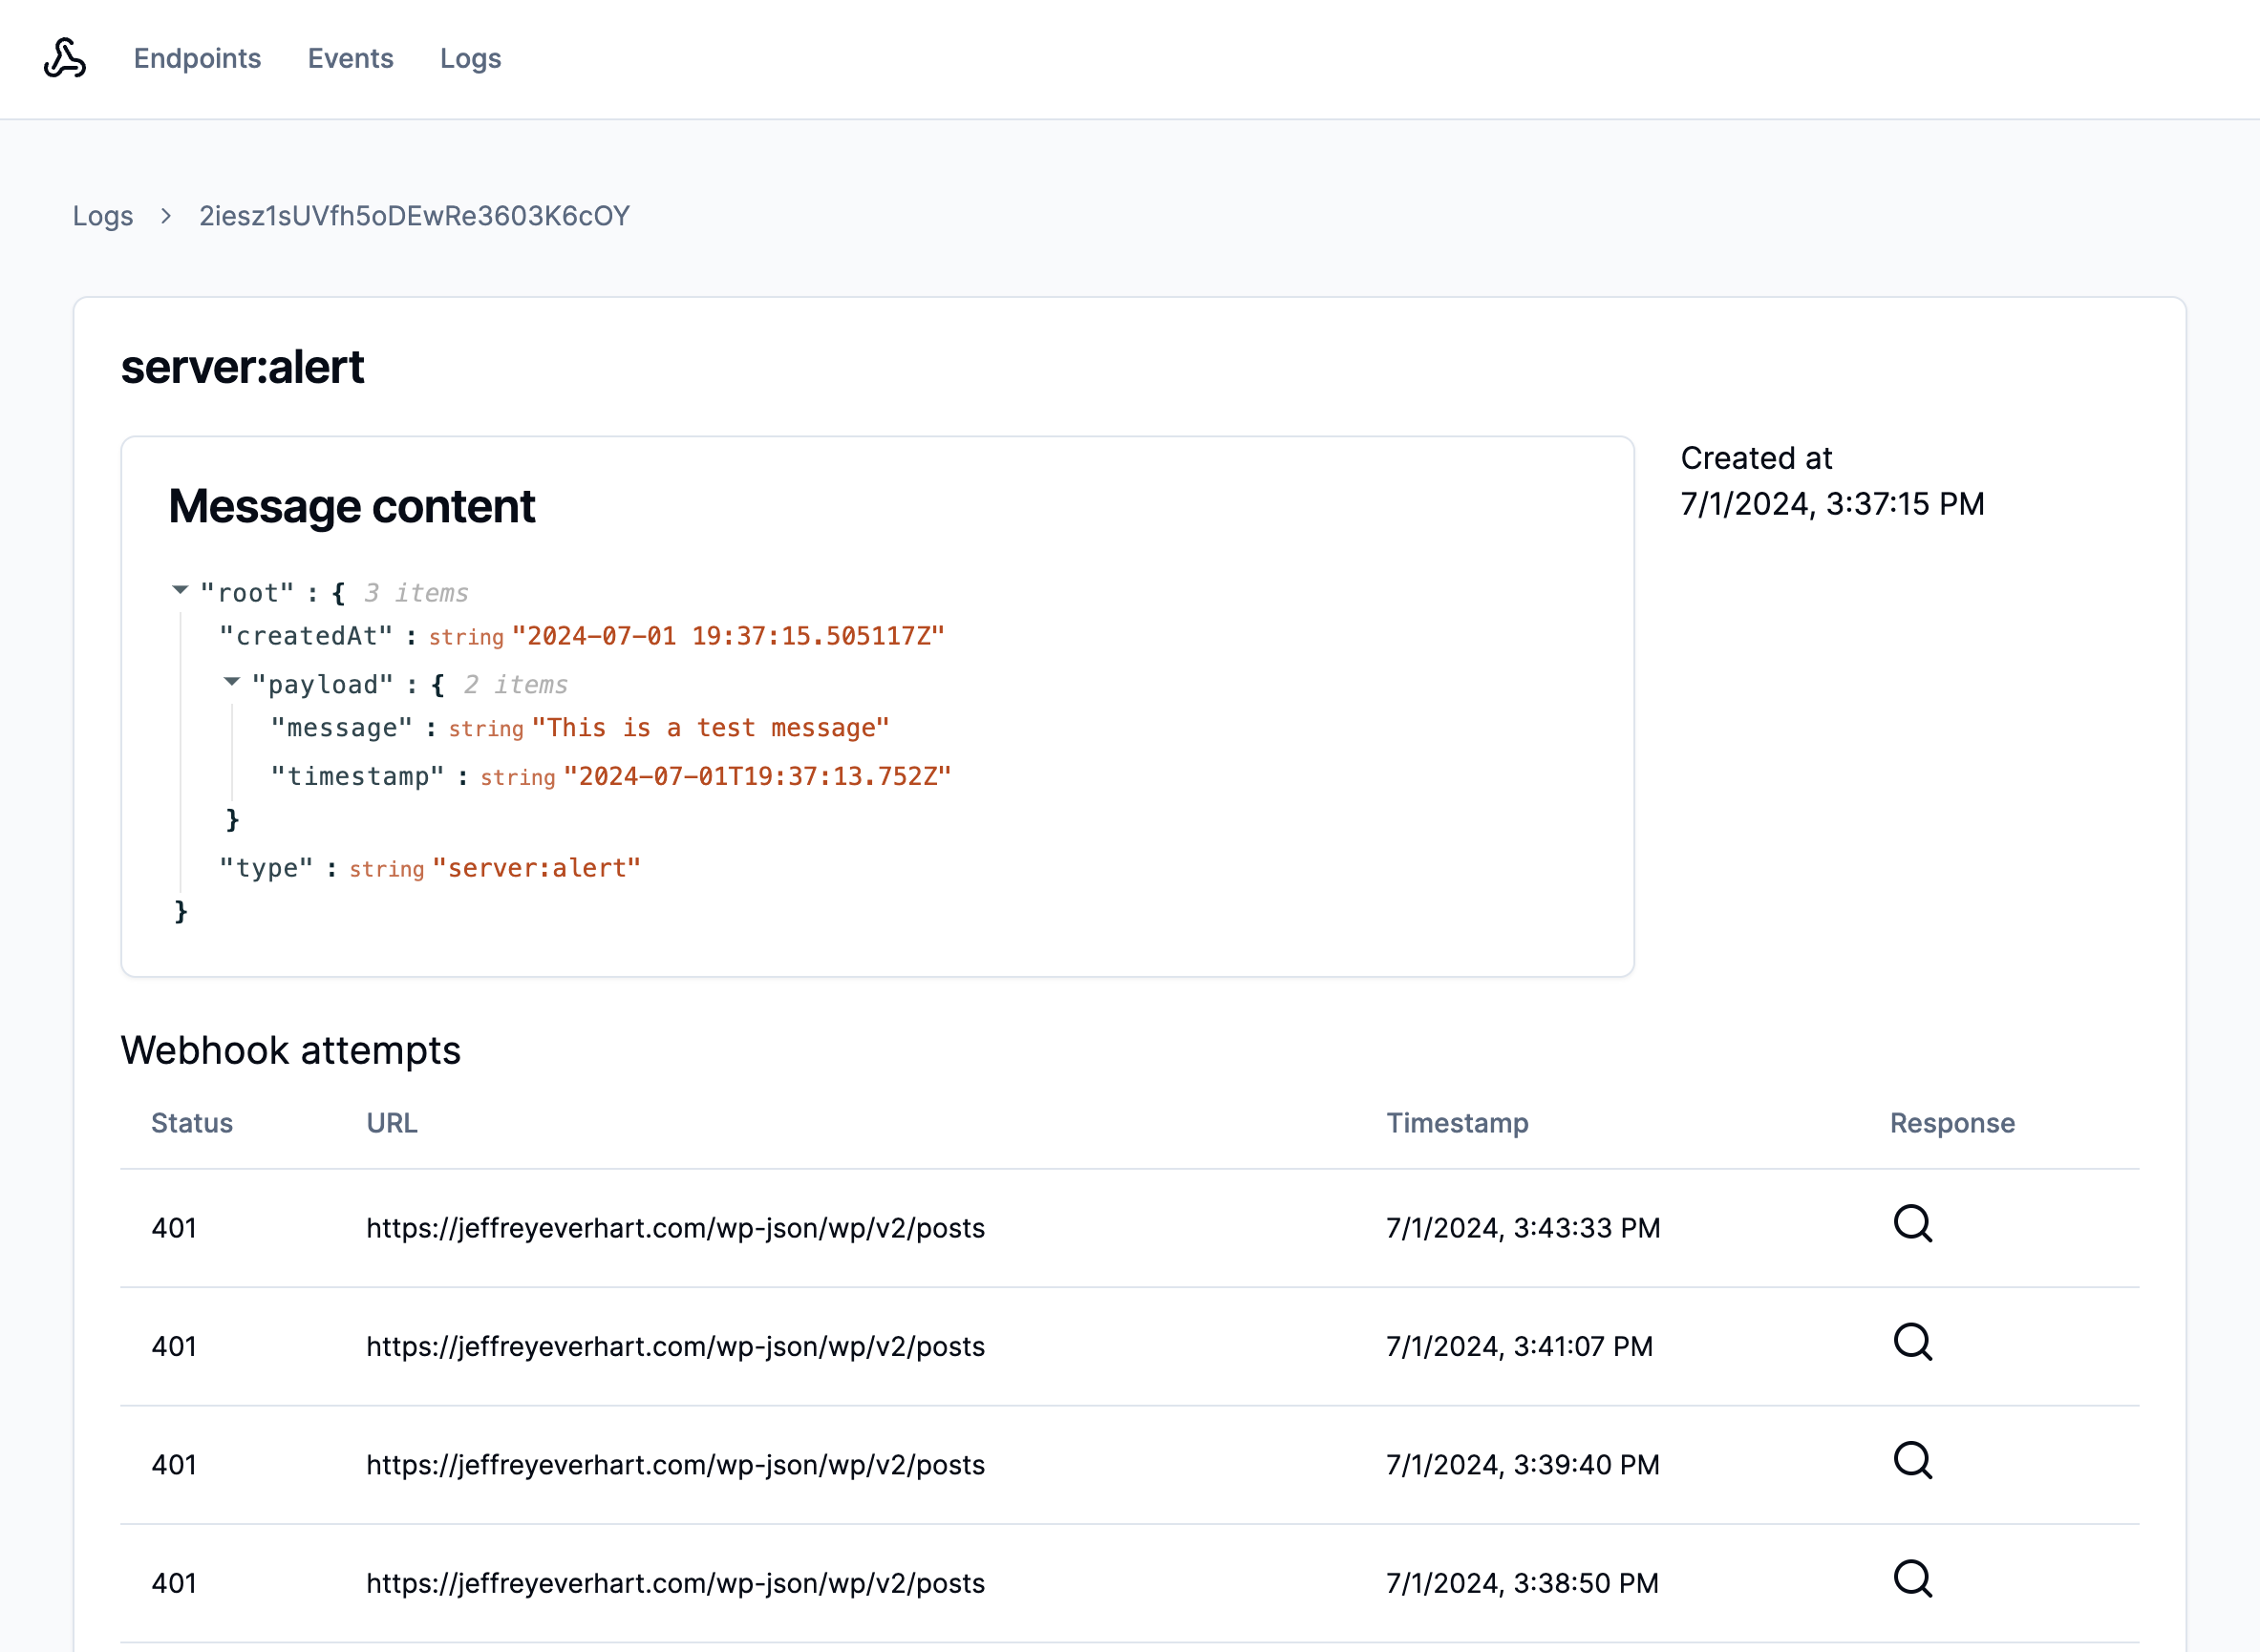
These logs record important details about the HTTP request and response created from a webhook message channel. This allows the developer to inspect the interaction between Knock and their downstream service. At this time, there isn't an SDK method to fetch delivery logs, but you can use the API endpoint to fetch them:
const knock = new Knock(process.env.KNOCK_API_KEY);
let message = null;
let deliveryLogs = null;
async function getMessageDeliveryLogs(id: string) {
  const results = await fetch(
    `https://api.knock.app/v1/messages/${id}/delivery_logs`,
    {
      headers: { Authorization: `Bearer ${process.env.KNOCK_API_KEY}` },
    },
  );
  return results.json();
}
try {
  const results = await Promise.all([
    knock.messages.get(params.logId),
    getMessageDeliveryLogs(params.logId),
  ]);
  [message, deliveryLogs] = results;
} catch (e) {
  console.log(e);
}
Once you have these deliveryLogs, you can use the items array property to examine all of the different attempts Knock made to contact the downstream service. If the request was successful, there will most likely only be one item in this array.
You can see an example of how to construct an interface using this data in the /app/logs/[logID]/page.tsx file.
Wrapping up
After learning about best practices and seeing an example interface, hopefully you have a better understanding of how to approach your own webhook feature in your project.
If you’re building a developer-first product or serve a more technical buyer persona, building customer-facing webhooks can help set your product apart from other similar solutions. But clearly, between security, reliability, and ease-of-use, there is a lot to consider.
If you want to try out Knock to power customer-facing webhooks for your product, you can sign up for free here. We have a generous free tier you can use to get started.