In this guide, we'll walk through how to build a real-time commenting system using React, Node.js, and Socket.io. We'll show you how to build a list of comments fed from an API, create new comments, and broadcast comments in real-time to connected users using Socket.io.
We'll also briefly introduce Knock, a developer platform for building a cross-channel notification system. Engineers use Knock for building powerful cross-channel notifications that can send to in-app and out-of-app channels like email, SMS, push, and Slack. All through a single API call.
Prerequisites
We recommend the following prerequisites before beginning:
- Familiarity with JavaScript and the React library
- Node installed on your machine
Getting started
In this section, we'll set up the basics of our application including the structure we'll use to house our Node.js server and our React front-end application.
First, create the project folder and two subfolders for the client and server of the application.
mkdir real-time-commenting-app
cd real-time-commenting-app
mkdir client server
Building our Node.js API server
Next, we're going to be creating the basis of our Node.js API server. The API server's job is to send information to the client for the comments we have available, and process any new comments created in the client. The server will also set up our Socket.io connection and expose a websocket that can be connected to from our React client.
Inside our server directory, we're going to install the dependencies we need to build our API server.
- Express.js is a minimalist web framework for Node.js that provides a simple interface for building HTTP listeners as well as other functionality that makes it easy to build web applications in Node.js.
- CORS is an NPM package that lets us process cross-origin requests. This is important as we'll be running a separate client and server application (e.g. they will be running on different ports).
- Nodemon is a package that will automatically restart our Node.js server after detecting any changes, making local development easy.
- Socket.io is a Javascript library that allows us to create real-time, bidirectional communication between web browsers (clients) and a Node.js server.
Let's go ahead and install our dependencies inside our server directory:
npm install express cors nodemon socket.ioThe next step is to create the entry point of our web server as index.js:
touch index.jsNow inside the server/index.js file, we're going to setup our simple Node.js server using Express.js:
const express = require("express");
const app = express();

const http = require("http").Server(app);
const cors = require("cors");

const PORT = 4000;

app.use(cors());
app.use(express.json());

app.get("/users", (req, res) => {
  // TODO: implement
  res.json([]);
});

app.get("/comments", (req, res) => {
  // TODO: implement
  res.json([]);
});

app.post("/comments", async (req, res) => {
  // TODO: implement
  res.json(null);
});

http.listen(PORT, () => {
  console.log(`Server listening on ${PORT}`);
});
Here we're defining a few endpoints that we'll be filling in during the course of this guide:
GET /users: returns a list of available usersGET /comments: returns a list of posted commentsPOST /comments: creates a new comment
We're also adding CORS support to our express server with app.use(cors()); and the ability to parse incoming JSON with app.use(express.json());.
Now let's add a start script so we can start our API server. Inside your server/package.json file, add the following:
"scripts": {
  "test": "echo \"Error: no test specified\" && exit 1",
  "start": "nodemon index.js"
}
You can now start the server on port 4000 by running:
npm startWe can verify our server is working correctly by going to http://localhost:4000/users where you should receive an empty list of users.
Implementing our users and commenting endpoints
In this next section, we're going to add the implementation for our HTTP endpoints.
Note: in this example application we're going to be using static and in-memory data, which won't work for any production use cases. You'll need to use a persistent database, like MySQL or Postgres, if you want to prepare this for production.
First of all, let's add some information to power our GET /users endpoint which will return a static list of users that we can post comments as:
touch lib/users.jsAnd the contents of the lib/users.js file will be:
const users = [
  {
    id: "1",
    name: "Dennis Nedry",
    email: "[email protected]",
    avatar:
      "https://cdn.vox-cdn.com/thumbor/4oha2z_P13Nc_Z_JUt1qpt133yw=/0x0:1440x653/920x613/filters:focal(314x95:544x325):format(webp)/cdn.vox-cdn.com/uploads/chorus_image/image/60017631/dennis_nedry_1440.0.jpg",
  },
  {
    id: "2",
    name: "John Hammond",
    email: "[email protected]",
    avatar:
      "https://openpsychometrics.org/tests/characters/test-resources/pics/JP/4.jpg",
  },
  {
    id: "3",
    name: "Ellie Sattler",
    email: "[email protected]",
    avatar:
      "https://encrypted-tbn0.gstatic.com/images?q=tbn:ANd9GcRQKxKHuGTXeNrhoozgtgrxNOmN7l5AcExYBwthS3yyfGGWbE5ewg0IGvp3tNGdCDZamMg&usqp=CAU",
  },
];

function findUserById(userId) {
  return users.find((user) => user.id === userId);
}

module.exports = { users, findUserById };
We can now go back to our index.js server root and start returning this static list of users:
// Under the last require:
const { users } = require("./lib/users");

// Replace the get `/users` endpoint with
app.get("/users", (req, res) => {
  res.json(users);
});
This ensures that the static list of users is returned as JSON when the /users endpoint is requested.
Let's next implement our comments functions:
touch lib/comments.jsThe contents of the lib/comments.js file will be:
const { findUserById, users } = require("./users");

let comments = [];
let lastId = 1;

function getCommentWithAuthor(comment) {
  return { ...comment, author: findUserById(comment.authorId) };
}

function createComment(params) {
  const comment = {
    id: lastId++,
    body: params.body,
    authorId: params.authorId,
    insertedAt: new Date().toISOString(),
  };

  comments.push(comment);

  const commentWithAuthor = getCommentWithAuthor(comment);
  return commentWithAuthor;
}

function listComments() {
  return comments.map((comment) => getCommentWithAuthor(comment));
}

module.exports = { createComment, listComments };
Here we're adding two new functions that we'll be calling from our endpoint: createComment and listComments. Our comments are implemented as a mutable array that we append to when we create a new comment, using an auto-incrementing id to generate a unique id for each comment created. The createComment function expects to be passed an object that contains a body and a authorId, which we'll implement within our React application shortly.
We're also "loading" the associated author with each comment when they are both created and listed, matching the authorId on the comment with a corresponding user that we have in our static user list.
Next, let's implement the endpoints in our index.js server entry point.
// Under the last require:
const { listComments, createComment } = require("./lib/comments");

app.get("/comments", (req, res) => {
  const comments = listComments();
  res.json(comments);
});
app.post("/comments", (req, res) => {
  const comment = createComment(req.body);
  res.json(comment);
});
Here we're creating a comment by passing the req.body, which will contain any JSON params that the client is sending up in the create comment request. These params expect a JSON encoded object to be sent that will look like { body: "My comment", authorId: "1" }.
It's worth checking at this stage that everything is working as expected. You can check out the endpoints we just added in an API testing tool like Postman. You should be able to create a new comment, and then retrieve the full list of comments with what we've built so far.
Note: since our comments are only stored in memory, when you refresh your Node server (or make changes) any comments will be reset.
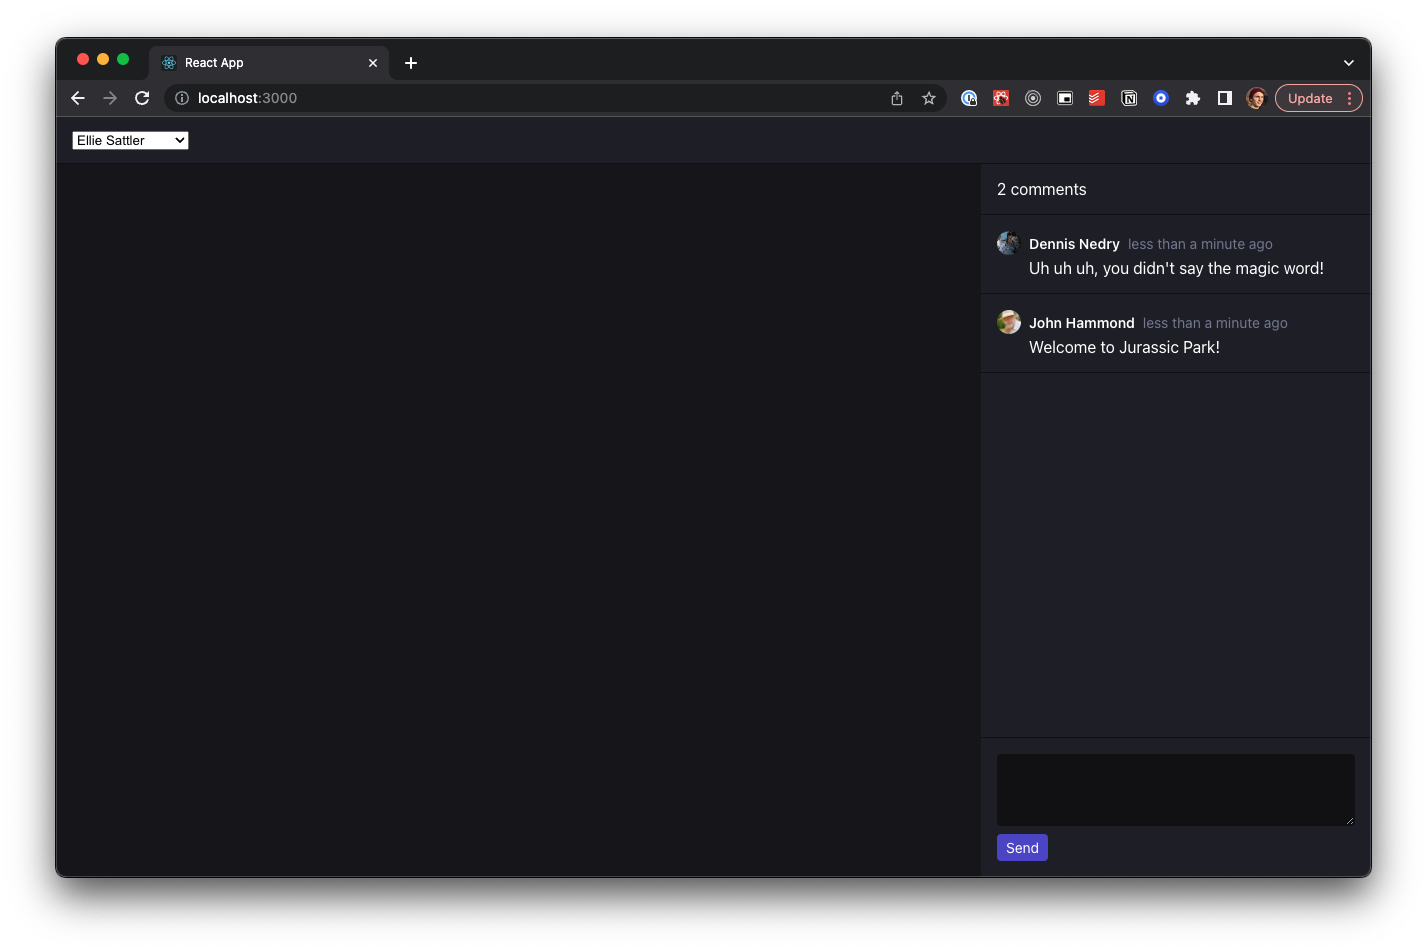
Creating our comments app in React
In this section, we're going to build out the client portion of our commenting app. The goal is that we'll end up with a single-page React application that looks like this:
First of all, we're going to be working in our client directory for this section so let's move to that directory:
cd clientWe're going to bootstrap our React application using the excellent create-react-app, which is a library from the React team that makes it easy to start building a single-page application in React.
npx create-react-app ./Next we're going to install any additional dependencies we need. In our case, we're just going to need date-fns which is a library that makes it trivial to work with datetimes in JavaScript.
npm i date-fnsNow that we've bootstrapped our React application and installed our dependencies, we can start our client running in the browser. With create-react-app you'll get a live reloading application environment, so that any changes you're making should be automatically displayed in the browser.
npm run startYour application should open on port 3000 by default in your browser.
Laying out our application through components
Next up we're going to start creating our components. For this application, we're breaking things down into Header and Comments components, where the Comments component renders individual Comment components.
Let's first make our empty component files. We'll be filling them in with code shortly.
touch src/components/Header.js
touch src/components/Comment.js
touch src/components/Comments.js
Creating the Header component
Inside our src/components/Header.js file:
const Header = ({ users, selectedUserId, setSelectedUserId }) => {
  return (
    <header className="Header" key={selectedUserId}>
      <div className="Header-user">
        <select
          value={selectedUserId}
          onChange={(e) => {
            setSelectedUserId(e.target.value);
          }}
        >
          <option>Select a user</option>
          {users.map((user) => (
            <option key={user.id} value={user.id}>
              {user.name}
            </option>
          ))}
        </select>
      </div>
    </header>
  );
};

export default Header;
Creating the Comment component
In our src/components/Comment.js component:
import parseISO from "date-fns/parseISO";
import formatDistance from "date-fns/formatDistance";

function formatDate(dateStr) {
  const date = parseISO(dateStr);
  return formatDistance(date, new Date(), { addSuffix: true });
}

const Comment = ({ comment, isYou }) => (
  <div className="Comment">
    <div className="Comment-header">
      <div className="Comment-avatar">
        <img src={comment.author.avatar} alt={comment.author.name} />
      </div>
      <span className="Comment-author">
        {isYou ? "You" : comment.author.name}
      </span>
      <span className="Comment-time">{formatDate(comment.insertedAt)}</span>
    </div>

    <div className="Comment-body">{comment.body}</div>
  </div>
);

export default Comment;
Here we're using the date-fns library to format the date and time in which the comment was posted as a relative date time (e.g. 3-days ago). Our formatDate function takes care of this behavior for us using the formatDistance function in date-fns to generate relative dates.
You'll also notice here that we're passing in an isYou prop which, when true, shows You as the author name rather than the full name.
Creating the Comments component
Next up, let's add the implementation for the src/components/Comments.js file. This component represents our comments sidebar and has the responsibility of showing a list of comments and displaying a form to post new comments.
The brains of our commenting application live in this component and it also houses the state about exactly which comments we have.
import { useEffect, useState } from "react";
import Comment from "./Comment";

const Comments = ({ selectedUserId }) => {
  const [comments, setComments] = useState([]);
  const [input, setInput] = useState("");

  async function sendComment() {
    const result = await fetch("http://localhost:4000/comments", {
      method: "POST",
      headers: { "Content-Type": "application/json" },
      body: JSON.stringify({ body: input, authorId: selectedUserId }),
    });
    const comment = await result.json();
    setComments((comments) => [...comments, comment]);
  }

  async function fetchComments() {
    const result = await fetch("http://localhost:4000/comments");
    const comments = await result.json();
    setComments(comments);
  }

  useEffect(() => {
    fetchComments();
  }, []);

  return (
    <div className="Comments">
      <h3 className="Comments-title">
        {comments.length === 1 ? `1 comment` : `${comments.length} comments`}
      </h3>

      <div className="Comments-list">
        {comments.map((comment) => (
          <Comment
            key={comment.id}
            comment={comment}
            isYou={selectedUserId === comment.authorId}
          />
        ))}
      </div>
      <div className="Comments-box">
        <form
          className=""
          onSubmit={(e) => {
            e.preventDefault();
            sendComment(input);
            setInput("");
          }}
        >
          <textarea
            value={input}
            onChange={(e) => setInput(e.target.value)}
            name="body"
            className="Comments-box__input"
          />
          <button
            type="submit"
            disabled={selectedUserId === ""}
            className="Comments-box__btn"
          >
            Send
          </button>
        </form>
      </div>
    </div>
  );
};

export default Comments;
There's quite a bit happening in here, so let's walk through it:
- We setup a piece of state (
comments) to keep track of the currently fetched comments. - We fetch all of the existing comments from the API by calling the
fetchCommentsfunction on mount. - We have a form where we can post new comments, which calls the
sendCommentfunction. - Once a comment has been successfully sent we store it in the
commentsstate.
Updating our App component
Inside src/App.js we're going to set up the main component structure:
import { useEffect, useState } from "react";
import "./App.css";
import Comments from "./components/Comments";
import Header from "./components/Header";

function App() {
  const [users, setUsers] = useState([]);
  const [selectedUserId, setSelectedUserId] = useState("");

  async function fetchUsers() {
    const result = await fetch("http://localhost:4000/users");
    const users = await result.json();

    setUsers(users);
  }

  useEffect(() => {
    fetchUsers();
  }, []);

  return (
    <div className="App">
      <Header
        users={users}
        selectedUserId={selectedUserId}
        setSelectedUserId={setSelectedUserId}
      />
      <Comments selectedUserId={selectedUserId} />
    </div>
  );
}

export default App;
Again, there are a few things going on here so let's break it down:
- We keep track of fetched users in state (as
users). - When the component mounts we fetch all users from the API by calling the
fetchUsersfunction. - We also keep track of the
selectedUserIdwhich represents which user we've selected. - We pass the
selectedUserIdandsetSelectedUserIdcomponents down to the child components.
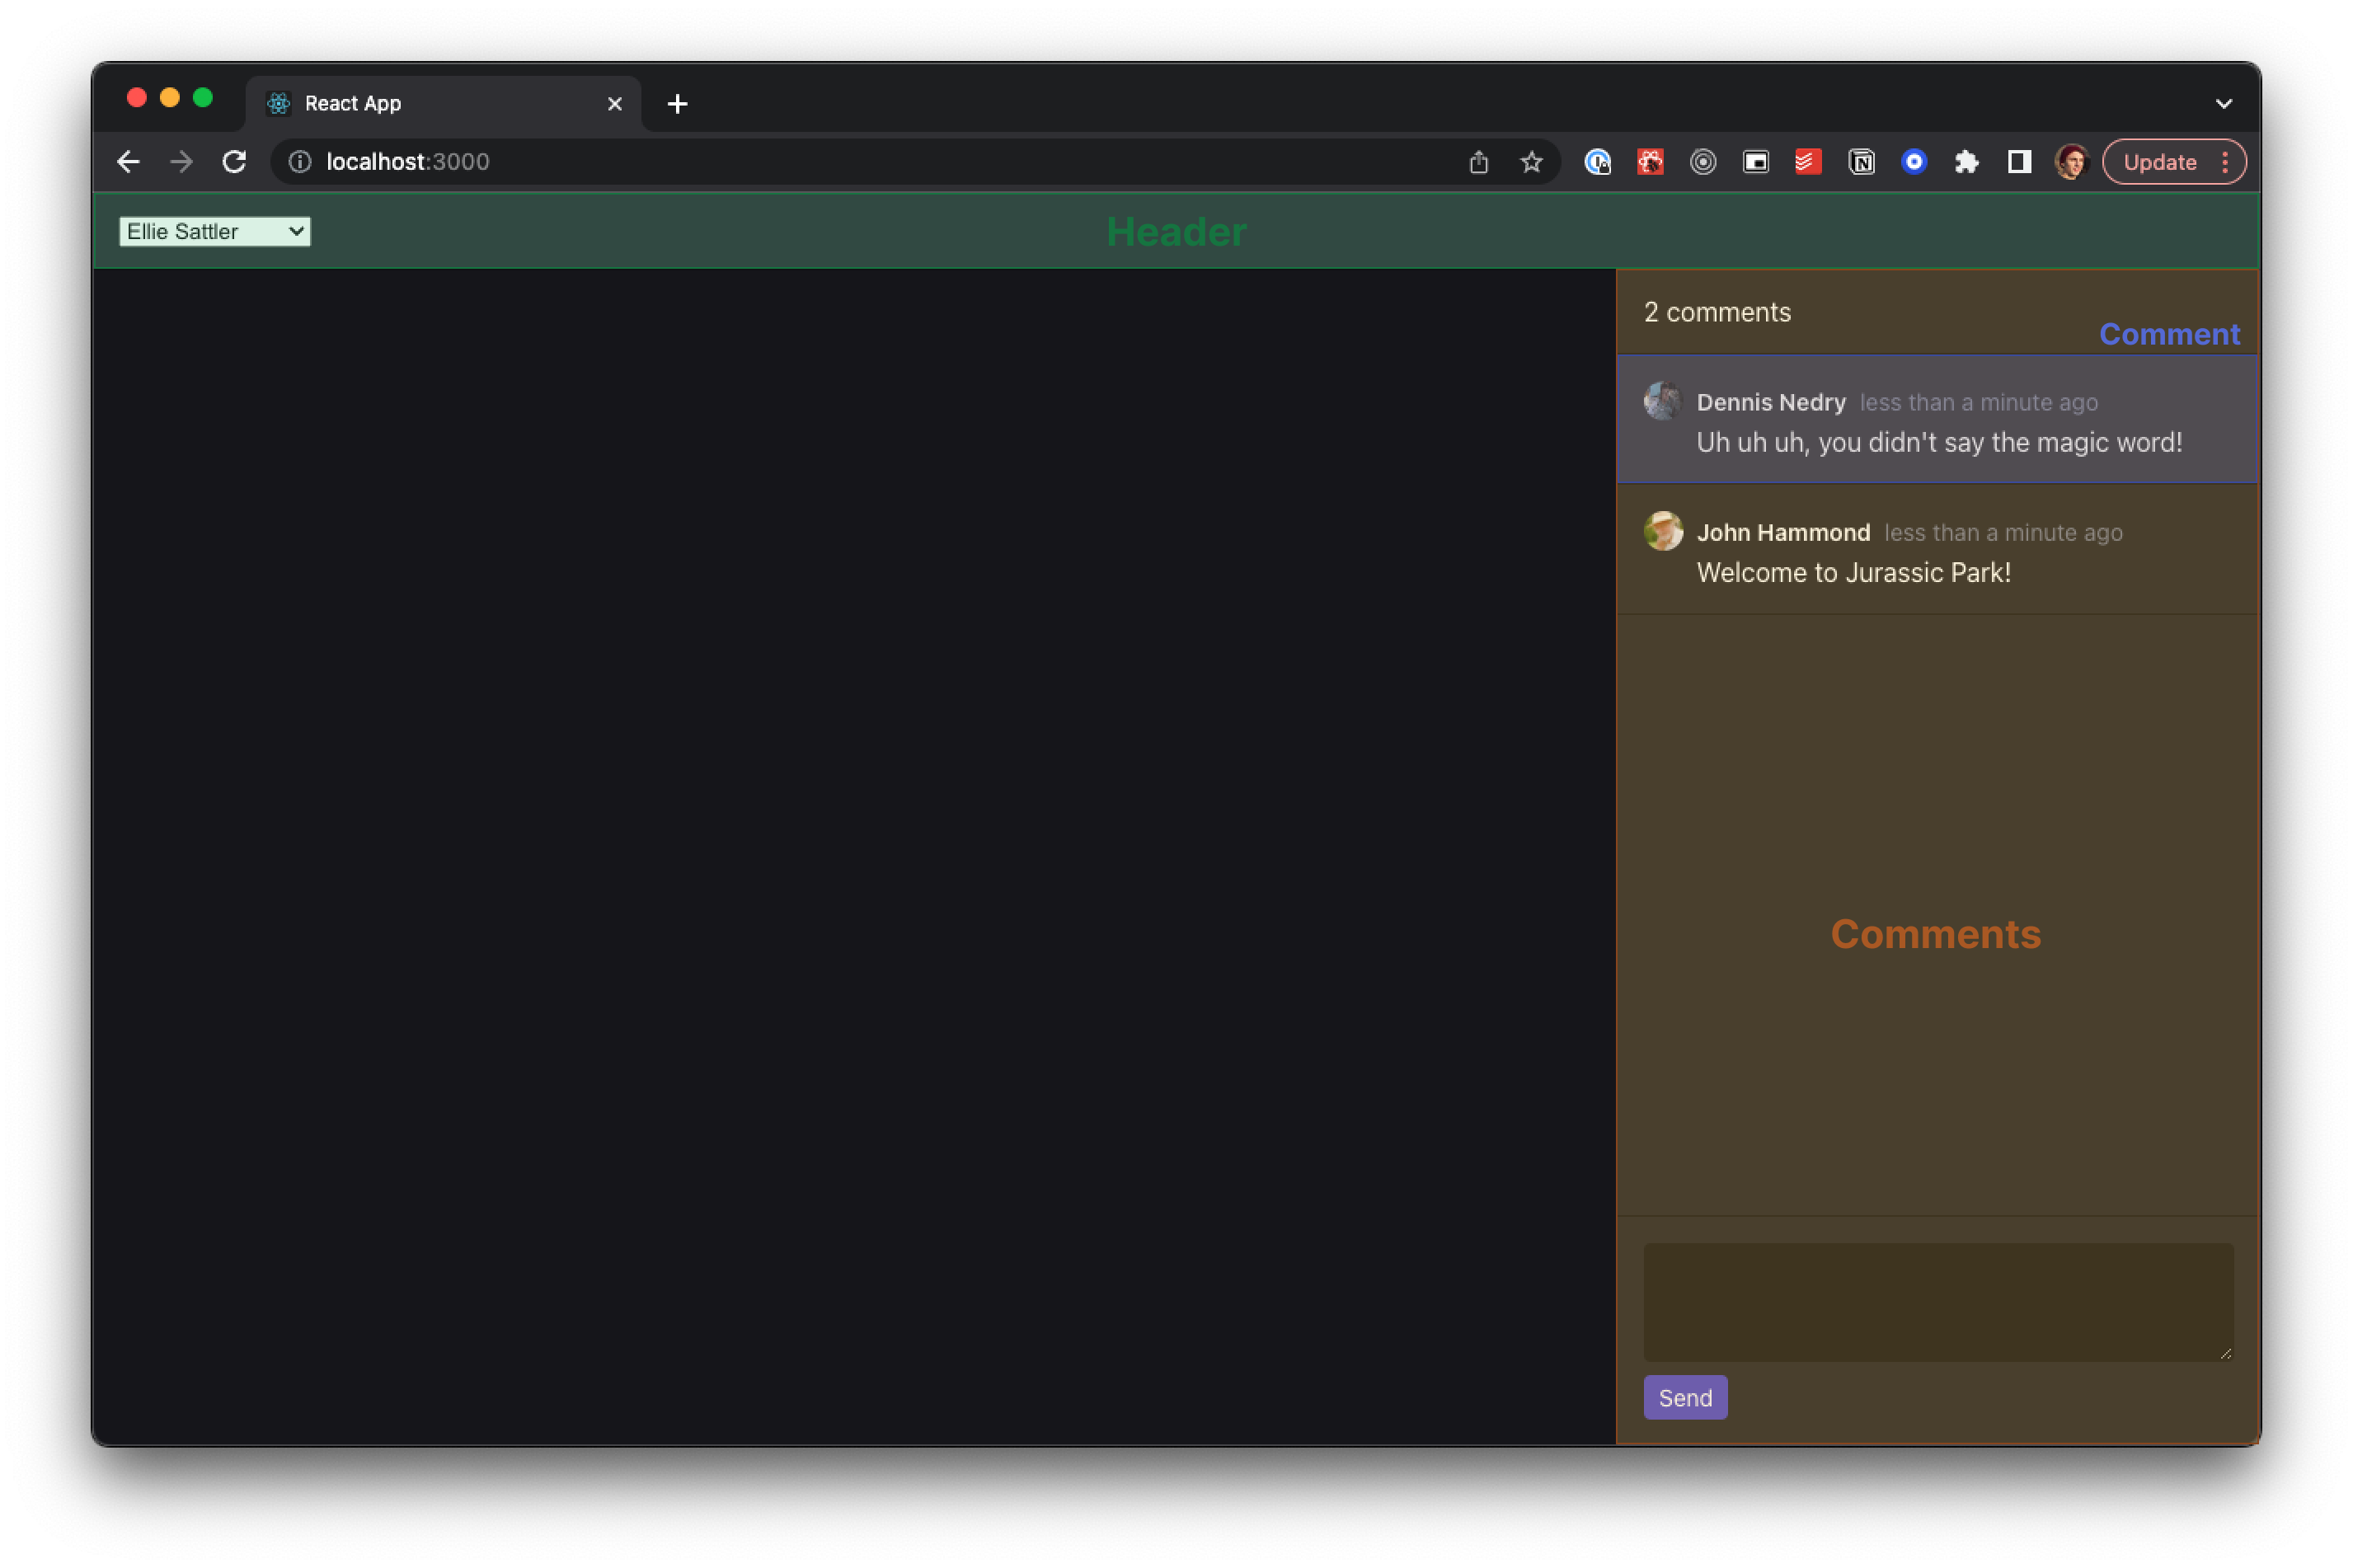
Styling our application
For our styling, you can replace the contents of the src/App.css file with:
.App {
  display: flex;
  flex-direction: column;
  height: 100vh;
  width: 100vw;
  background-color: #15151c;
}

.Header {
  display: flex;
  padding: 8px 16px;
  height: 32px;
  background-color: #20222b;
  border-bottom: 1px solid #0f1014;
}

.Header-notifications {
  margin-left: auto;
  position: relative;
}

.Header-user {
  display: flex;
  align-items: center;
}

.Comments {
  width: 390px;
  margin-left: auto;
  height: 100%;
  display: flex;
  flex-direction: column;
  background-color: #20222b;
}

.Comments-title {
  color: #fff;
  margin: 16px;
  font-size: 16px;
  font-weight: normal;
}

.Comments-list {
  overflow-y: auto;
  border-top: 1px solid #0f1014;
}

.Comments-box {
  margin-top: auto;
  border-top: 1px solid #0f1014;
  padding: 16px;
}

.Comments-box__input {
  background-color: rgb(15 16 20);
  border: 1px solid transparent;
  font-family: inherit;
  font-size: 16px;
  color: #fff;
  display: block;
  box-sizing: border-box;
  width: 100%;
  height: 72px;
  padding: 8px;
  border-radius: 4px;
  margin-bottom: 8px;
}

.Comments-box__input:focus,
.Comments-box__input:active {
  border-color: rgb(91 83 255 / 75%);
  appearance: none;
}

.Comments-box__btn {
  background-color: rgb(91 83 255 / 75%);
  color: #fff;
  border: 1px solid transparent;
  padding: 4px 8px;
  display: inline-block;
  appearance: none;
  font-family: inherit;
  font-size: 14px;
  border-radius: 4px;
  margin-left: auto;
}

.Comments-box__btn:disabled {
  background-color: #ccc;
}

.Comment {
  padding: 16px;
  border-bottom: 1px solid #0f1014;
  color: #fff;
}

.Comment-header {
  margin-bottom: 4px;
  display: flex;
  align-items: center;
}

.Comment-avatar {
  width: 24px;
  height: 24px;
  background-color: #15151c;
  border-radius: 100%;
  margin-right: 8px;
  overflow: hidden;
}

.Comment-avatar img {
  width: 100%;
  height: 100%;
}

.Comment-author {
  font-weight: 600;
  font-size: 14px;
  margin-right: 8px;
}

.Comment-time {
  font-size: 14px;
  color: rgb(125 130 154);
}

.Comment-body {
  margin-left: 32px;
}
You should now have a functioning, styled React application that allows you to select a user in the top-left corner and post a comment as that user.
What you might notice at this stage is that our application does not post any sent comments in real-time to any other users who are looking at the application. We're going to fix this next.
Adding Socket.io to our application for real-time communication between React and Node.js
Our goal now is to add real-time support to our client and our server so that whenever a comment is posted, everyone viewing the comments page will receive the comment. This is where Socket.io is useful. We can add websocket support to our Node.js server, and have users connect to receive comments created in real-time.
Let's start by adding Socket.io in our webserver. Inside our server/index.js file we'll add the necessary socket.io setup code:
// Add this to where your other requires are
const io = require("socket.io")(http, {
  cors: {
    origin: "http://localhost:3000",
  },
});

// Above our `app.get("/users")` handler
io.on("connection", (socket) => {
  console.log(`⚡: ${socket.id} user just connected!`);

  socket.on("disconnect", () => {
    console.log("🔥: A user disconnected");
  });
});
This sets up our socket.io websocket server and allows a cross-origin websocket request to be made from our client application (which is running on port 3000). We'll also automatically log when a user connects and disconnects from the websocket, which happens when the websocket connection is terminated from the client.
The next step in our server is to broadcast any new comments that are created over a channel in socket.io so that we can receive them on the client. To do so, we'll change our create comment endpoint handler to emit the created comment:
// Replace our create comment handler
app.post("/comments", async (req, res) => {
  const comment = createComment(req.body);
  io.emit("new-comment", { comment });
  res.json(comment);
});
Here we're saying to socket.io to emit (broadcast) to all connected clients on the new-comment channel and send a payload that includes the created comment. When we listen for this event in our client application, we'll be able to receive the created comment and add it to the list of comments that we have available in state.
And now let's implement the changes required on the client.
Inside the client directory let's install the socket.io-client library which allows us to connect from the client to the web socket connection on the server.
npm install socket.io-clientAnd in client/src/App.js we're going to set up the websocket connection:
// Add with other imports
import io from "socket.io-client";

// Before the component definition:
const socket = io.connect("http://localhost:4000");

function App() {
Next, we're going to pass this newly created socket to our Comments component in our src/App.js component so we have it accessible in the Comments component:
<Comments socket={socket} selectedUserId={selectedUserId} />And now in src/components/Comments.js we'll add our real-time support for creating and receiving a comment.
Let's extract the passed-in socket prop in our component definition:
const Comments = ({ socket, selectedUserId }) => {
  // Same component code
And now we want to connect to our new-comment channel when the component mounts so we'll add a new useEffect hook that will handle the socket setup code for us.
useEffect(() => {
  socket.on("new-comment", ({ comment }) => {
    // Only insert comments when the current user is not the author
    if (comment.author.id !== selectedUserId) {
      setComments((comments) => [...comments, comment]);
    }
  });

  return () => {
    socket.off("new-comment");
  };
}, [setComments, socket, selectedUserId]);
Here we're saying that every time a new-comment event is received we want to append that comment to the list of comments that we already have in our comments state. We use the function setter to do this so that any existing comments in state are preserved. Note that we're also returning a cleanup function to stop listening to the channel once the component unmounts (the return from the useEffect does this).
One other important line to note here is that we're not appending the comment to our list of comments when the selected user is the author. This avoids the duplicate comment problem where we add the comment to the list of comments in state twice; once when it's been created in the sendComment handler and once when it's broadcast in the new-comment channel.
And with that we should now have a fully functioning real-time commenting app 🎉. You can try it out by opening up two browser windows, selecting different users, and posting a few comments. You should see the comments coming in real-time to each connected user.
Using Knock to send cross-channel notifications
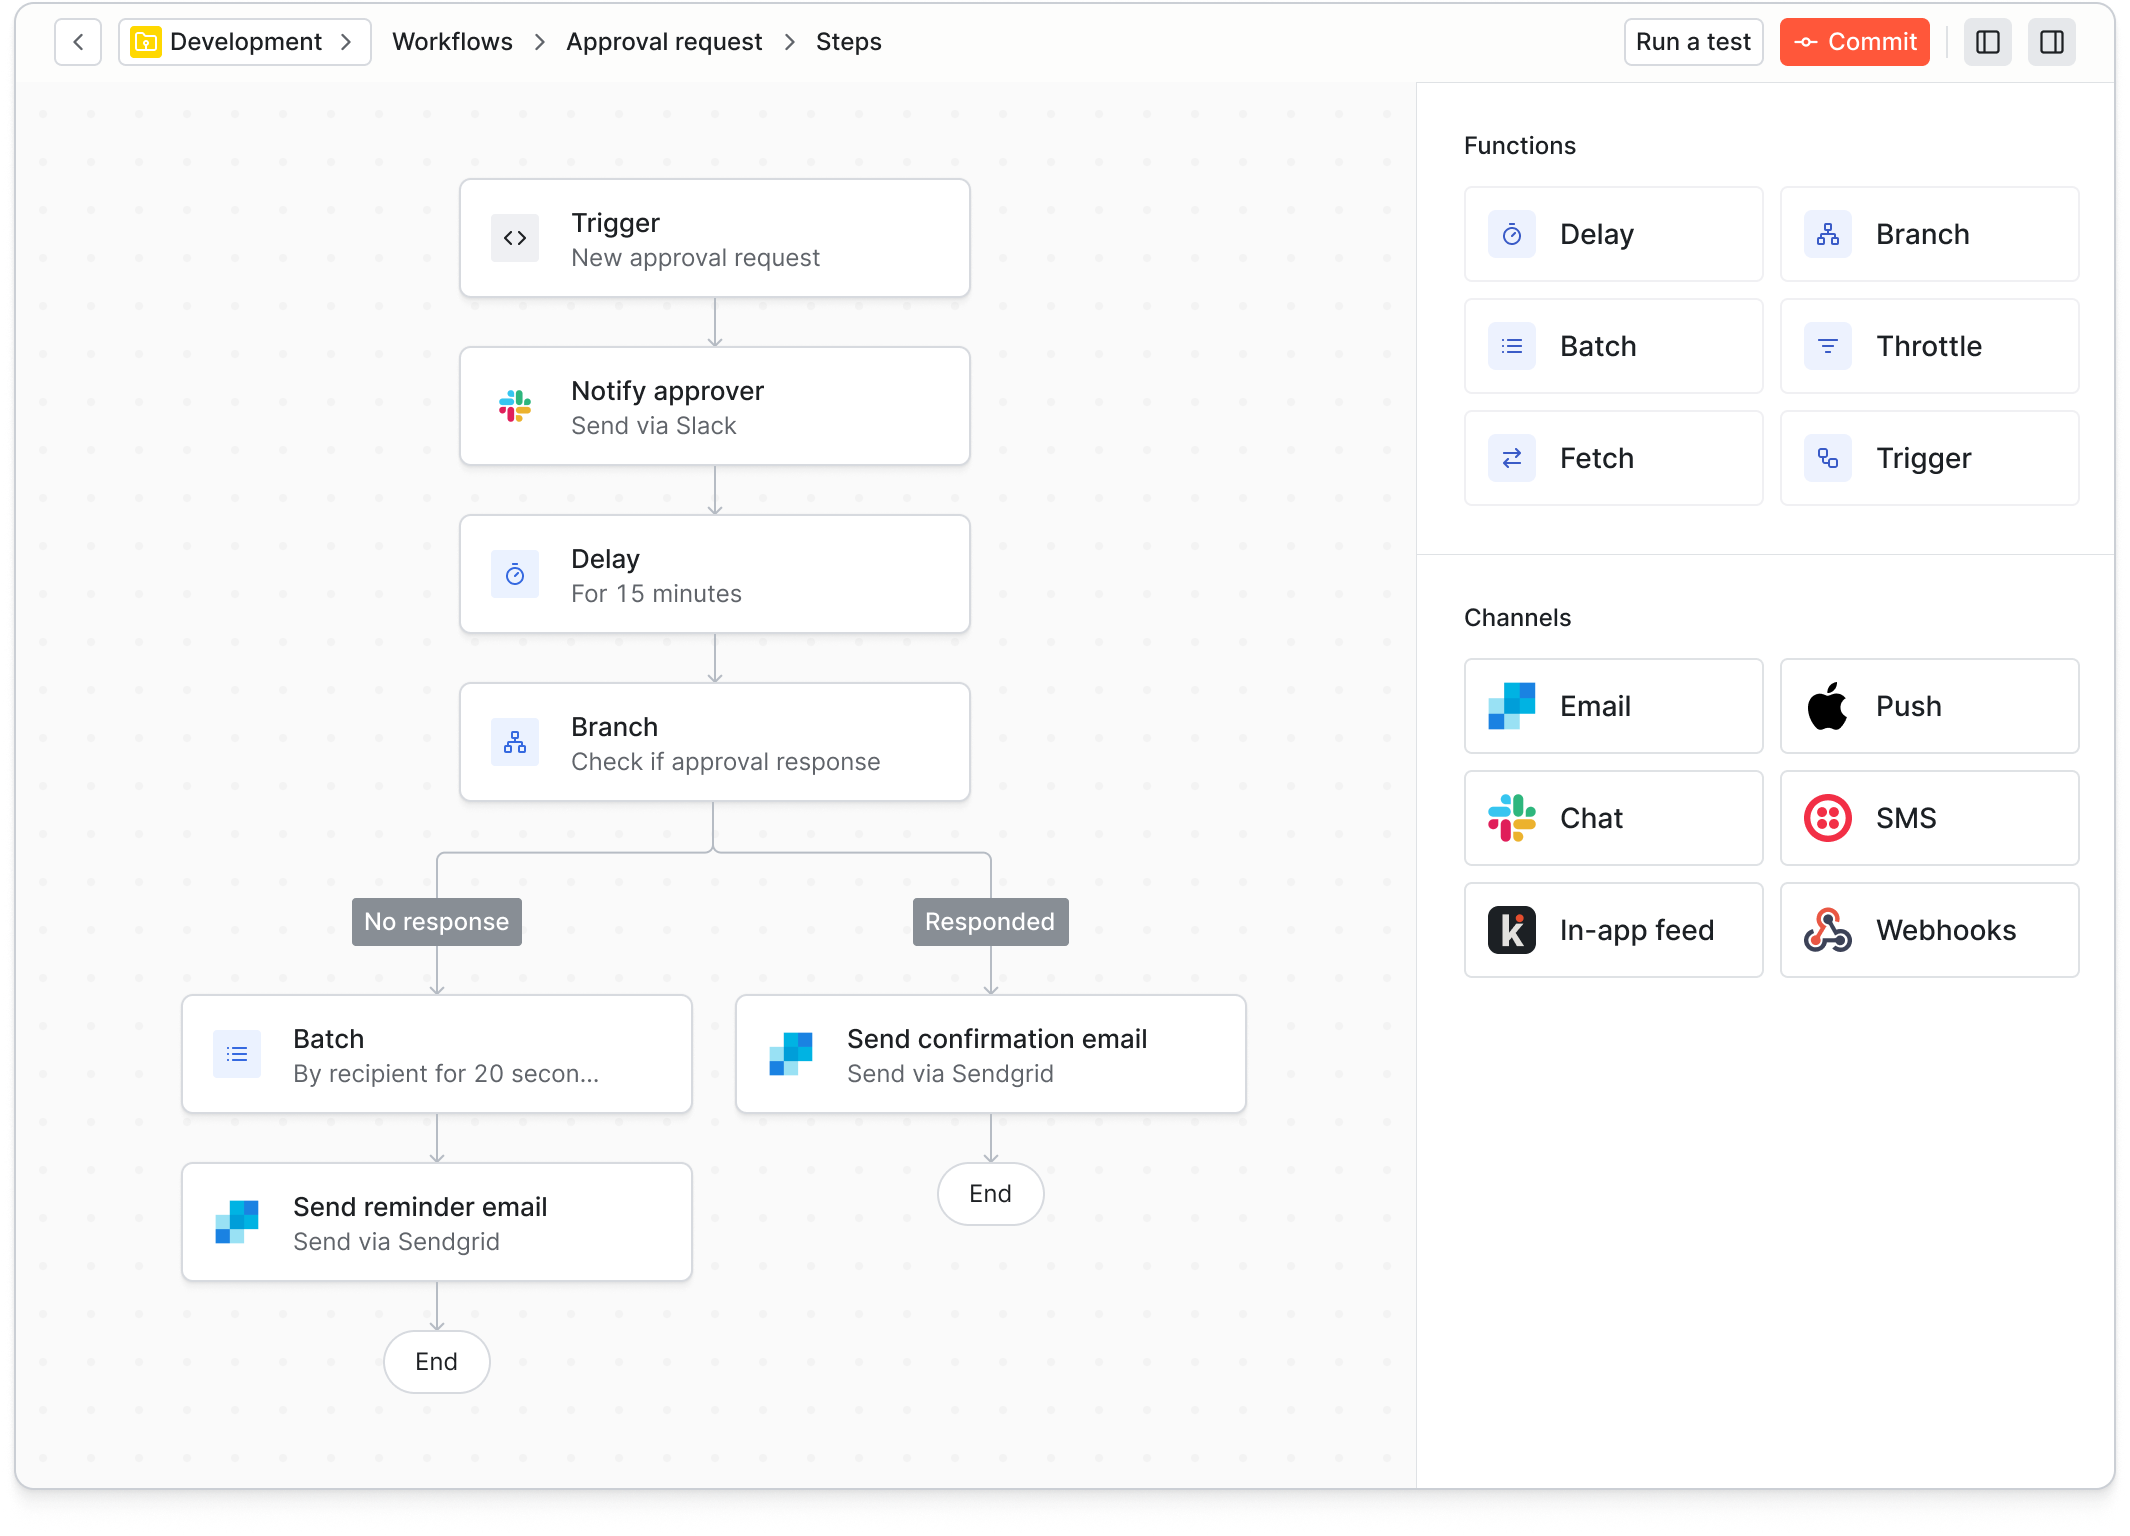
Commenting is a common use case for where you'll likely want to add some notifications to your product. In a collaboration product with commenting, you can imagine needing to add both an in-app notification feed of comments that have been left as well as an email summarizing any missed comments while the user was away from the product and did not see their notifications. This is where Knock can help.
Knock is a developer tool for building cross-channel notification systems. With Knock, you can create complex cross-channel notifications for your product without the need to build out the system yourself. You call Knock's API and you can send notifications with a single API call to in-app and out-of-app channels like email, push, SMS, and Slack.
When it comes to integrating an in-app notification feed, Knock's pre-built React feed components comes ready out of the box with real-time behavior, live updating badge counts, and the ability to mark notifications as read or seen. You can use the in-app notification components to effortlessly get in-app notification inboxes, feeds, or toasts up and running in a matter of hours, all powered by Knock's scalable and reliable notification engine.
In addition to powering in-app notifications, Knock takes care of batching (collapsing multiple notifications about a single topic into one), intelligent orchestration (send to email only if the in-app notification has been seen), managing user preferences, and gives you unparalleled visibility into the notifications your product is sending.
If you'd like to try it out, you can sign up for a free account or book a demo. 👋